Microsoft Integration
NAVIGATION Admin > Integrations > Microsoft
PERMISSIONS Manager or Administrator
This integration enables the flow of data from Microsoft directly to IT Glue. Microsoft tenants, users, mailbox information, and more will sync automatically to IT Glue, ensuring accurate and up-to-date data.
Benefits of this integration
The benefits to you of enabling this integration include the following:
- Manage the options of your Microsoft asset, including manual syncing and comparing data between IT Glue and Microsoft.
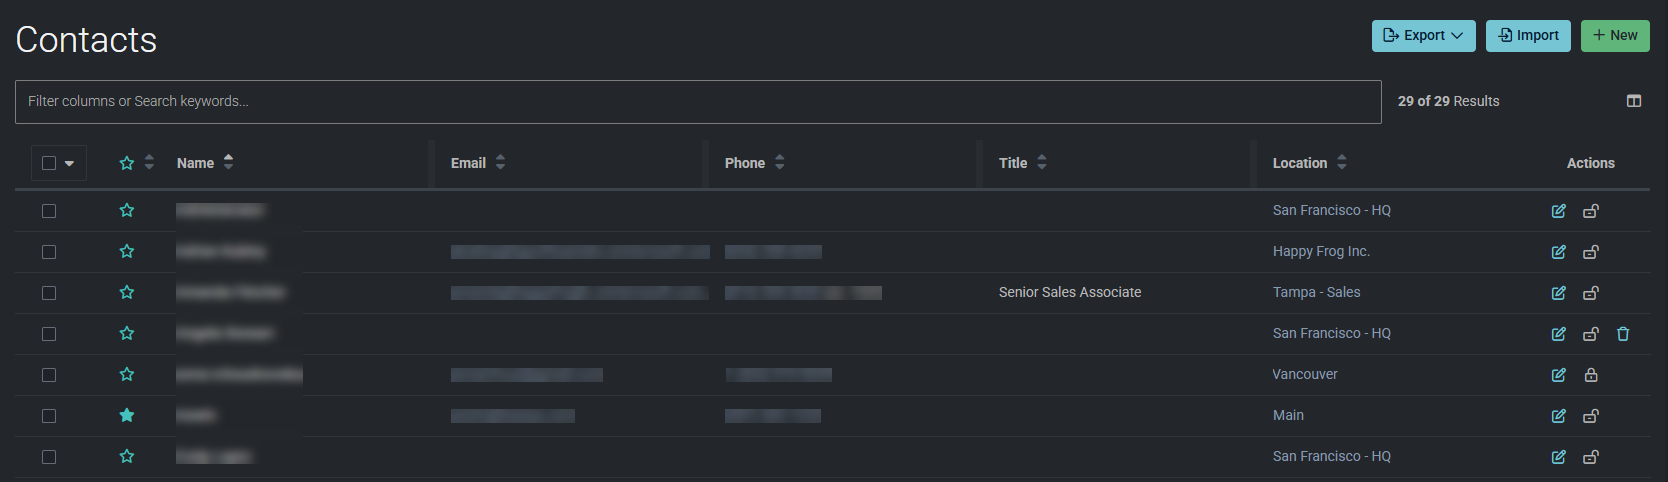
- Jump from IT Glue to a user list in the tenant portal when you click Manage on a synced contact.
- Match data between Intune devices and existing IT Glue configurations, allowing you to compare data between IT Glue and Microsoft Intune.
- View logs related to your integration in the sync logs.
At any time, you can return to the Active Integrations page (Admin > Integrations) to make changes to the integration.
IMPORTANT
- IT Glue will only pull mailbox information for instances with Microsoft Enterprise licenses.
- It Glue syncs with Microsoft twice daily for most IT Glue partners and once daily for our largest partner accounts. After a new sync between Microsoft and IT Glue is finished, updated data will appear after a 15-minute period.
- This integration supports direct logins to client admin centers, but integration in this way requires an additional data source and following the steps in this article for each client you wish to integrate.
- If you prefer to bypass the manual steps outlined in this article to perform your integration in a shorter period of time by running a script, refer to Automating the creation of app registration and service principal using PowerShell at the end of this article.
Microsoft field mappings
Microsoft fields are automatically mapped to IT Glue when you set up the integration. Refer to Microsoft field mappings.
BEFORE YOU BEGIN Before you set up this integration, thoroughly review your existing contacts in IT Glue and ensure they adhere to the following matching logic. If existing contacts do not exactly match this logic, the integration will create unwanted duplicates.
| IT Glue Asset | Field in IT Glue | Field in Microsoft |
|---|---|---|
| Contacts |
|
Prerequisites
- Manager or Administrator access to IT Glue.
- Microsoft Cloud Partner certified to offer delegated administration (optional for Intune).
- Delegated admin permissions (DAP) to each of your clients' Microsoft tenants through your own Microsoft Partner Center rather than direct logins to their admin portals (optional for Intune).
Required for Microsoft 365 only
- One available data source.
- Granular delegated admin permissions (GDAP) relationship with Microsoft Entra roles to each of your clients' Microsoft tenants through your own Microsoft Partner Center. (Not applicable to single tenants.) Refer to Microsoft Integration: GDAP.
Features
From the sync settings, this integration supports syncing Microsoft 365 contacts, locations, Entra ID functionality, and licenses from the Microsoft 365 tab as well as Intune devices from the Intune tab. Refer to the following topics to explore the various features offered through this integration, depending on what you choose to sync:
- Microsoft Integration: Intune
- Microsoft Integration: Syncing contacts with BMS
- Microsoft Integration: Syncing Microsoft licenses with IT Glue
- Microsoft Integration: Entra ID password rotation
- Microsoft Integration: Entra ID groups auto-documentation
- Microsoft Integration: BitLocker recovery keys
- Microsoft Integration: Copilot Smart Relate
Displaying concealed Microsoft 365 user, group, and site names
You will need to turn off a feature in Microsoft 365 that conceals users, groups, and site names. If you do not turn off this feature, the integration will not be able to retrieve mailbox usage.
To prevent this issue, complete the following steps in the Microsoft 365 admin center.
- In the Microsoft 365 admin center, navigate to Settings > Org Settings > Services.
- Select Reports.
- Clear Display concealed user, group, and site names in all reports, and click Save.
How to...
IMPORTANT As of January 2024, IT Glue supports GDAP. If configuring GDAP, refer to Microsoft Integration: GDAP, following the instructions in Creating a service account user for GDAP and Creating a new security group, before proceeding with the following steps.
IMPORTANT IT Glue Contacts and Configuration names will not get overwritten by the Microsoft integration, unless you check the setting Overwrite IT Glue Contact and Configuration names. In this case , Contact and Configuration names from Microsoft will propagate to IT Glue. 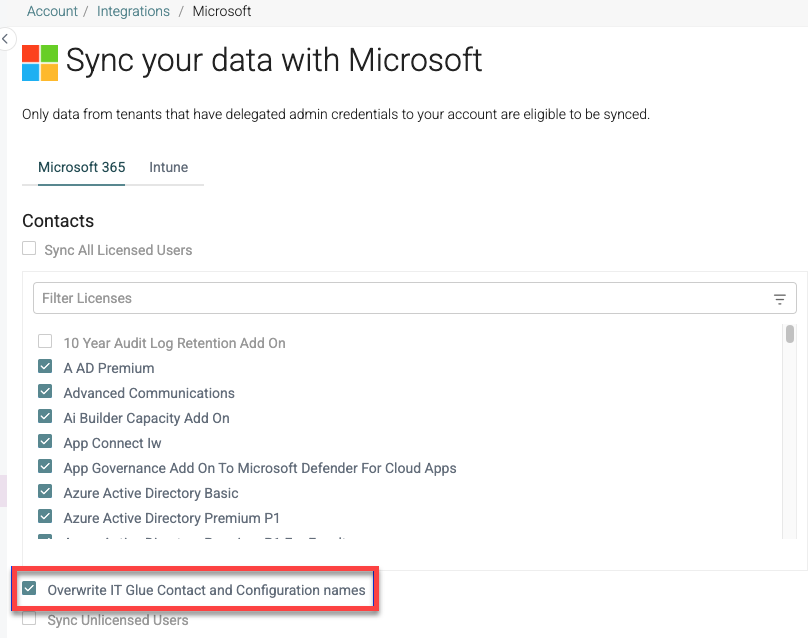
- Log in to your Microsoft Entra ID admin center.
- From the left navigation menu, navigate to Identity > Applications > App registrations.
- Click New registration.

- On the Register an application page, fill in the following fields:
- Name: Enter an application name that will be displayed to users of the application.
- Supported account types: Select the Accounts in any organizational directory and personal Microsoft accounts option to map to.
- Redirect URI: Select Web in the drop-down menu and enter a URL for the app.
- NA: https://[subdomain].itglue.com/microsofts
- EU: https://[subdomain].eu.itglue.com/microsofts
- AU: https://[subdomain].au.itglue.com/microsofts
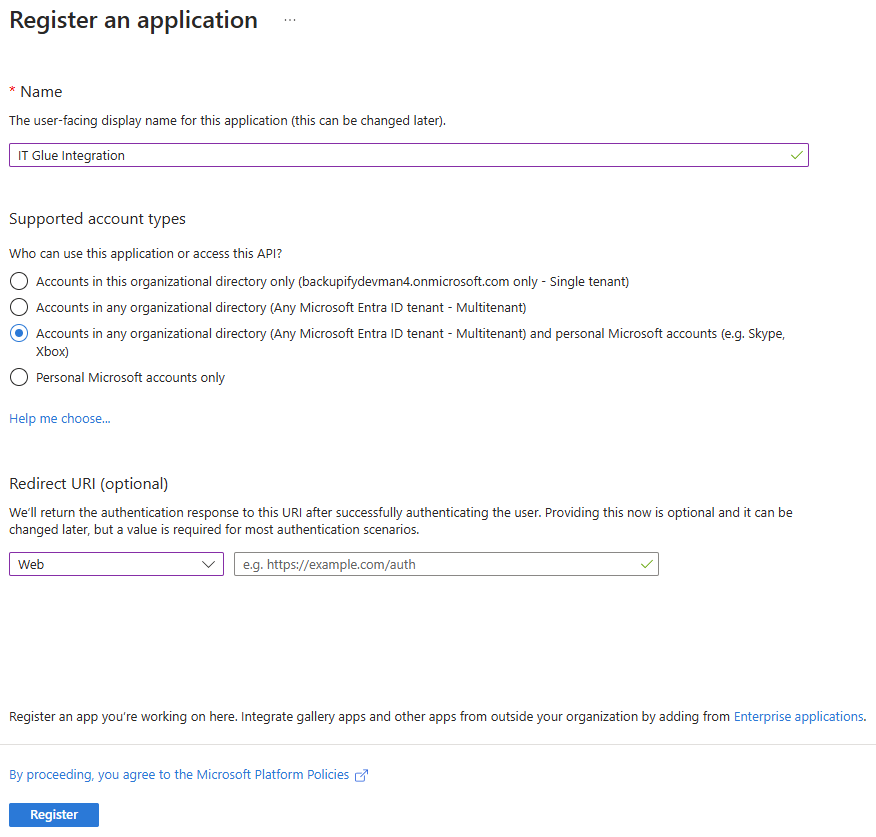
NOTE The Redirect URI field is required for users setting up GDAP. Refer to Microsoft Integration: GDAP.
- Click Register to access the newly created application.
Complete the following steps to copy the IDs for your IT Glue application in Microsoft, which you will later need to paste into IT Glue as part of the Set up the integration in IT Glue process:
- From the All applications tab on the App registrations page, click the newly configured application in the list.
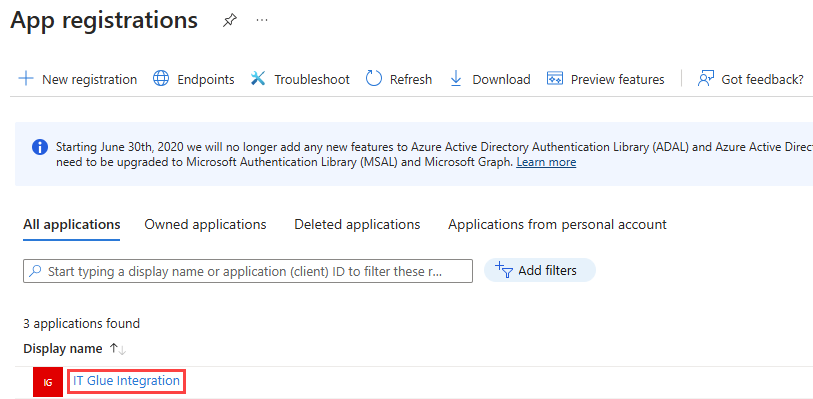
- Click the Copy to clipboard icon next to the Application (client) ID and Directory (tenant) ID, which you will paste into IT Glue.

Complete the following steps to generate a secret key for your IT Glue application in Microsoft, which you will later need to paste into IT Glue as part of the Set up the integration in IT Glue process:
- With your IT Glue application selected in the Microsoft Entra admin center, click Certificates & secrets.
- Click New client secret.
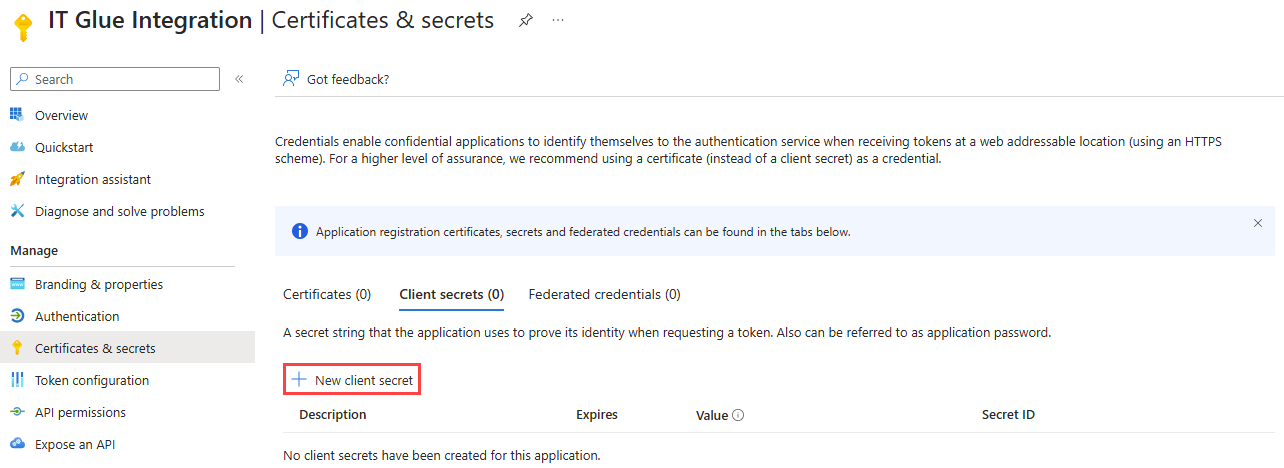
- Enter a description for the client secret and select 730 days (24 months) from the Expires drop-down menu.
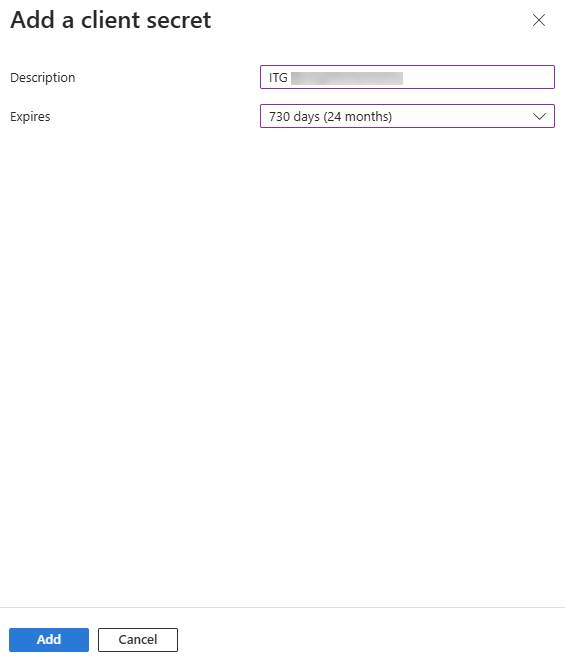
- Click Add.
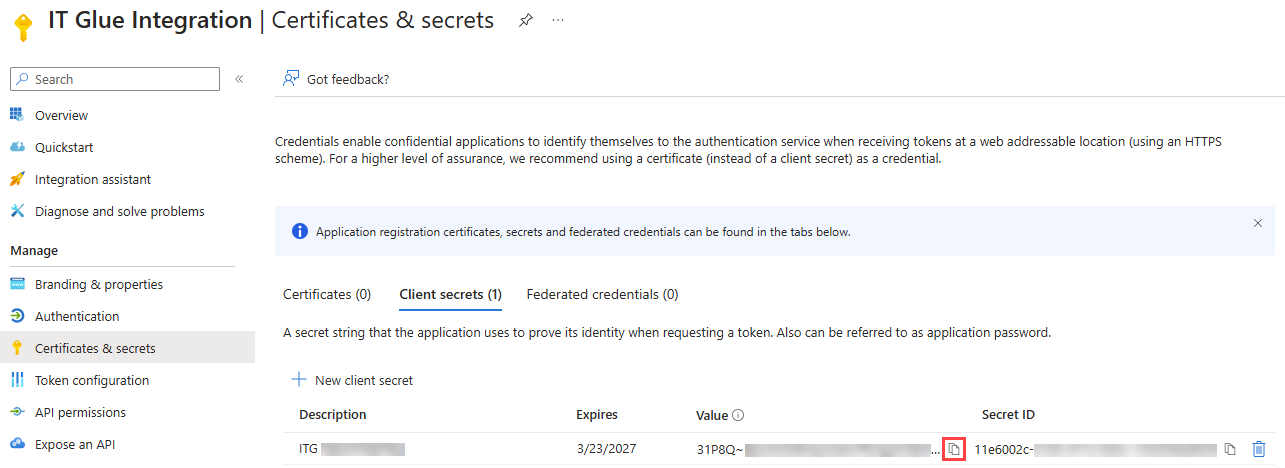
- In the Value column, click the Copy to clipboard icon to copy the client secret value, which you will paste into IT Glue.
NOTE Client secret values cannot be viewed, except for immediately after creation. Be sure to save the secret when created before leaving the page.
You will need to add API access to complete the application.
IMPORTANT Support for the Azure Active Directory Graph API is deprecated. Update your API permissions using the App registrations page in Microsoft Azure to reflect the information provided here. In addition to these permissions, Microsoft Partner Center permission should be added. This may be found within APIs my organization uses in Microsoft Entra Admin center using the following ID: fa3d9a0c-3fb0-42cc-9193-47c7ecd2edbd.
- With the IT Glue application selected, click API permissions in the left navigation menu.
- You will see that Microsoft Graph is already assigned a default User.Read permission. Click the more menu for this permission and select Remove permission.
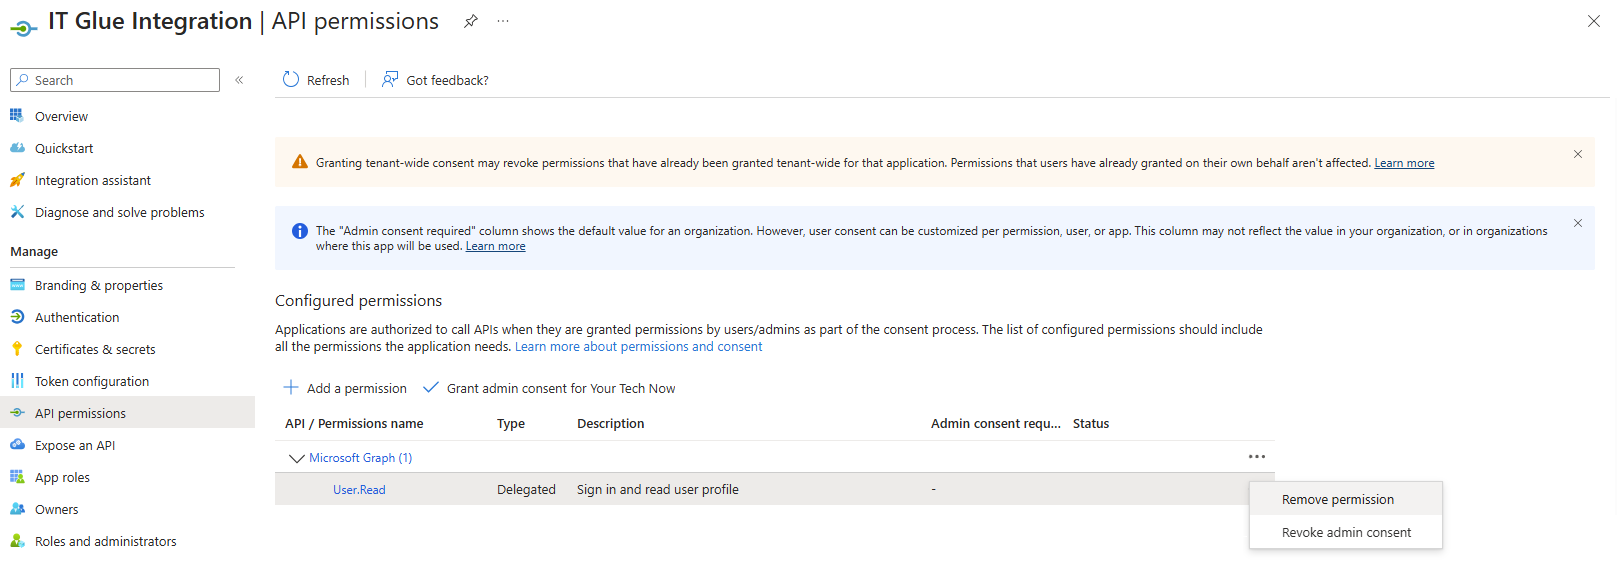
- In the confirmation dialog box, click Yes, remove to delete this permission.
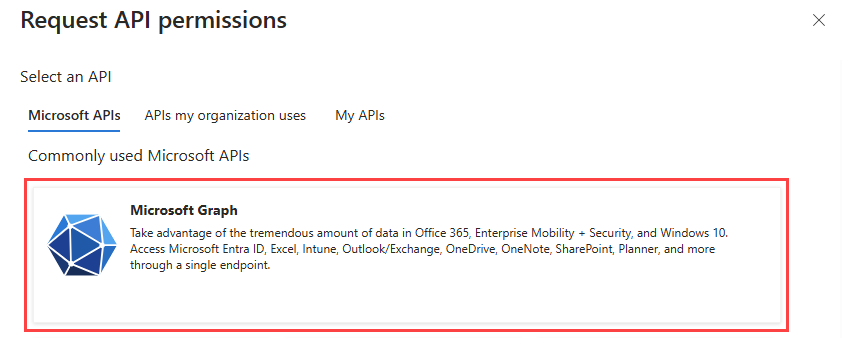
- Once the default permission is removed, click Add a permission.
- From the Request API permissions pane, click the Microsoft Graph tile.
- Click Application permissions.
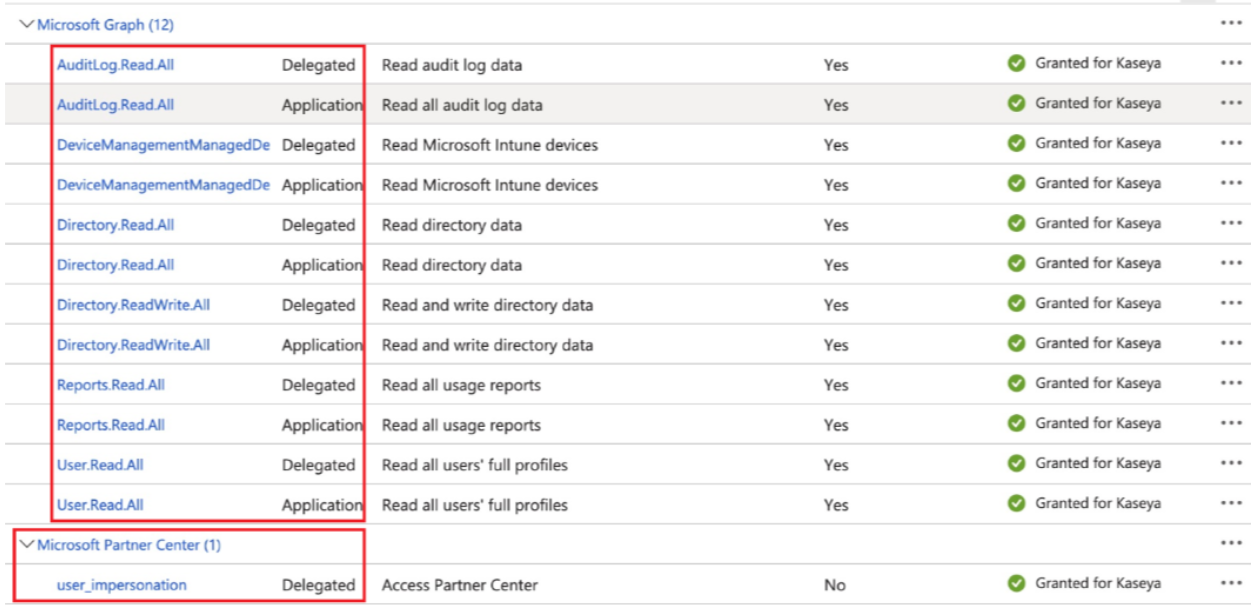
- Expand each of the following sections and make the following selections:
- Directory: Select the Directory.ReadWrite.All check box.
- Reports: Select the Reports.Read.All check box.
- User: Select the User.Read.All check box.
- (Required only if you are syncing Intune devices to IT Glue) DeviceManagementManagedDevices: Select the DeviceManagementManagedDevices.Read.All check box. Refer to Microsoft Integration: Intune.
- (Required only if you are using IT Glue to update BitLocker recovery keys) BitlockerKey: Select the BitlockerKey.Read.All check box. Refer to Microsoft Integration: BitLocker recovery keys.
NOTE If you are syncing Intune devices and have a parent tenant, update the application permission in the parent tenant to include all the Device/DeviceManagement permissions.
NOTE If you have a GDAP configuration, review your API permissions to ensure they are up to date with the following requirements.
- AuditLog.Read.All
- DeviceManagementManagedDevices.Read.All
- Directory.Read.All
- Directory.ReadWrite.All
- Reports.Read.All
- User.Read.All
IMPORTANT ReadWrite access to directory data is required to add the created Azure application to the AdminAgents security group. Without this permission, this can only be done directly with Microsoft's API or PowerShell. Microsoft 365 only supports adding new users to groups and not the applications.
IMPORTANT Ensure that you add the corresponding DAP type, as well, for all application permission types, as shown.
NOTE In addition to these permissions, Microsoft Partner Center permission should be added. This can be found within APIs my organization uses in Microsoft Entra Admin center using the following ID: fa3d9a0c-3fb0-42cc-9193-47c7ecd2edbd.
- Save the changes by clicking Add permissions.
- On the API permissions page, click Grant admin consent for <company>.
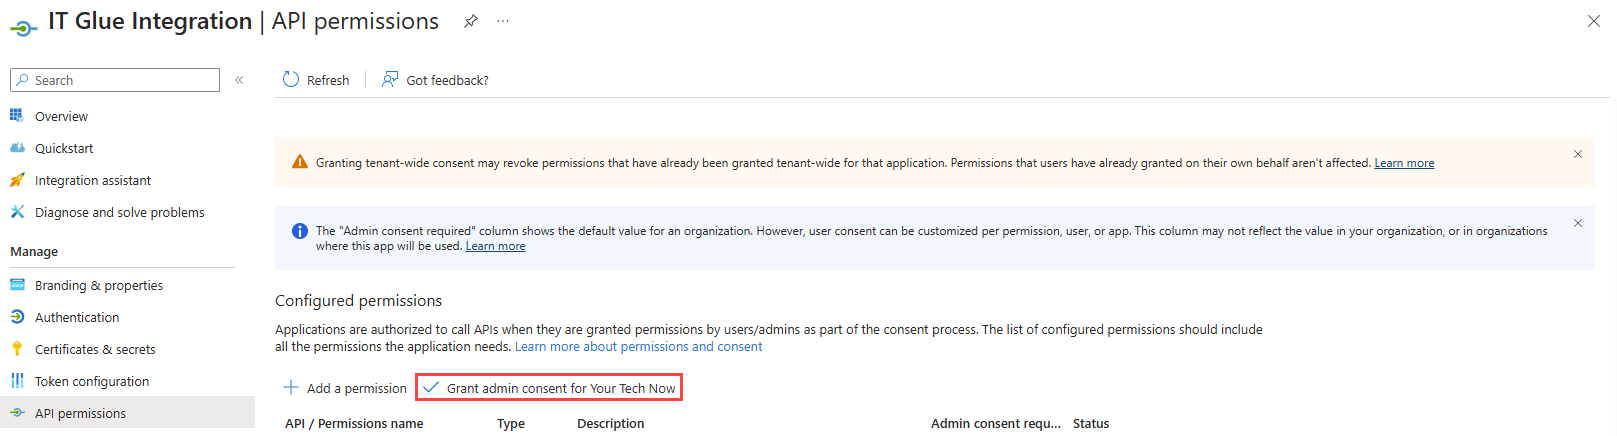
- In the confirmation dialog box, click Yes.
Once consent is granted, you will see a confirmation banner at the top of the page and that the Status column for all permissions displays Granted.
Next, you'll authenticate the integration by completing the following steps in IT Glue:
- From the top navigation menu, click Admin.
- From the left navigation menu, navigate toIntegrations.
- In the upper-right corner of the page, click New.
- In the Featured Integrations section, click the + icon in the Microsoft tile.
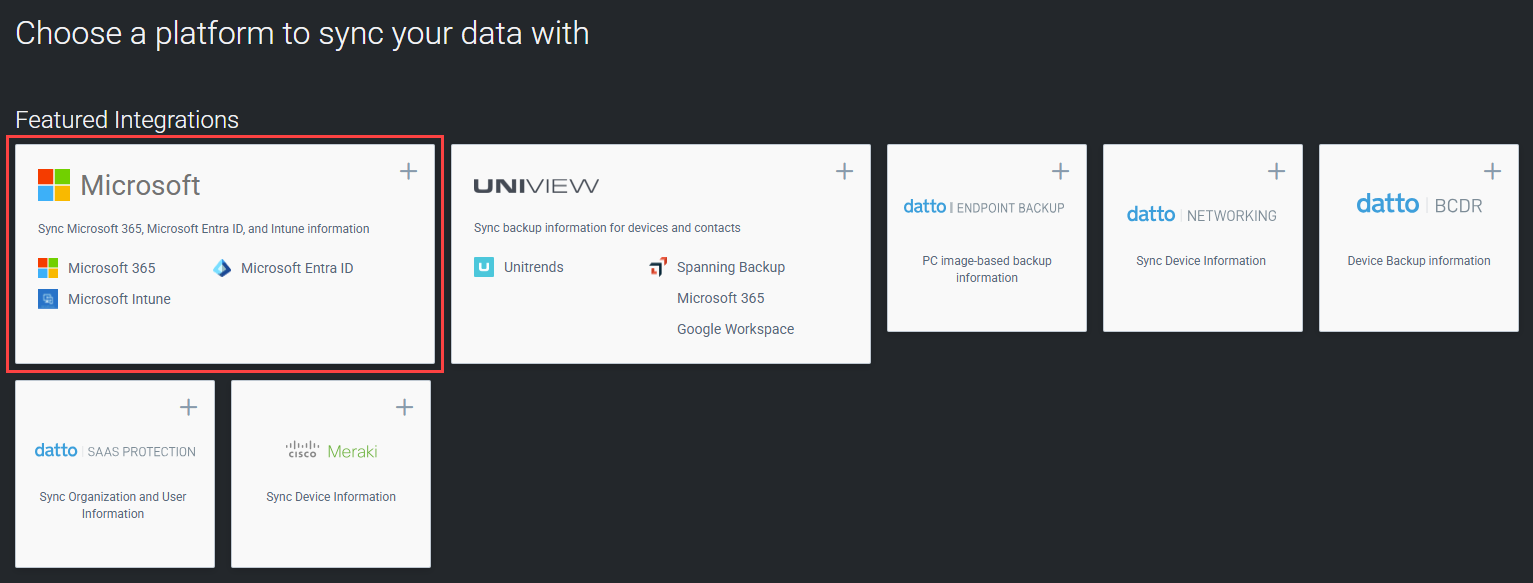
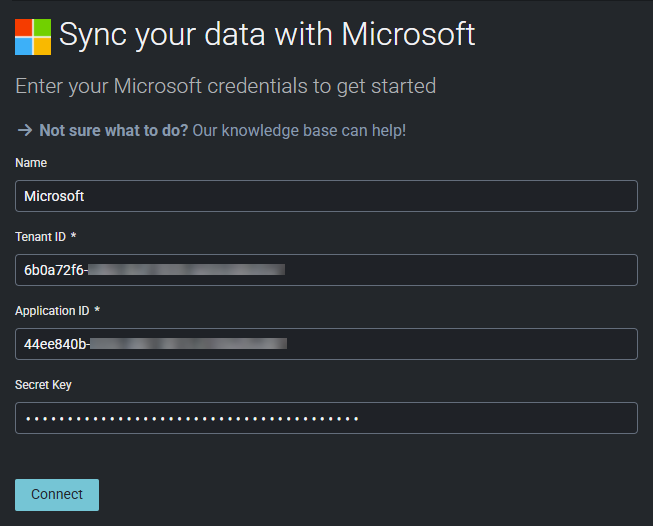
- In the Name field, enter a name for this integration's connector. The value you input here will appear in your list of integrations on the Active Integrations page in IT Glue.
- In the Tenant ID field, paste the Directory (tenant) ID you copied from Microsoft in Copy your client ID and tenant ID from Microsoft.
- In the Application ID field, paste the Application (client) ID you copied from Microsoft in Copy your client ID and tenant ID from Microsoft.
- In the Secret Key field, paste the client secret value you copied from Microsoft in Generate and copy your client secret value in Microsoft.
- Click Connect.
- You will be redirected to the Microsoft login page, where you will enter your integrating account credentials.
IMPORTANT You must log in using credentials from your designated service account, not your personal or admin credentials. If using GDAP, refer to Microsoft Integration: GDAP to learn how to create the service account you will use for authentication.
- Once you log in, you will be prompted to authorize and accept the permissions.
- On the Sync your data Microsoft page, you will select the data you want to sync. By default, recommended options are listed first.
- If you are a Network Glue customer, you can select the Enhance Contacts with Microsoft Entra ID check box in the Microsoft Entra ID Sync section to further enhance your IT Glue contacts with Microsoft Entra information. This feature pulls in fields for Status, Last Logon, and Last Password Change.
- If you are syncing Intune devices from the Intune tab, refer to Microsoft Integration: Intune for instructions.
- Click Save and Continue. The sync will be automatically queued on the Active Integrations page.
- By default, newly queued syncs are scheduled to take place one hour later. From the more menu
 in the Microsoft connector, select Start Manual Sync to initiate immediate syncing.
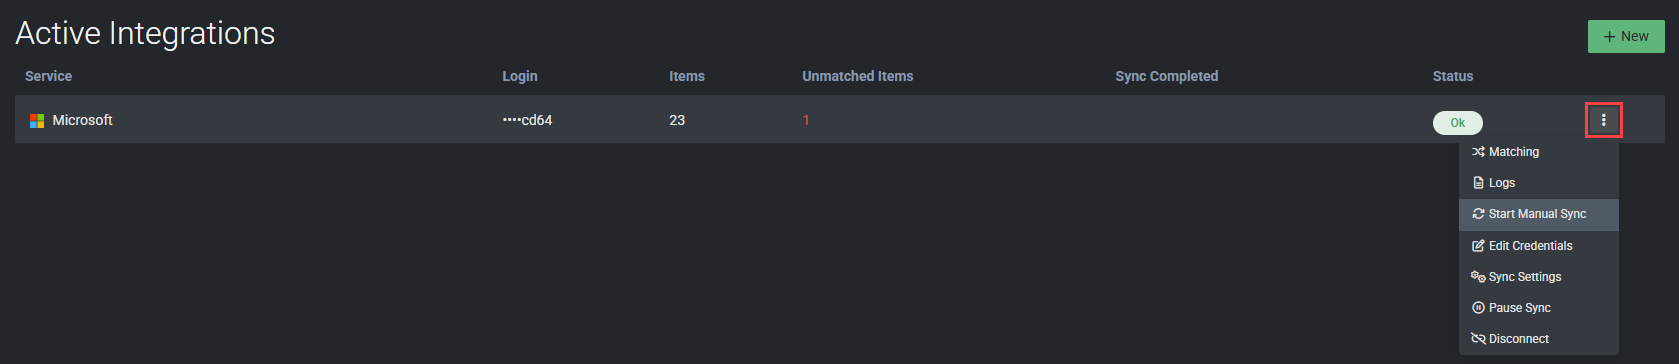
NOTE As a best practice, we recommend that you select only the user subscriptions that you actively manage.
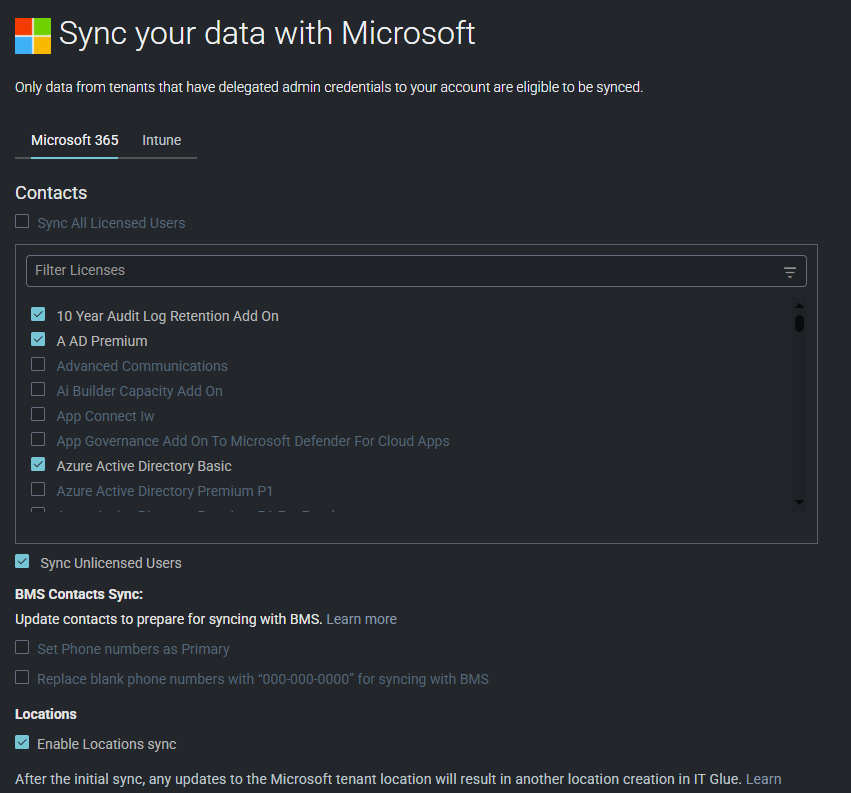
NOTE To obtain all available Microsoft Entra fields, the Microsoft Graph permission must be enabled in the Microsoft application.
NOTE The Last Logon field will appear only when the user has logged in within the past 30 days.
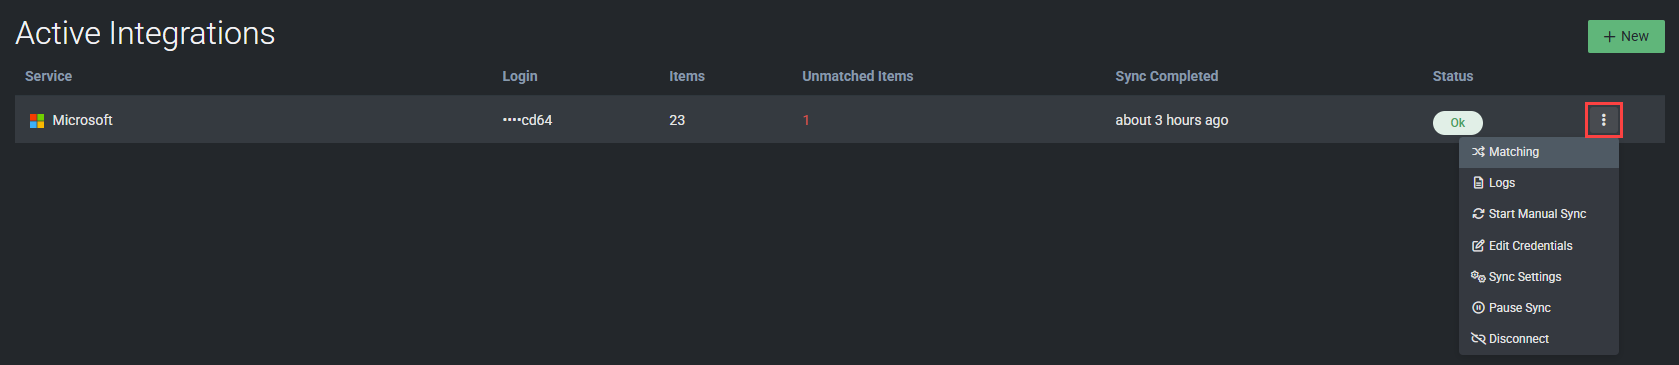
IT Glue will begin to import and match your Microsoft data. During this process, the Status column will display Syncing. When the process finishes, the Status column will change to OK, and you will receive an email notification.
Pausing and resuming a sync
To pause a sync, select Pause Sync from the connector more menu ![]() . When ready to resume the sync, select Resume Sync.
. When ready to resume the sync, select Resume Sync.
NOTE If you have a Microsoft Partner Network account with access to multiple tenants, disconnecting a Microsoft integration will not remove Admin privileges from your configured application. Remove these Admin privileges yourself or delete the configured application if no longer needed.
IT Glue discovers Microsoft tenants and users and attempts to match them to the data in your account based on the following logic:
| Rule | Matches on |
|---|---|
| Organization | Tenant name |
| Contact email address | Username + @ domain |
If no IT Glue organization can be matched automatically, suggestions will be made based on name similarity. If no suggestions can be made, you will have the option to create a new organization.
Tip! If you have two-way sync enabled in Kaseya BMS or Vorex PSA, all contacts created with your Microsoft integration can be automatically pushed to your PSA. For two-way sync instructions, refer to Enable two-way sync.
Following the initial sync and automatic matching in IT Glue, it's important to review the results of the import to check for and manually map any unmatched tenants as follows:
- From the top navigation menu, click Admin.
- From the left navigation menu, navigate to Integrations.
- From the more menu in the Microsoft connector, select Matching.
- In the Unmatched filter, which is selected by default, review any unmatched tenants. If IT Glue has a mapping recommendation, it will appear in the Suggested Match column.
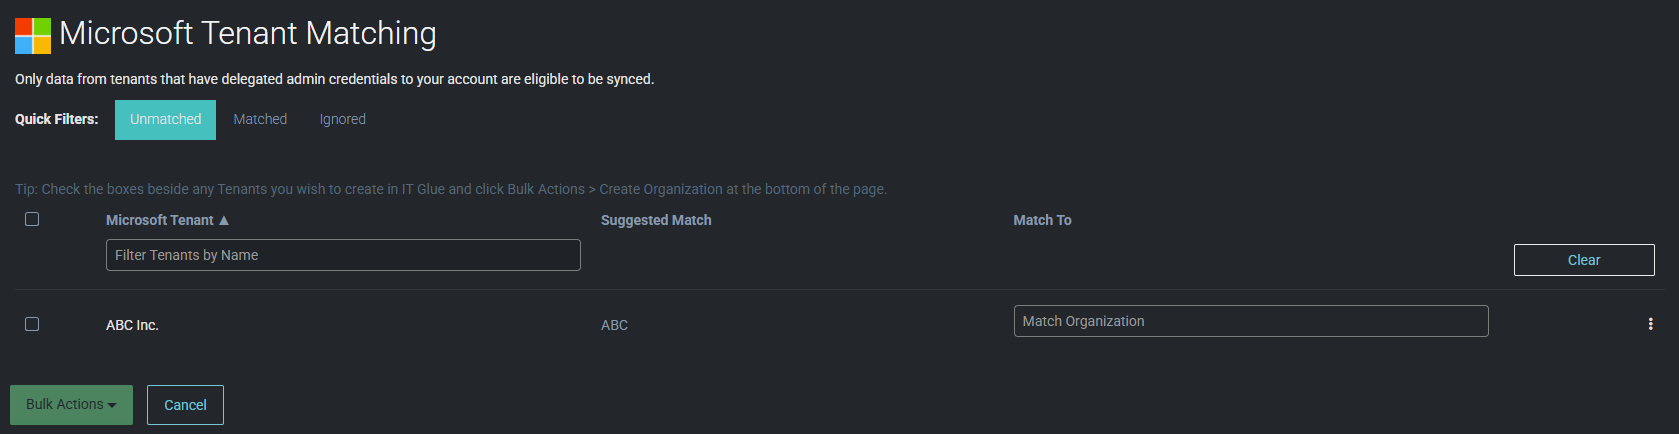
- For any unmatched tenants, you can perform one of the following actions:
- Match to a suggested IT Glue organization, if available in the Suggested Match column, by selecting Accept Suggested Match from the more menu .
- Create a new IT Glue organization to match to by selecting Create Organization from the more menu .
- Prevent an item from counting as unmatched in subsequent syncs by selecting Ignore from the more menu . The group will move to the Ignored filter, where you can match it in the future, if desired.
- Search for and select an IT Glue organization to match to by entering its name in the Match To column.
IMPORTANT Before creating an organization, ensure that no corresponding organization already exists; otherwise, a duplicate will be created.
You also have the option to accepted suggested matches for, create organizations for, or ignore multiple tenants at once. Select the check boxes next to any number of tenants, or select all tenants by selecting the check box in the header, and select the applicable action from the Bulk Actions drop-down menu in the lower-left corner of the page.
- Match to a suggested IT Glue organization, if available in the Suggested Match column, by selecting Accept Suggested Match from the more menu
Reverting or changing a match
To revert a match, click the Matched filter. From the more menu ![]() for a tenant, select Revert Match to move it back to the Unmatched filter.
for a tenant, select Revert Match to move it back to the Unmatched filter.
To change a match, click the Matched filter. From the more menu ![]() for a tenant, select Change Match, and enter an IT Glue organization name in the Matched To column.
for a tenant, select Change Match, and enter an IT Glue organization name in the Matched To column.
- Once all tenants have been matched, you will need to start a new manual sync to sync all Microsoft contacts to IT Glue. From the more menu in the Microsoft connector, select Start Manual Sync.
- When the sync is complete, click any matched organization to open it in IT Glue. Then, click Contacts from the left navigation menu to review the list of synced Microsoft contacts and their data.
IMPORTANT The Microsoft integration syncs contact data, such as user profiles, email addresses, and Entra ID attributes from Microsoft to IT Glue. However, group synchronization (mapping Microsoft Entra ID security groups directly to IT Glue user groups for permissions or access control) is not currently supported as a native feature.
IMPORTANT IT Glue user group memberships and their associated access levels must be configured manually within IT Glue. After contacts are synced from Microsoft, navigate to Admin > Groups in IT Glue to assign users to the appropriate groups and set their permission levels.
NOTE Contact matching behaves slightly differently to standard matching logic. If no match can be made based on the criteria, a new duplicate contact will be created without further user input.
Automating the creation of app registration and service principal using PowerShell
This GitHub script will automatically create an app registration and a security group in your Microsoft tenant with all the required API permissions to connect the integration with IT Glue.
You must use PowerShell/Powershell ISE to run the script. The script will prompt you to insert the necessary information and provide admin consent to the API permission added to the app to pull the information into IT Glue.
NOTE For this script to work, it will automatically install the required PowerShell modules and prompt you to log in with the local tenant Global Admin user.
At the end of the process, you will receive all the information you are required to enter on the Microsoft integration setup page in IT Glue, as detailed in Set up the integration in IT Glue.
Prerequisite
- Access to the Global Admin user for your local Microsoft tenant
Steps after running the script
- Create a Service Account user in Microsoft Entra with Global Admin permission. Refer to Microsoft Integration: GDAP.
- Add a GDAP relationship in Microsoft Partner Center with the appropriate Microsoft Entra roles assigned to the security group. Refer to Microsoft Integration: GDAP.
- If you wish to enable password rotation or BitLocker, you will need to add additional API permissions and follow the steps in Microsoft Integration: Entra ID password rotation or Microsoft Integration: BitLocker recovery keys, respectively.


