Configuring and managing MyGlue accounts
These instructions walk you through the steps for configuring and managing your MyGlue accounts.
If you're just getting started with MyGlue, complete the steps in this article and in Creating MyGlue groups and users and you will have successfully:
- Configured the custom support button
- Configured your first MyGlue account
- Provisioned your first MyGlue group
- Sent your first MyGlue invitations
We recommend that an Administrator be responsible for deploying new MyGlue accounts, though a Manager with "Allow All Organizations" access also has the ability to manage MyGlue.
Configuring the MyGlue support button
When you configure a MyGlue account for the first time, you're asked to enter your contact information for the orange support button found in the bottom right corner of MyGlue. This button directs users requiring support with MyGlue to your internal support team.
The information you enter here is displayed across all MyGlue accounts. At minimum, you must enter an email address to display in the support pop-up. You can also provide a phone number and written instructions. You can update these details anytime by going to the Support tab from Admin > MyGlue.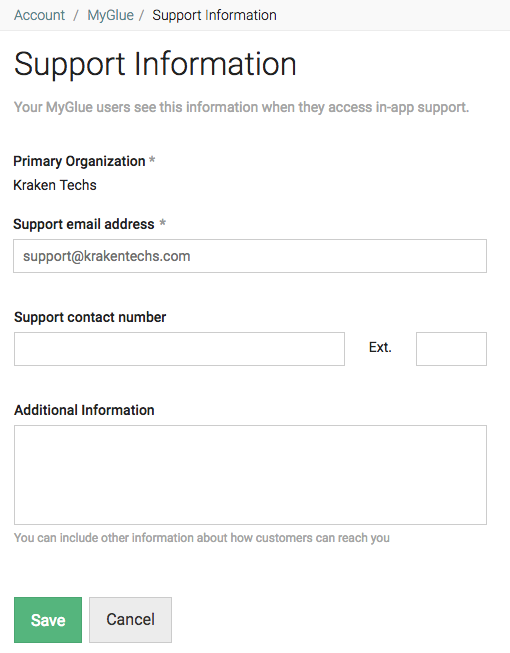
After that's done, MyGlue users who click the in-app Support button will see your contact information in a pop-up that looks something like this:
Also, when a customer is sent an email from MyGlue, the email address you enter will be set as the "Reply-to" email address.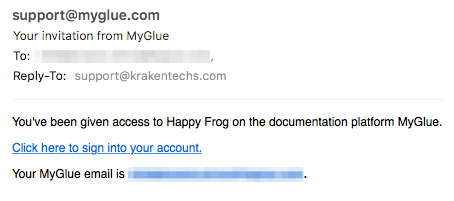
Configuring a new MyGlue account
This section shows how to create a MyGlue account.
Keep in mind that each organization in your IT Glue account can belong to only one MyGlue account. This way each MyGlue account is a completely separate entity, and whatever is being done in one MyGlue account is not visible and available in other MyGlue accounts and vice versa.
To configure a new MyGlue account, follow these steps:
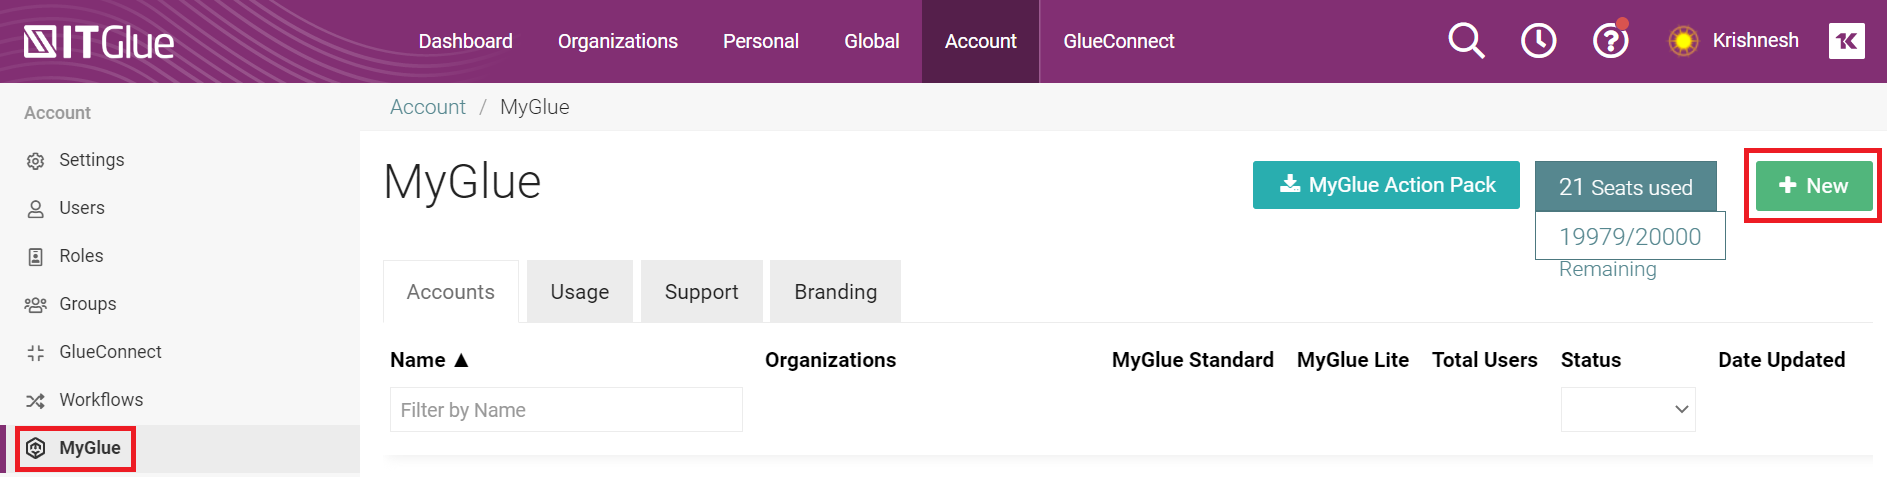
- Log in to your IT Glue account and navigate to Admin > MyGlue. Then, click the + New button.
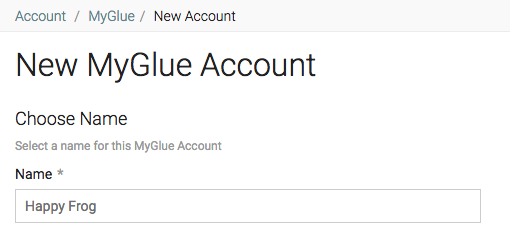
- On the next screen, give the new account a name.
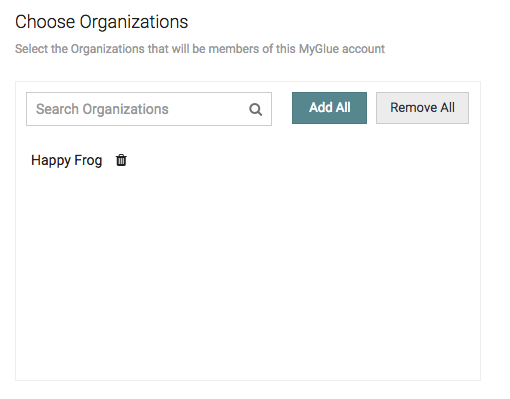
- Choose the organizations that will be associated with this account. For example, you might choose one organization, or one organization and multiple sub-organizations.
- Click Save.
After that's done, you're ready to proceed to the next step and Creating MyGlue groups and users for the account you just created.
As the IT Glue Administrator or Manager with access to all organizations, you can configure SSO for your clients using MyGlue so that they can streamline their login process and eliminate an extra set of credentials they need to remember. Enabling SSO improves their workflows especially if they already use it to access other sites and apps.
To enable SSO for MyGlue, refer to our Setting up single sign-on (SSO) to MyGlue KB.
NOTE If you want to disassociate an organization from a MyGlue account, you must clear your browser cache after disassociating before you can associate that organization to another MyGlue account.
Directing users to MyGlue
Once you've configured a MyGlue account and invited users, they can access MyGlue in the following ways:
Email invitation: New users receive an email invitation with a link to set up their account and log in. No additional URL is needed for first-time access. If an invitation expires, you can resend it from Admin > Users > MyGlue. For more details, see Creating MyGlue groups and users.
Direct login URL: For subsequent logins, users can sign in at app.myglue.com. You may want to share this URL with your users or add it to your internal bookmarks so they can easily return to MyGlue.
SSO login: If you have configured single sign-on (SSO) for a MyGlue account, users can also log in through your identity provider's portal. For setup instructions, refer to our Setting up single sign-on (SSO) to MyGlue.
TIP Consider including the MyGlue login URL in your onboarding materials or support documentation so users always know where to go.
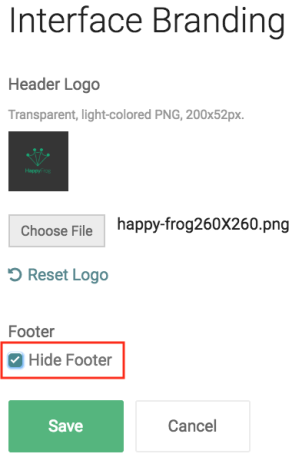
MyGlue Account Branding
Customize the look of your MyGlue interface by adding your own company logo to replace the MyGlue logo in the top menu bar. You can also hide the default MyGlue-branded footer.
- Under Admin > MyGlue > Branding, click Choose File and upload your custom logo.
Managing MyGlue accounts
Configured MyGlue accounts display within a table on the MyGlue screen. This table provides a summary of the name of the account, the associated organizations, number of users, etc. You can use the Actions button in the far right column to edit, deactivate, or delete an account.
All accounts are in an active state by default. However, you might sometimes deactivate an account so the users of that account can no longer sign in to MyGlue, but any data they created is not removed. If you deactivate an account, you can reactivate it anytime.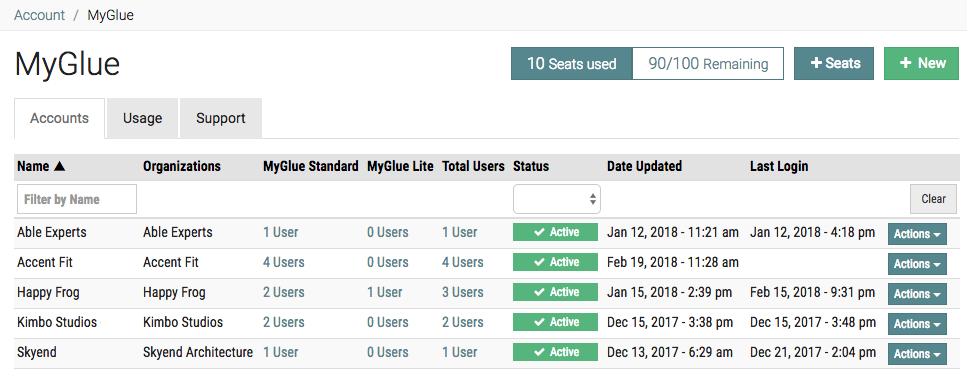
Checking your usage and seat counts
You can view your MyGlue account usage by going to the Usage tab from MyGlue. You can drill down from the general usage stats to more detailed usage stats. Click the View button on the far right to display usage per MyGlue account for that specific month. This view was designed to help you generate customer invoices (if desired).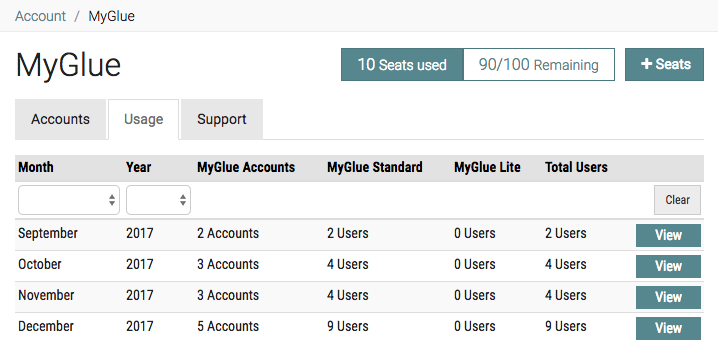
At the top of the screen, you can see your current seat count and the number of seats remaining.
If you run out of seats, and you'd like more users to have access to MyGlue, you can purchase additional seats anytime. Click the + Seats button and use the slider to decide the number of seats you'd like to purchase.


