Setting up Network Glue for an IT Glue organization
This article will show you how to set up Network Glue for an IT Glue organization.
Prerequisites
- Network Glue Collector setup is only accessible by IT Glue Managers and Administrator users.
- Enable SNMP v2c or 3 on Routers and Switches for Network Glue to discover connections properly.
NOTE IT Glue Lite users or above can navigate to a list of networks documented by Network Glue by accessing Organization > Networks. From there, they can view the Network Glue Collector key.
Instructions
Configuring network information
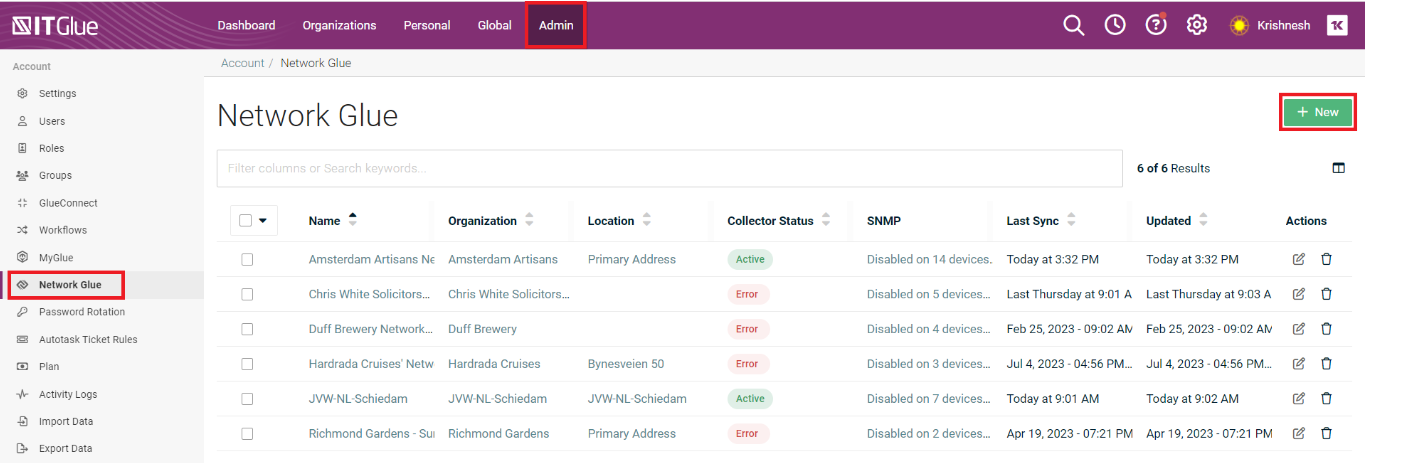
- From the top navigation menu, click Admin.
- From the left navigation menu, click Network Glue.
- In the upper-right corner of the page, click New.
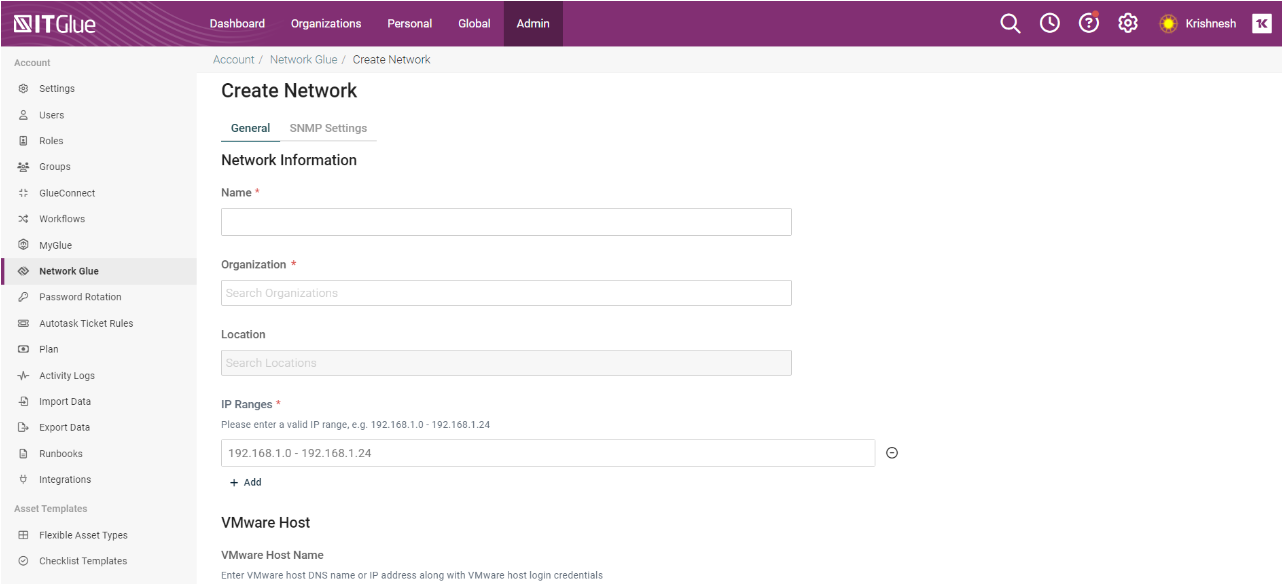
- Click the General tab and enter the following information:
- Network name
- Organization name
- Location
- IP Ranges - Enter multiple IP ranges by clicking the plus (+) button.
- VMware Host (optional) - Enter VMware host DNS name or IP address and VMware host login credentials. Complete this for every VM host device on the network by clicking the plus (+Add) button. For more information on this field, read our notes here.
- Notes on VMware hosts (if applicable)
- We support VMWare version 5.5 and higher. Versions below this may work, but are not officially supported.
- We strongly recommend that you enter a DNS name if your IP addresses are constantly changing and not static. If you use a dynamic IP address and a host machine’s IP is changed, your diagram will no longer show VMware.
- You will not require additional credentials to automate the discovery of Hyper-V hosts or guests if your Active Directory credentials match the Hyper-V hosts’ credentials.
- To collect VMware information, you can choose to add Admin or read-only credentials. If you choose to add read-only credentials, you must ensure that this user has access to all clusters. If the user does not have access to some clusters, they will not be discovered.
- A network with VM hosts will include all VM guest endpoints on that host, regardless of whether the endpoints are in the specified IP scan range.
- Notes on VMware hosts (if applicable)
- Scan Active Directory toggle switch - By default, Network Glue Collector will leverage Active Directory to detect additional information. To turn off this feature, turn off the toggle switch.
- Enter the following information:
- Domain Controller Hostname
- Admin User FQDN (read-only access required)
- Select the password in the Admin Password field.
NOTE You should have added the password to IT Glue to select it here. You can only select a password that belongs to the organization you had set up a network.
- Active Directory Users: Select the user types (Active, Disabled) that you want to sync to IT Glue. You can further select whether you want to select all disabled users, or only disabled users from a specific last logon date using the calendar picker.
Notes on Active Directory- The use of Active Directory (AD) and data from WMI queries and Remote Registry allows a richer and more complete picture of the network to be formed. The Network Glue Collector access to the Active Directory is read-only and is only used for discovery purposes. AD data can also help you easily create new IT Glue Contacts automatically, or enrich existing Contacts by automatically matching them with AD data. This allows you to easily automate and manage your AD user documentation directly within IT Glue.
- In Network Glue, AD collects the below information:
- All computers in AD in the domain
- Computer attributes such as operating system, IP address, network configuration information
- Printers and other related devices
- AD users (you will need to specify which AD user types you want to sync to IT Glue)
- A network that has a domain controller hostname and valid credentials will discover all endpoints in the Active Directory hosted on that domain controller, regardless of whether the endpoints are in the specified IP scan range.
- Host names are retrieved from DNS servers. For entities with the same hostname but different IP addresses, they will be treated as one network device, with multiple interfaces (IP addresses). Besides, entities with the same IP address or MAC address will also be treated as one network device.
-
Click Save. A confirmation dialog box will confirm that the network has been created.
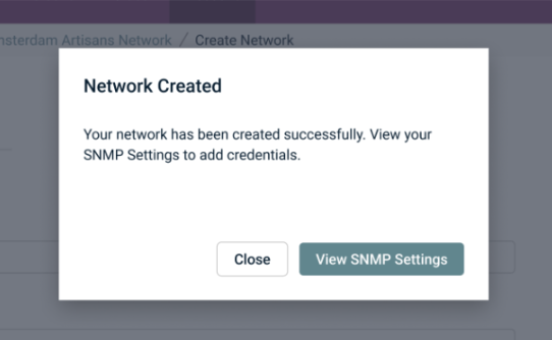
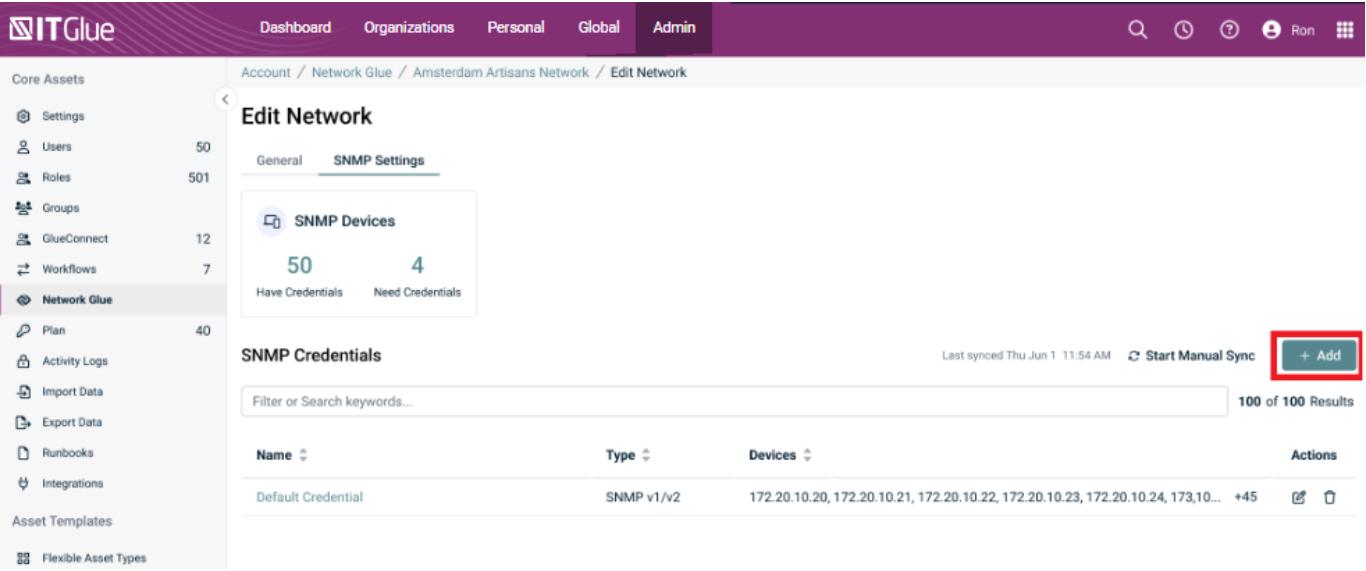
- Click View SNMP Settings.
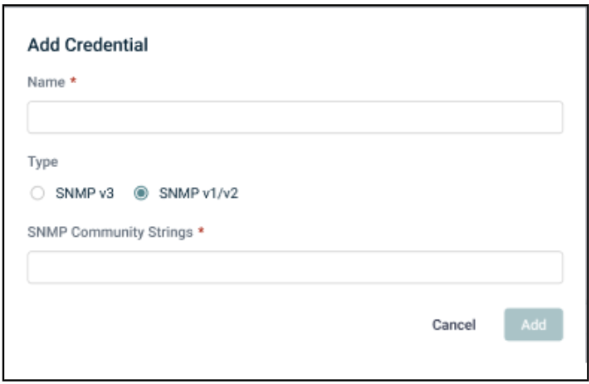
- Click Add to add SNMP credentials.
- In the Add Credential window, configure the following fields:
- Name: Enter the name of the SNMP credential.
- Type: Select the SNMP type option (SNMP V3 or SMP V1/V2)
- If you have selected SNMP v1/V2, the SNMP Community Strings field is displayed. The SNMP Community Strings field is defaulted to Public. SNMP v1 and v2c credentials are supported. We recommend activating SNMP on your network devices so that the Network Glue Collector can collect maximum information about your network.
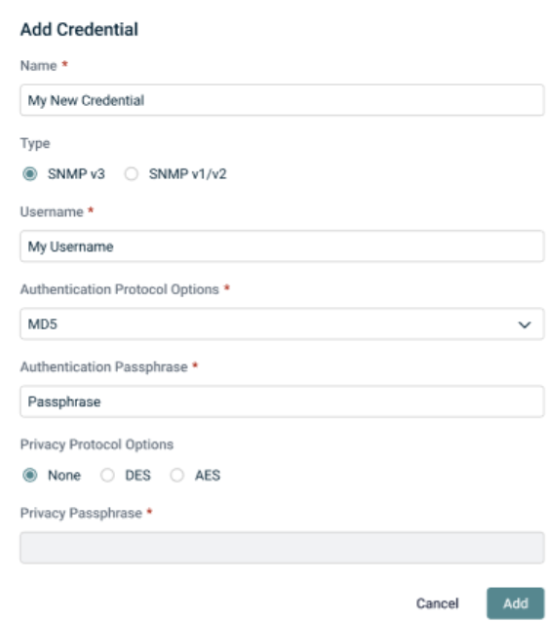
- If you have selected SNMP V3, configure the following fields:
- Username
- Authentication Protocol Options (MD5 or SHA)
- Authentication Paraphrase
- Primary Protocol Options
- Primary Paraphrase
NOTE The collector agent does not support SNMP for Windows workstations, servers, VMs, and Hyper-V hosts of Windows operating systems.
- If you have selected SNMP v1/V2, the SNMP Community Strings field is displayed. The SNMP Community Strings field is defaulted to Public. SNMP v1 and v2c credentials are supported. We recommend activating SNMP on your network devices so that the Network Glue Collector can collect maximum information about your network.
- Click Add.
NOTE SNMP V3 supports SHA1 authentication algorithm.
Viewing SNMP credentials
In the Manage SNMP credentials page, you can view the list of SNMP credentials that are applied on devices.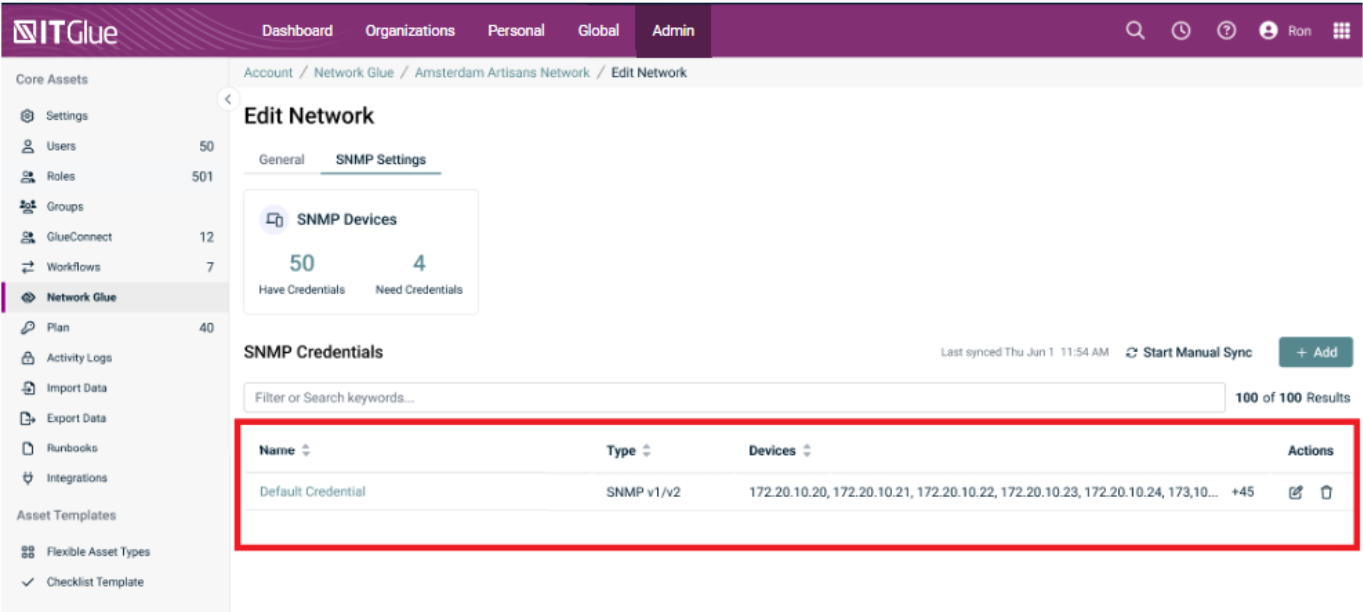
The statistics on the number of devices to which the credentials were successfully applied or not applied are specified on the page as shown below.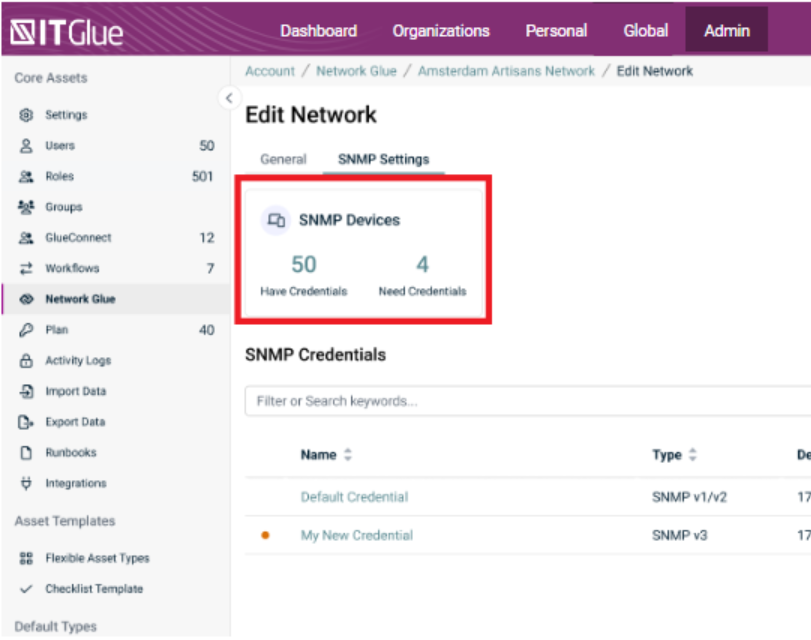
To initiate a network sync, click Start Manual Sync.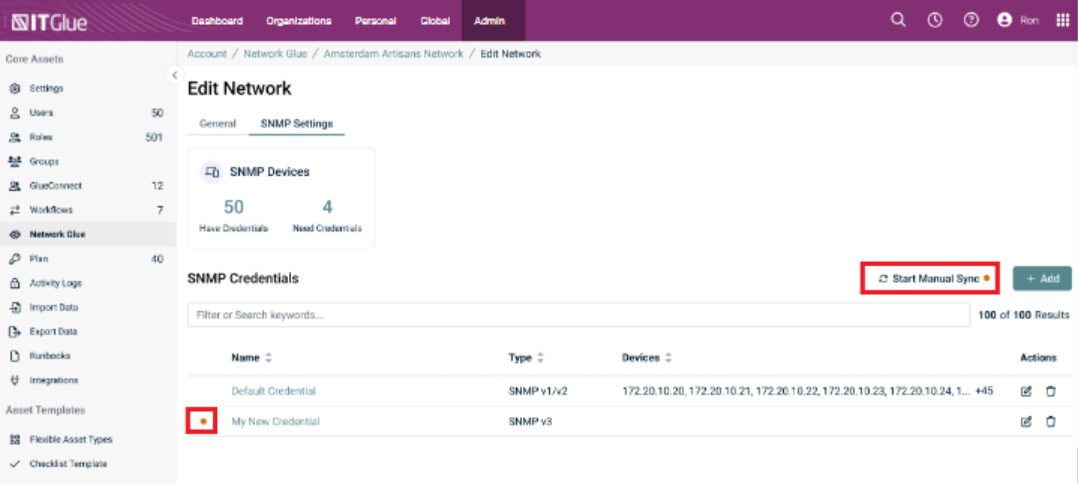
NOTE The SNMP credential will not run until the next sync or manual sync. This is indicated by a red colored dot in the table on the new credentials to show that the credentials did not run.
A red colored dot will also show on the Start Manual Sync button to indicate that there are credentials have not been synced.
Network page
Collector Key
The collector key displayed is the unique key that connects the Network Glue Collector to the IT Glue organization. You can copy the collector key by clicking the Copy to clipboard icon beside the key. If desired, you can also generate a new collector key by clicking Generate.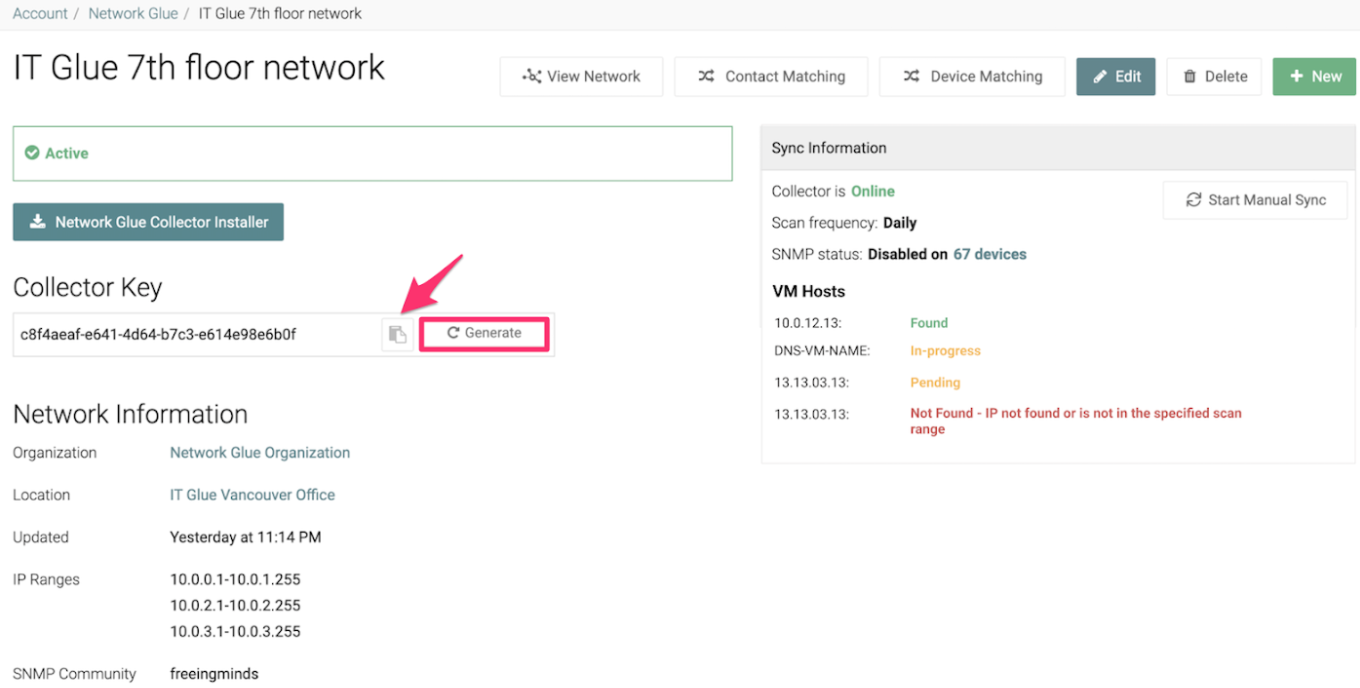
If you choose to generate a new collector key, you will receive a warning that the current key shall expire. You can use this feature if you want to deploy the Network Glue Collector to another device.
Status bar
The bar at the top left corner of the page shows the status of the Network Glue Collector for the network. There are three possible statuses: Active, Awaiting Data, or Error.
NOTE Network Glue scans the IP ranges of all available devices. If there are more than 600 devices in the range specified, the error Your network could not be processed due to a high volume of devices. Please consider adding an additional collector. will be displayed and your network diagram will not load. If you have more than 600 devices on your network, you can install additional collectors per subnet to identify all of your devices. Network Glue allows you to install an unlimited number of collectors.
NOTE The descriptions for both Awaiting Data and Error can be described as being in one of two states as indicated in the following table:
| Status | Description | Actions |
| Active | Collector is active. No issues have been reported. |
|
| Awaiting Data 1 | The parameters of the Network Glue Collector have been set up and the Network Glue Collector is ready for download and installation. |
|
| Awaiting Data 2 | Network Glue has been installed and is awaiting network information to be synced to IT Glue. |
|
| Error 1 | No network data retrieved in the past 24 hours. |
|
| Error 2 | Network data could not be retrieved. |
|
Sync information
To activate a manual sync, click Start Manual Sync. If the collector status is Online, that means manual sync is available. If the collector status is Offline, manual sync is currently not available. When syncing, a Sync in progress status will appear. If you added VM host data in Configuring network information, then you will see the status of each VM host device you entered during the setup.
There are four possible statuses:
| Status | Description |
|---|---|
| Found |
The host and VMs were found. The credentials are valid. NOTE Networks with VM hosts will include all VM guest endpoints on that host as well. Networks that have a domain controller hostname and valid credentials will discover all endpoints in the Active Directory hosted on that domain controller. In both cases, this occurs regardless of whether the endpoints are in the specified IP scan range. |
| Not Found |
|
| Awaiting data |
|
| Scan in progress | The scan is still in progress. |
If you did not add VM host data during the Collector setup, the VM Hosts section will indicate Not selected. You can add this data at any later time by navigating to Admin > Network Glue > select a network > Edit.
Next, refer to Deploying Network Glue Collector for an IT Glue organization to get started with Network Glue and Guide to successful Network Glue deployment for more information on the Network Glue deployment process.


