Getting started with the IT Glue API
For partners subscribed to the current Enterprise plan.
Introduction
The IT Glue API is a powerful tool for automation and getting data from external sources into your IT Glue account. It provides a direct, machine-friendly way of accessing your data, so that you can pull it into your own applications or integrate with third-party tools that we don't currently integrate with.
In this article, you'll learn how to:
- Generate and manage API keys from IT Glue
- Pause and activate API keys using the new Pause and Activate controls
- Locate a new organization's object ID using a GET request
- Use a parameter in the GET request to sort the output by a specific field like the object ID
- Locate a new flexible asset type's object ID and field name-keys using GET requests
- Use the requested data to POST (create) new flexible assets
Programmatically accessing data and making requests
If you're an Administrator on your account and you have some programming experience, you’ve got everything you need to start making requests and accessing your data. You need your Administrator credentials to generate an API key.
REST APIs have a base URL to which the endpoint paths are appended. The developer documentation for each endpoint shows the parameters that can be appended to the base URL to form a request (or sent as the body of the request).
The base URL for all endpoints and methods is:
- Standard: https://api.itglue.com.
- EU partners use: https://api.eu.itglue.com.
The following is an example of the form of a request URL:
| https://api.itglue.com/organizations?sort=id |
The URL is composed of the following parts:
| Component | Example | Description |
|---|---|---|
| Base URL | https://api.itglue.com | Root endpoint for all API requests |
| Path | /organizations | The resource endpoint |
| Query parameter | sort=id | Optional filter or sort parameter |
Some things to note:
- All API access must use HTTPS.
- Data is sent and received as JSON.
- Dates are in UTC timezone and in the following format: yyyy-mm-dd (e.g. 2016-03-31).
- By default, you get a paginated set of objects (50 per page is the default). If you're making requests and receiving an incomplete set of results, you might only be seeing the first page. You'll need to request the remaining pages to get more results.
- HTTP response codes are used to indicate errors. The developer documentation provides more information, including details about the kinds of errors each API call might result in and what could cause such errors.
- There is an API payload size limit of 10 MB, set by Amazon API Gateway. For more information please see this article.
Instructions
Creating a test environment
We recommend setting up a test environment in your account. As you are accessing the API in production, you'll want to keep your API tests confined to a handful of test organizations.
- Log in to IT Glue and create one or more new organizations.
- Note the name of each test organization. You'll need the names to find the organization IDs further in this KB article.
NOTE PSA syncing can be temporarily disabled by clicking Admin > Integrations and then Actions> Pause Sync. The change takes effect after any running sync jobs complete. This ensures that any test data you create won't accidentally push to your PSA. Remember to delete the test organizations before restarting the sync.
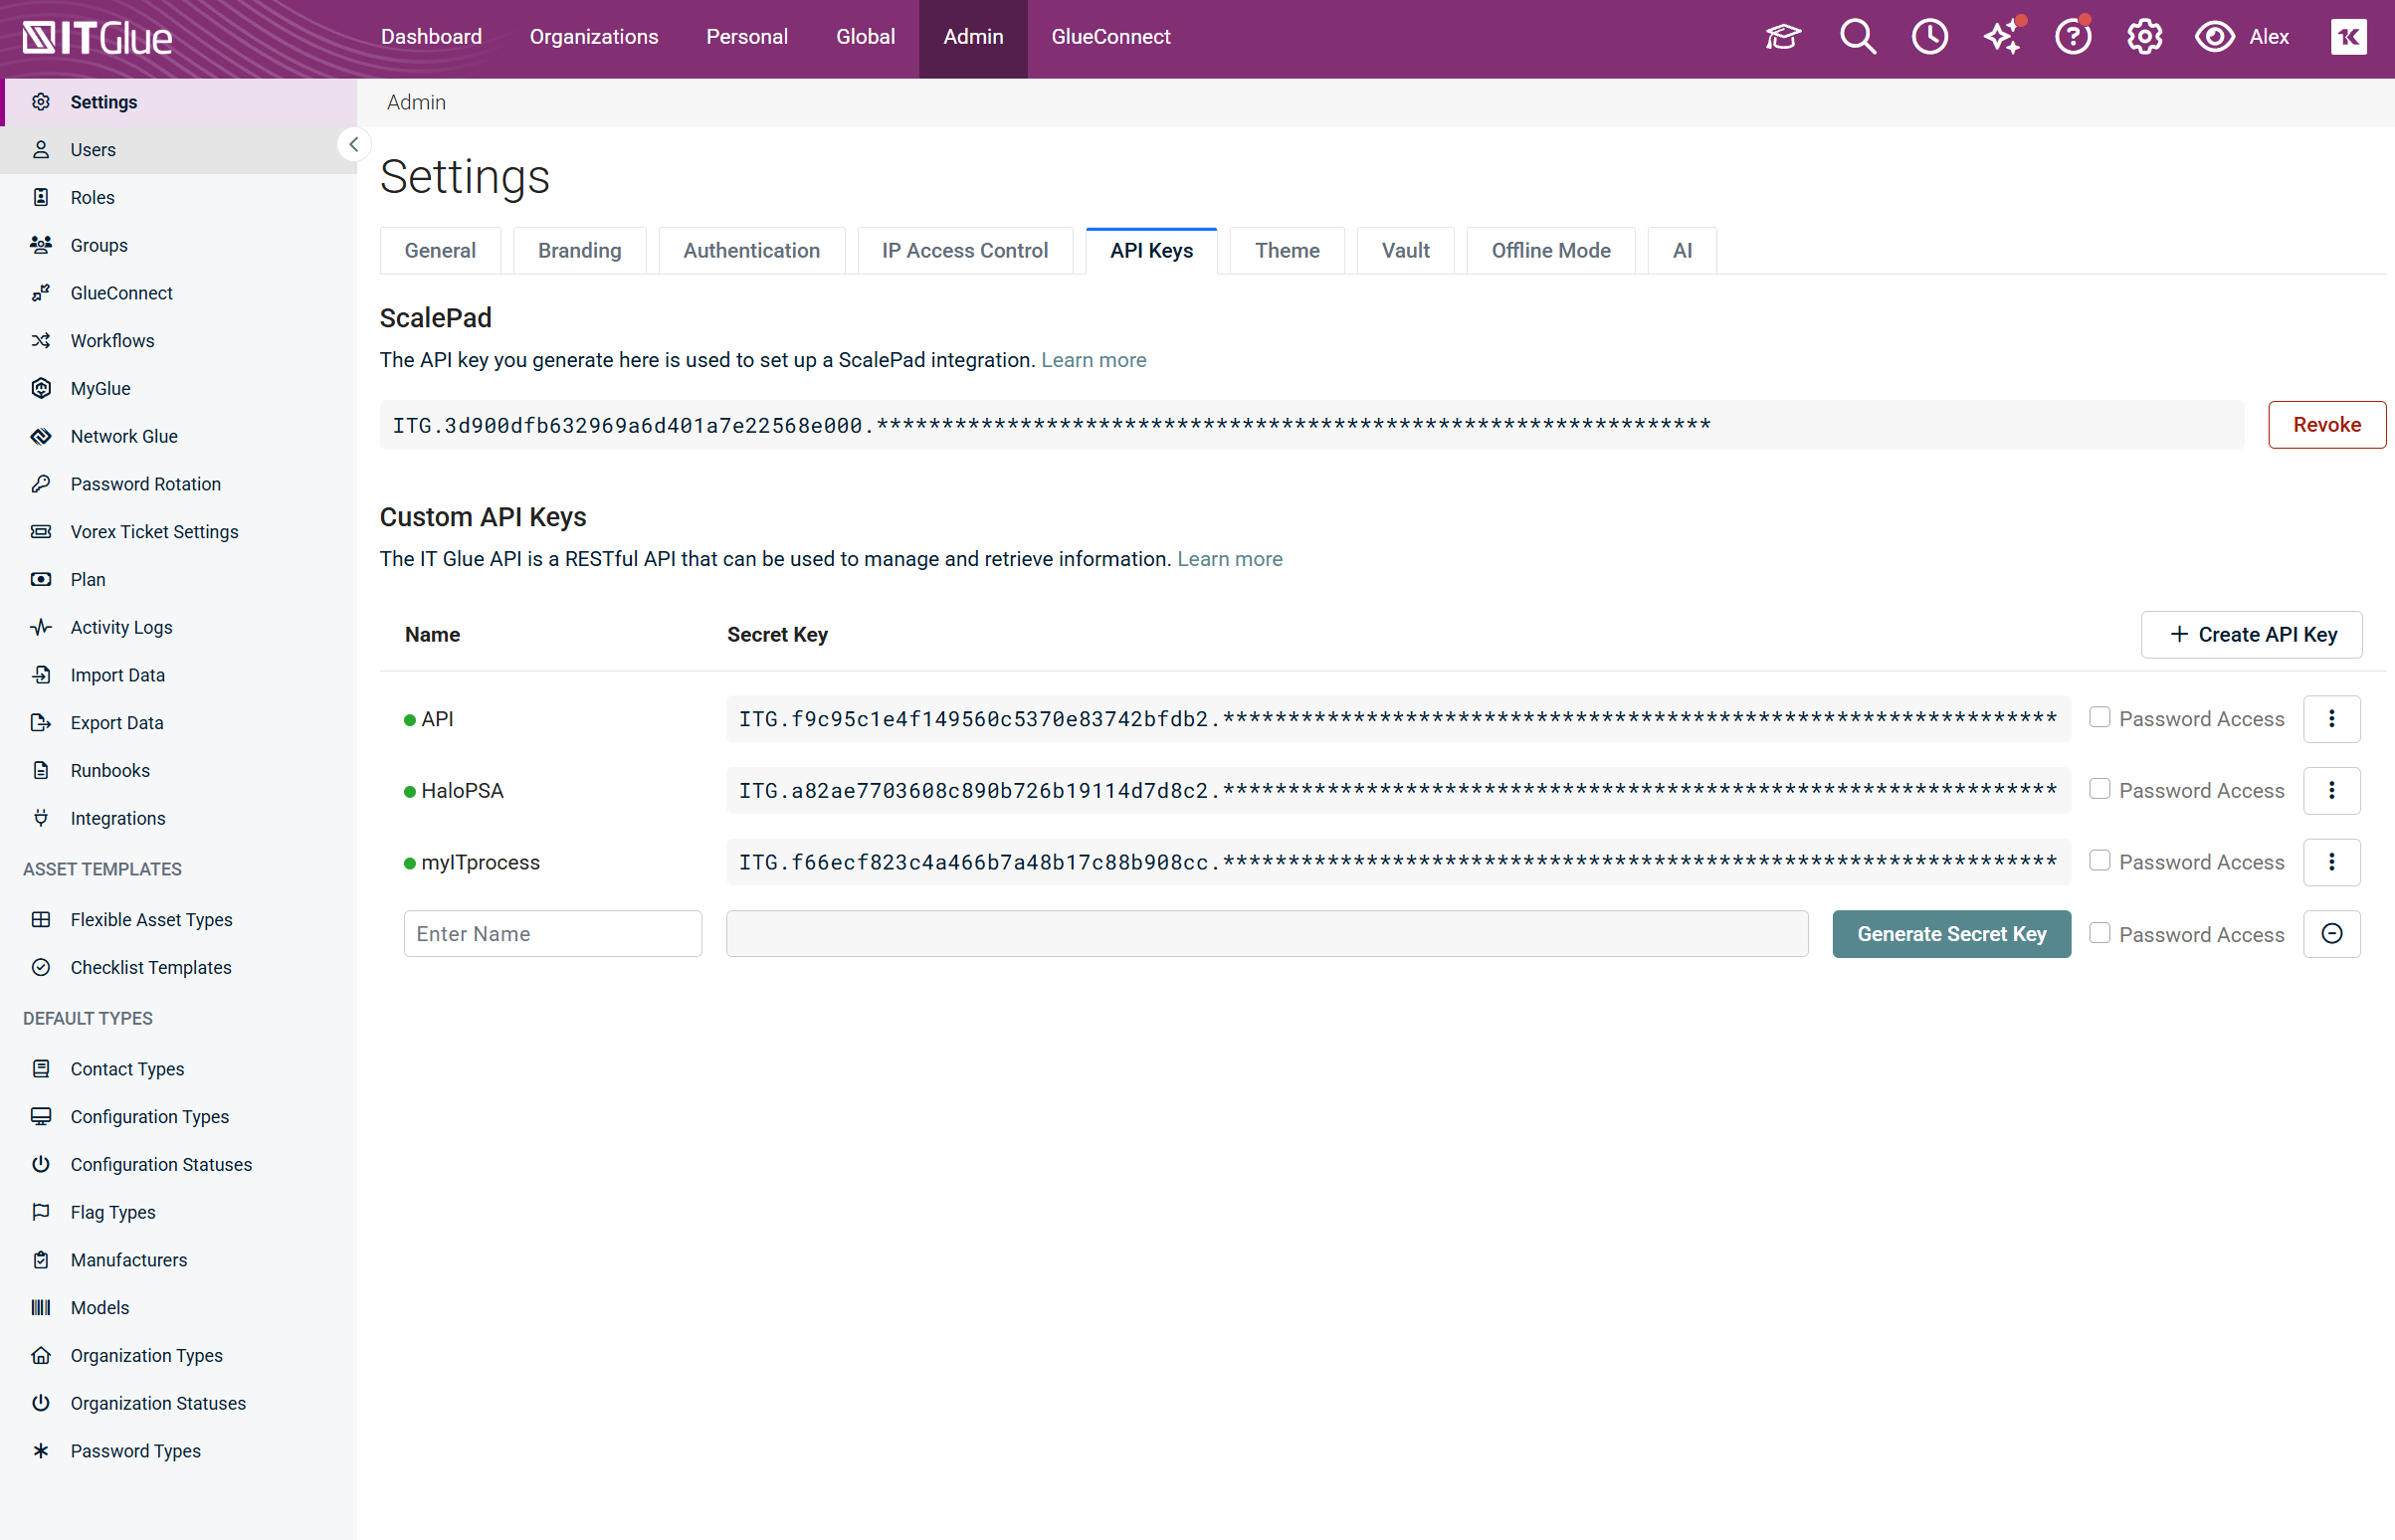
Generating an API key
All API endpoints require authentication using a private API key. You can generate one or more API keys for your account. To generate a new API key:
- Users with an Administrator role can navigate to Admin > Settings.
- Click on Custom API Keys > Create API Key.
- Enter a name for the key and click Generate API Key. You will not be able to view a key again after it has been generated.
- For security, an optional Password Access setting is provided for each API key. Password values can be accessed from the Passwords API only if this setting is enabled.
- To generate multiple API keys, click Create API Key.
NOTE Whenever you send a request to the API, you send your key with it so that we know it's you. This means that anyone who has your key can access your data, so it’s important to keep it private. You can revoke an old API key and generate a new one at any time from your IT Glue account. Any requests made using your old key will no longer work.
Pausing and activating API keys
The Pause and Activate controls let you temporarily suspend an API key without deleting it. This is useful when you need to block access for a specific integration while preserving the key for later reactivation, for example, during security reviews or when an integration is taken offline temporarily.
NOTE Only users with the IT Glue Administrator role can view the API Keys tab and pause or activate keys. This applies to both the UI and the API.
NOTE This feature is available on Enterprise plans where the API feature is enabled.
API key statuses at a glance
| Status | Indicator | Button shown | Can Authenticate? |
|---|---|---|---|
| Active | Green dot | Pause icon (pause key) | Yes |
| Paused | Gray dot | Play or Activate icon (reactivate key) | No |
Pausing an API key
Use the Pause control to temporarily prevent a key from authenticating, without revoking or deleting it.
- Navigate to Admin > Settings > API Keys.
- Locate the API key you want to pause. Click Pause in the key's drop down menu, positioned to the right of the API name.
- Confirm the action. The key status changes from Active (green dot) to Paused (gray dot), and the button icon changes from a pause icon to a play or activate icon.

NOTE External systems attempting to use a paused key will receive an authentication failure. Ensure that any integrations relying on the key are aware before pausing it.
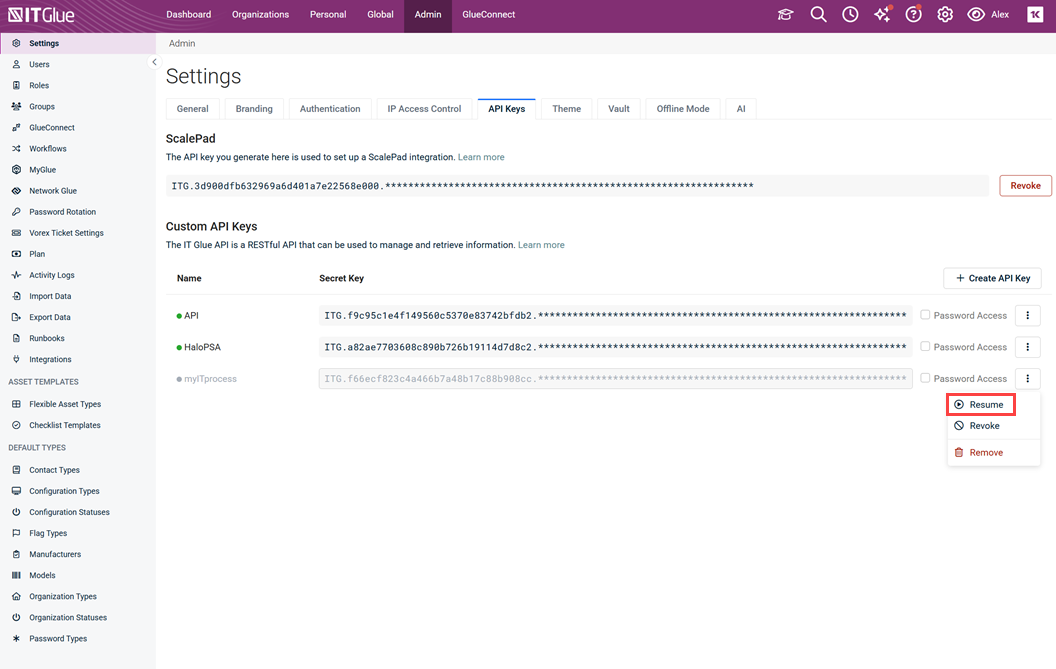
Reactivating a paused API key
When you are ready to restore access, you can reactivate a paused key at any time.
- Navigate to Admin > Settings > API Keys.
- Locate the paused key (shown with a gray dot and the play/activate icon).
- Click the Resume (play) icon. The key status immediately returns to Active (green dot), and the button reverts to the pause icon.
- The API key immediately resumes authenticating and processing API calls.
Audit logging for pause and activate actions
All pause and activate actions are recorded in the IT Glue audit log. Each log entry includes:
- The admin who performed the action
- The time stamp of the action
- The API key identifier
To review audit log entries, navigate to Admin > Logs.
Flexible asset resources
In the IT Glue API, there are three Flexible Asset resources that you can interact with:
| Resource | Description |
|---|---|
| Flexible Asset Type | An object that defines the data structure of Flexible Assets as a table containing one or more child field objects with defined field specifications. Multiple field types are available: string, text, date, number, and more. |
| Flexible Asset Field | A child object to a parent Flexible Asset type. This object allows you to interact directly with the individual fields of a flexible asset type. |
| Flexible Asset | An object created from the data structure pre-defined by a Flexible Asset type. |
Get your organization ID
Now you can start building the first request. The most important part is setting the authorization header to provide the API key.
This first call is a GET request that gives you a list of all organizations in the reverse order they were created. The list includes the organization name, the object ID, and other details. Locate and take note of the ID of one of your test organizations - you will need it when you create a flexible asset later in the process.
Click each of the tabs below:
Remember to include your API key with each call to the API.
GET /organizations?sort=-id HTTP/1.1 |
Example response showing the details of one organization:
{
  "data": {
    "id": "2",
    "type": "organizations",
    "attributes": {
      "name": "Happy Frog",
      "alert": "EXCHANGE SERVER WAS UPGRADED TO R2 2012",
      "description": "Based in San Francisco, CA with major offices in Detroit. MI and Tampa, FL. In business since 1994, they have been a managed services client with Kraken Techs since 2009, and have plans to expand into Europe and Asia by 2020.",
      "organization-type-id": 88,
      "organization-type-name": "Testing Only",
      "organization-status-id": 68,
      "organization-status-name": "Active",
      "my-glue-account-id": null,
      "my-glue-account-status": null,
      "psa-integration": null,
      "primary": false,
      "logo": "happy_frog.png",
      "quick-notes": "<p><strong><font color=\"#f04124\">Critical Project Update:</font></strong></p><div><font color=\"#000000\">- New servers going live Friday at 6:00 PM PST</font></div><div><font color=\"#000000\">- Please contact Project Manager <a href=\"https://demo.itglue.com/1013/contacts/7460\" target=\"_blank\">John Morgan</a> </font></div><div><br></div><div><font color=\"#000000\"><span style=\"background-color:#FFD700\">NOTE: CFO recently terminated</span></font> - Contact Jackie Tilds as needed</div>",
      "short-name": "happy",
      "created-at": "2017-07-16T15:51:56.000Z",
      "updated-at": "2017-07-16T15:53:55.000Z"
    }
  }
}
This is a scrollable box.
Remember to include your API key with each call to the API.
|
Create a new flexible asset type
In IT Glue, create a new Flexible Asset type. In the example below, we created a Flexible Asset type called "API Email Example" and gave it six fields: a Type, two Tags, two Select (drop-downs), and a Text field for a URL. In this example, only the first and second fields are required.
Name: Domains
Kind: Tag
Hint: Tag accepted domains for this email system
Type: Domains
Checkboxes: Required, Show in list

Name: Type
Kind: Select
Hint: Select the email platform
Options: Office 365, Exchange 2016, Exchange 2013, POP/IMAP
Checkboxes: Required, Use for title, Show in list

Name: Email Servers
Kind: Tag
Hint: Tag server(s) participating in email delivery
Type: Configurations
Checkboxes: Show in list

Name: Location
Kind: Select
Hint: Where is the email hosted
Options: Cloud, On-Premises

Name: Inbound Delivery
Kind: Select
Hint: How is inbound email delivered
Options: Office 365, Google, Proofpoint, Mimecast, Reflexion
Checkboxes: Show in list

Name: Webmail URL
Kind: Text
Checkboxes: Show in list
Flexible asset types may contain any number and combination of fields. To decide which field types to use, refer to the table below. For more information, see Flexible asset field definitions.
| Option | Description |
|---|---|
|
Checkbox |
A true/false field. The checkbox is ticked when the value is set to true. |
| Date |
A date field. |
| Number |
A number field. |
| Select |
A field that provides a set of values in a drop-down menu. |
| Tag |
A field that allows one or more assets to be tagged. |
| Text |
A short text field for adding a small amount of text. |
| Textbox |
A multi-line text field for adding a large body of text. |
Use a GET request to locate the Flexible Asset type ID
After you create a new Flexible Asset type in your account, send another GET request to get the JSON object ID of your newFlexible Asset type. When you make this call, you receive a list of allFlexible Asset types in the reverse order they were created. Locate and note the ID of your newly created Flexible Asset type. You'll need the ID further in this KB article.
Click each of the tabs below:
Remember to include your API key with each call to the API.
|
Example response showing the details of one flexible asset type:
{
  "data": {
    "id": "33",
    "type": "flexible_asset_types",
    "attributes": {
      "name": "API Email Example",
      "description": "This is an example",
      "created-at": "2017-07-27T16:20:43.000Z",
      "updated-at": "2017-07-27T16:20:43.000Z",
      "icon": "envelope-o",
      "enabled": true,
    }
  }
}
This is a scrollable box.
Remember to include your API key with each call to the API.
curl -X GET \ |
Use a GET request to view the JSON object
This next call sends the request to the GET /flexible_asset_types endpoint with the JSON object ID and the flexible_asset_fields parameter included. You need the JSON object details (name-keys for each field) from the response body to complete the next step. Copy and paste the information to where you can refer to it.
Click each of the tabs below:
Remember to include your API key with each call to the API.
GET /flexible_asset_types/33?include=flexible_asset_fields HTTP/1.1 |
Example response showing the details of one flexible asset type:
{
  "data": {
    "id": "33",
    "type": "flexible_asset_types",
    "attributes": {
      "name": "API Email Example",
      "description": "This is an example",
      "created-at": "2017-07-27T16:20:43.000Z",
      "updated-at": "2017-07-27T16:20:43.000Z",
      "icon": "envelope-o",
      "enabled": true,
    "relationships":{
      "flexible-asset-fields":{
        "data": [...]
      }
    }
  },
  "included":[
     {
       "id": 1182,
       "type":"flexible-asset-fields",
       "attributes":{
         "flexible-asset-type-id":33,
         "order": 1,
         "name": "Domains",
         "kind": "Tag",
         "hint": "Tag accepted domains for this email system",
         "tag-type": "Domains",
         "required": true,
         "use-for-title": false,
         "show-in-list": true,
         "name-key": "domains",
         "created-at": "2017-07-27T16:20:43.000Z",
         "updated-at": "2017-07-27T16:20:43.000Z"
       },
       "relationships":{
         "flexible-asset-type":{
           "data":{
             "id":"33",
             "type":"flexible-asset-types"
           }
         }
       }
     },
     {
      "id": 1183,
      "type":"flexible-asset-fields",
      "attributes":{
        "flexible-asset-type-id":33,
        "order": 2,
        "name": "Type",
        "kind": "Select",
        "hint": "Select the email platform",
        "default-value": "Office 365\nExchange 2016\nExchange 2013\nExchange 2010\nPOP/IMAP"
        "required": true,
        "use-for-title": true,
        "show-in-list": true,
        "name-key": "type",
        "created-at": "2017-07-27T16:20:43.000Z",
        "updated-at": "2017-07-27T16:20:43.000Z"
      },
      "relationships":{
        "flexible-asset-type":{
          "data":{
            "id":"33",
            "type":"flexible-asset-types"
          }
        }
      }
    },
    {
      "id": 1184,
      "type":"flexible-asset-fields",
      "attributes":{
        "flexible-asset-type-id":33,
        "order": 3,
        "name": "Email Servers",
        "kind": "Tag",
        "hint": "Tag server(s) participating in email delivery",
        "tag-type": "Configurations",
        "required": false,
        "use-for-title": false,
        "show-in-list": true,
        "name-key": "email-servers",
        "created-at": "2017-07-27T16:20:43.000Z",
        "updated-at": "2017-07-27T16:20:43.000Z"
      },
      "relationships":{
        "flexible-asset-type":{
          "data":{
            "id":"33",
            "type":"flexible-asset-types"
          }
        }
      }
    },
    {
      "id": 1185,
      "type":"flexible-asset-fields",
      "attributes":{
        "flexible-asset-type-id":33,
        "order": 4,
        "name": "Location",
        "kind": "Select",
        "hint": "Where is the email hosted",
        "default-value": "Cloud\nOn-Premises"
        "required": false,
        "use-for-title": false,
        "show-in-list": false,
        "name-key": "location",
        "created-at": "2017-07-27T16:20:43.000Z",
        "updated-at": "2017-07-27T16:20:43.000Z"
      },
      "relationships":{
        "flexible-asset-type":{
          "data":{
            "id":"33",
            "type":"flexible-asset-types"
          }
        }
      }
    },
    {
      "id": 1186,
      "type":"flexible-asset-fields",
      "attributes":{
        "flexible-asset-type-id":33,
        "order": 5,
        "name": "Inbound Delivery",
        "kind": "Select",
        "hint": "How is inbound email delivered",
        "default-value": "Office 365\nGoogle\nProofpoint\nMimecast\nReflexion"
        "required": false,
        "use-for-title": false,
        "show-in-list": true,
        "name-key": "inbound-delivery",
        "created-at": "2017-07-27T16:20:43.000Z",
        "updated-at": "2017-07-27T16:20:43.000Z"
      },
      "relationships":{
        "flexible-asset-type":{
          "data":{
            "id":"33",
            "type":"flexible-asset-types"
          }
        }
      }
    },
    {
      "id": 1187,
      "type":"flexible-asset-fields",
      "attributes":{
        "flexible-asset-type-id":33,
        "order": 6,
        "name": "Webmail URL",
        "kind": "Text",
        "required": false,
        "use-for-title": false,
        "show-in-list": true,
        "name-key": "webmail-url",
        "created-at": "2017-07-27T16:20:43.000Z",
        "updated-at": "2017-07-27T16:20:43.000Z"
      },
      "relationships":{
        "flexible-asset-type":{
          "data":{
            "id":"33",
            "type":"flexible-asset-types"
          }
        }
      }
    }
  ]
}
This is a scrollable box.
Remember to include your API key with each call to the API.
curl -X GET \ |
Create a flexible asset
Finally, let's create a flexible asset using the flexible asset type you created above.
When creating your flexible asset, pass the values as a JSON object that has defined "traits". Traits are key-value pairs and used to create your Flexible Asset data. An example would look like {"name-key1": 1, "name-key2": 2}. View your Flexible Asset type to identify the name-key for each field you want to populate as well as any fields that may be required.
A Flexible Asset can be tagged with associated organizations, configurations, contacts, etc. which are all separate JSON objects. When creating the trait values, you need to enter the JSON object IDs of the assets being tagged. You can use the API to make additional calls to get the object IDs. However, after you create an asset in your account, IT Glue gives it a URL that references the asset's object ID. If you need a quick way to find an asset's object ID, view the asset in IT Glue and locate the object ID in the URL. Now, construct a POST request.
Click each of the tabs below:
Remember to include your API key with each call to the API.
POST /flexible_assets HTTP/1.1 |
Example response:
{
  "data": {
    "id": "401",
    "type": "flexible-assets",
    "attributes": {
      "organization-id": 2,
      "organization-name": "Happy Frog",
      "flexible-asset-type-id": 33,
      "flexible-asset-type-name": "API Email Example",
      "name": "Office 365",
      "traits": {
        "domains": "happyfrog.com",
        "type": "Office 365",
        "email-servers": "HF-SF-EXCH01",
        "location": "Cloud",
        "select": "Office 365",
        "webmail-url": "https://portal.office.com/"
      },
      "created-at": "2017-07-27T17:04:21.000Z",
      "updated-at": "2017-07-27T17:04:21.000Z"
    }
  }
}
This is a scrollable box.
Remember to include your API key with each call to the API.
curl -X POST \ |
This makes a request to the POST /flexible_assets endpoint that conforms to the field specification of the Flexible Asset type you created earlier. The new Flexible Asset is associated with the organization ID and Flexible Asset type ID you specified in the request. The response returns the created Flexible Asset if successful.
JSON Trait Examples
Trait values must be a valid data type (string, number, array, boolean, or null). Use the following table as a reference when determining what kind of data type to enter.
| Field | Name | JSON |
|---|---|---|
|
Checkbox |
Client has signed and acknowledged MSA |
{"client-has-signed-and-acknowledged-msa": true} |
| Date |
Signing Date |
{"signing-date": "2018-10-31"} |
| Number |
Number of seats |
{"number-of-seats": 25} |
| Select |
Field Technician |
{"field-technician": "Randy Rios"} |
| Tag |
Emergency Contact |
To pass a single tag To pass multiple tags {"emergency-contact": [4387, 3901, 7891]} |
| Text |
Emergency Contact Telephone Number |
{"emergency-contact-telephone-number": "555-234-9876"} |
| Textbox |
Notes |
{"notes": "These are the notes."} |
Further reading
Learn more about working with the API in the developer docs.
NOTE Thanks to community member Caleb Albers there is now a PowerShell API wrapper and a place to share information about automating documentation on GitHub at https://github.com/itglue/automation. This collection of tools and code samples was designed to give developers the means to script and automate their Active Directory and IT infrastructure documentation.


