Integrating with Autotask
Autotask
NAVIGATION Admin > Extensions & Integrations > Kaseya Integrations > IT Glue Integration
NAVIGATION My > Miscellaneous > Profile > IT Glue
PERMISSIONS For integration setup, a security level with Admin permission to configure Kaseya Integrations is required. Refer to Admin security settings in the Autotask Help system. At the user level, a user account in IT Glue is required.
The security permissions configured for a user in IT Glue also apply in Autotask.
IT Glue
NAVIGATION Admin > Integrations
PERMISSIONS For integration setup, the Administrator or Manager role is required. At the user level, a user account in Autotask is required.
The security permissions configured for a user in Autotask also apply in IT Glue.
Overview
This integration allows you to sync checklists from IT Glue organizations to Autotask. You can also create checklists based on IT Glue templates to be added to Autotask tickets, and surface related documents, passwords, and flexible assets from IT Glue as insights in Autotask tickets. In addition, IT Glue documents and passwords are dynamically shown on Autotask tickets based on attributes of the ticket, such as type, sub-type, subject, and keywords.
This integration is enabled at two levels:
- Administrators can connect and disconnect their organization's Autotask instance from their instance of IT Glue.
- Users can connect and disconnect their Autotask user account from their IT Glue user account.
IMPORTANT If you are migrating your PSA tool or merging to a different instance, contact your account manager. Guidance from our team is recommended to ensure your integration setup is completed successfully.
If you plan to sync with your RMM tool next, refer to the sync methods overview in the IT Glue Help system for information about the various methods available.
Kaseya 365This integration is included as part of a Kaseya 365 Ops subscription and will be configured for you in a session with an implementation consultant from Kaseya. Refer to Getting started with Kaseya 365 Ops. |
NOTE Contact asset synchronization to Autotask may experience delays when IT Glue is used as a source of truth. Syncing contacts from IT Glue to Autotask can take up to 20 minutes, during which updates may not appear immediately in Autotask.
Automations powered by this integration
- True-Sync for Autotask: Configure Autotask sync settings in IT Glue
- True-Sync for IT Glue Checklists in Autotask: Link Autotask checklists to IT Glue checklist templates
- Checklist Shortcut for Autotask: Work with IT Glue checklists embedded in Autotask
- SmartLook Documentation with IT Glue: View IT Glue insights in Autotask tickets
Prerequisites
- An SSL connection with a valid certificate (not self-signed) from a trusted authority is required.
- Select or Enterprise IT Glue plan.
NOTE In this article, IT Glue screenshots are presented in dark mode while Autotask screenshots are presented in light mode for easy differentiating.
Autotask-IT Glue field mappings
This section defines how Autotask fields are mapped to IT Glue fields.
Summary of two-way sync behavior
- Autotask organizations ↔ IT Glue organizations
- Autotask devices ↔ IT Glue configurations (excluding Autotask custom fields)
- Autotask contacts ↔ IT Glue contacts
- Autotask locations ↔ IT Glue locations
- Autotask tickets ↔ IT Glue tickets
NOTE For this field in Autotask, you can select a local term other than Organization. In your Autotask instance, it may be labeled account, business unit, client, company, customer, organization, or site. Throughout this article, this term is referred to as the default option: organization.
| Autotask: Organization | IT Glue: Organization |
|---|---|
| Organization Name | Name |
| Active | Status |
| Organization Type | Type |
| Parent Organization Name | Parent Organization |
| Organization Location | Primary Location |
| Organization Number | Short Name |
NOTE For this field in Autotask, you can select a local term other than Device. In your Autotask instance, it may be labeled asset, configuration item, device, installed asset, or installed product. Throughout this article, this term is referred to as the default option: device.
| Autotask: Device | IT Glue: Configuration |
|---|---|
| Reference Name (if present) OR Product Name | Name |
| Reference Number | Asset Tag |
| Contact | Contact |
| Active | Configuration Status |
| Device Type | Configuration Type |
| Install Date | Installed At |
| Installed By | Installed By |
| Product Name ↔ Manufacturer* | Manufacturer |
| Product Name ↔ Manufacturer Product Number* | Model |
| Description | Notes |
| Serial Number | Serial Number |
| Warranty Expiration Date | Expiration Date |
| Location | Location |
*Manufacturers and models are created in IT Glue if they don't already exist. For a list of the manufacturers and models created in IT Glue, navigate to Admin and click the relevant option in the Default Types section of the left navigation menu.
NOTE Autotask user-defined fields are read-only in IT Glue but do appear in the configuration record.
| Autotask: Contact | IT Glue: Contact |
|---|---|
| First Name | First Name |
| Last Name | Last Name |
| Title | Title |
| Email Address | Work Email |
| Phone/Ext | Work Phone |
| Mobile Phone | Mobile Phone |
NOTE For this field in Autotask, you can select a local term other than Location. In your Autotask instance, it may be labeled branch, location, or site. Throughout this article, this term is referred to as the default option: location.
| Autotask: Location | IT Glue: Location |
|---|---|
| Name* | Name |
| Address 1 | Address 1 |
| Address 2 | Address 2 |
| City | City |
| State/Province | State/Province |
| Zip Code | Zip Code |
*This matching logic does not apply to personal address details of an Autotask contact.
| Autotask: Ticket | IT Glue: Ticket |
|---|---|
| Queue | Board |
| Name | Title |
| Ticket Number | Ticket Number |
| Contact | Contact |
| Status | Status |
| Priority | Priority |
Standard matching rules are used to match records in IT Glue when pulling data from Autotask. The sync discovers organizations, devices, contacts, organization locations, and tickets in Autotask and matches them to data in IT Glue using the following fields:
| IT Glue Data | Autotask Data Matched On |
|---|---|
| Organization | Organization Name |
| Configuration | (Organization) AND (Serial Number OR MAC Address) |
| Contact | (Organization) AND (First Name AND Last Name) |
| Location | (Organization) AND (Address 1 AND Address 2 AND City AND State/Province AND Country) |
| Ticket | (Organization) AND (Ticket Number) |
If the matching logic is unsuccessful in finding a match, a new record is created. When one or more identical matches are found, the record that was created first is matched on. For configurations, the system attempts to narrow the matches using unique identifiers, including serial number and MAC address, before matching on date created.
Best practices for integrating Autotask, Datto RMM, and IT Glue
Refer to Integrating Autotask, Datto RMM, and IT Glue.
How to...
You have the option to set up a custom security level in Autotask with minimum permissions that you can use specifically for managing this integration with IT Glue. Complete the following steps in Autotask to do so:
- Navigate to Admin > Organization Settings & Users > Resources/Users (HR) > Security Levels.
- From the context menu for the API User (system) security level, which is configured with the settings needed for the new security level you will create, select Copy.

- Enter a name indicating that this security level is used for the integration with IT Glue.
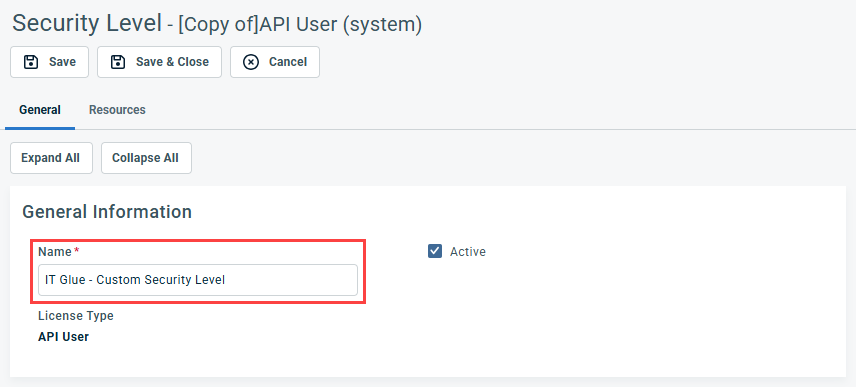
- Click Save & Close.
Autotask allows you to create API-only access user types for the purpose of OAuth integrations with other applications. An Autotask security level with Admin permission to configure Resources/Users (HR) can complete the following steps to create credentials for an API user in Autotask, which will not have access to the Autotask user interface. The API user credentials configured in the following steps will be used for connecting this integration:
- Navigate to Admin > Organization Settings & Users > Resources/Users (HR) > Resources/Users.
- From the New drop-down menu, select New API User.
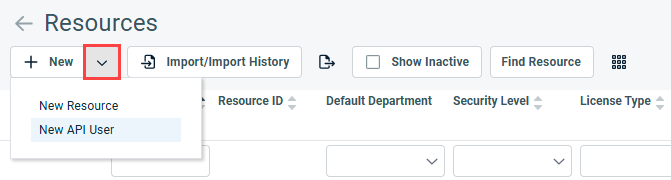
- In the General section, fill in the required fields. From the Security Level drop-down menu, select API User (system) or the custom security level you set up in Create a dedicated security level in Autotask (optional).
- In the Credentials section, click Generate Key and Generate Secret to populate those fields. Copy and securely save these values, which you will later enter in IT Glue.
- In the API Tracking Identifier section, select IT Glue - Documentation Management as the integration vendor.
- Click Save & Close to create the new user and receive an email with login credentials.

- Next, navigate to Admin > Organization Settings & Users > Resources/Users (HR) > Protected Data Permission.
- Select the View Protected Data check box for the new IT Glue integrator resource.
- Click Save.

NOTE When creating the API user, it's important to take note of the credentials you create, as you cannot recover the Password (Secret) value from the user record in Autotask once it has been saved.
Learn more about API users in the Autotask Help system.
In Autotask, the integration must be enabled by an Administrator at the database level and by each individual user at the user account level.
To enable the integration with IT Glue for the entire Autotask account (database level), complete the following steps:
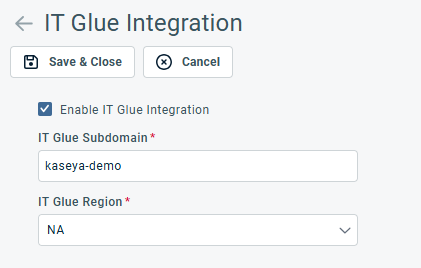
- From the left navigation menu, navigate to Admin > Extensions & Integrations > Kaseya Integrations > IT Glue Integration.
| Field | Description |
|---|---|
| Enable IT Glue Integration | Select this check box to enable the integration with IT Glue at the database level. Clear this check box to sever the connection between Autotask and IT Glue. NOTE Clearing the check box breaks the connection for all Autotask resources who enabled it for their user account. |
| IT Glue Subdomain | Enter your IT Glue subdomain, which appears in your IT Glue URL. EXAMPLE If your IT Glue URL is kaseya-demo.itglue.com, your subdomain is kaseya-demo. |
| IT Glue Region |
From the drop-down menu, select your region: AU (Australia), EU (Europe), or NA (North America). |
- Click Save & Close.
Saving the setup makes the Profile > IT Glue tab visible for all resources and allow them to connect their IT Glue user account to their Autotask user account. Refer to Establish a connection on the IT Glue tab in Autotask.
Users can also establish the connection from the IT Glue accessory tab on the Organization page. Refer to Establishing a connection in Work with IT Glue checklists embedded in Autotask.
Authenticate the integration for the entire IT Glue account by completing the following steps in IT Glue:
- From the top navigation menu, click Admin.
- From the left navigation menu, click Integrations.
- In the upper-right corner of the page, click New.
- In the Business Management & Ticketing section, click the Autotask tile.

- In the Integrator Username field, paste the Username (Key) value you generated in Create a dedicated API user in Autotask.
- In the Integrator Password field, paste the Password (Secret) value you generated in Create a dedicated API user in Autotask.
- Click Connect. If all fields are successfully validated, IT Glue will connect to Autotask.

BEFORE YOU BEGIN Configure your Autotask account with the initial organization, organization classification, organization location, device, contact, and ticket data that you want to manage and sync to IT Glue through this integration. Review the one-time push feature described in Perform a one-time push to sync existing IT Glue data to Autotask or manually configure Autotask data as follows:
• If you plan to sync organizations based on their classifications, create any classification icons you would like to apply to Autotask organizations that IT Glue will detect in order to sync those organizations. To do so, navigate to Admin > Features & Settings > Organizations & Contacts > Classification Icons in Autotask.
• Create any device types you would like to apply to Autotask devices and subsequently sync to IT Glue configurations. To do so, navigate to Admin > Features & Settings > Devices > Device Types in Autotask.
• Create any ticket queues you would like to apply to Autotask tickets and subsequently sync to IT Glue. To do so, navigate to Admin > Features & Settings > Service Desk (Tickets) > Queues in Autotask.
• Add or mass import the Autotask organizations, devices, and contacts you wish to manage and sync to their IT Glue counterparts. Learn how to import data in the Autotask Help system.
• For the Autotask organizations you want to sync, ensure they are assigned organization types and classifications you will select to sync. You will have the option to sync organizations without classifications.
• For the Autotask devices you want to sync, ensure they are assigned device types you will select to sync. You will have the option to sync devices without device types.
In the integration sync settings in IT Glue, you'll configure the sync of any Autotask organizations, devices, contacts, organization locations, and tickets you want to pull into IT Glue.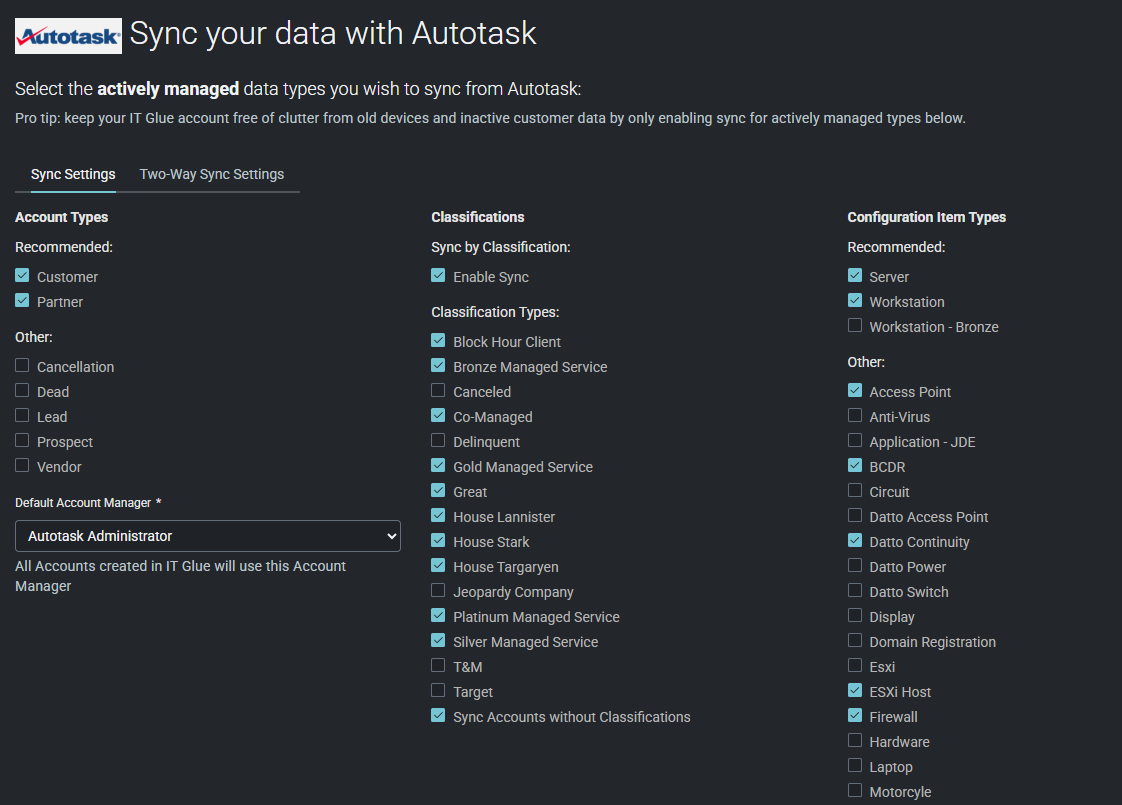
Most organization, configuration, contact, organization location, and ticket fields in IT Glue can sync with Autotask. Refer to Autotask-IT Glue field mappings. The types of Autotask records that are enabled for syncing via the Sync Settings tab in IT Glue are integral to the integration sync logic.
NOTE The Autotask data selected in the Sync Settings tab is pushed to IT Glue with each integration sync. If you will not enable two-way syncing, any data you wish to manage using PSA functionality should be added to Autotask instead of IT Glue, as your IT Glue data will not sync to Autotask if two-way syncing is not enabled.
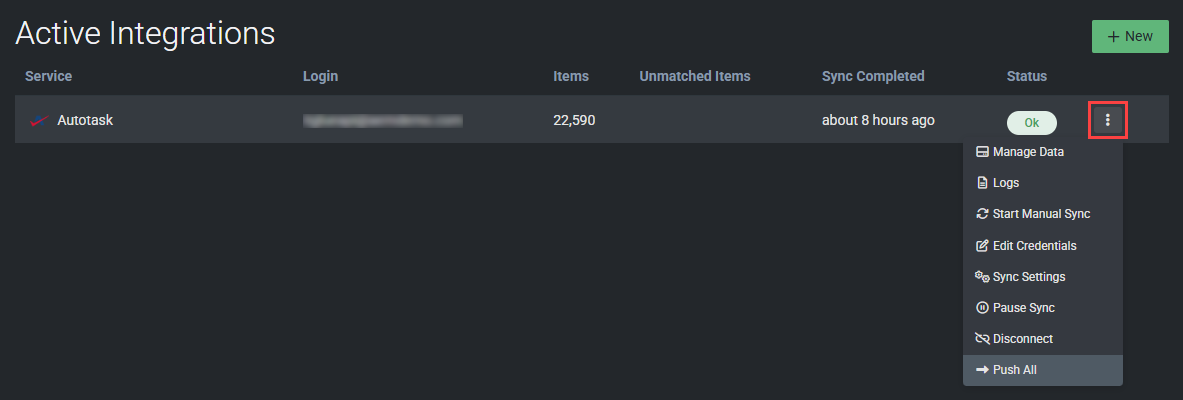
Complete the following steps to navigate to the integration sync settings in IT Glue at any time:
- From the top navigation menu, click Admin.
- From the left navigation menu, click Integrations.
- From the more menu
 in the Autotask connector, select Sync Settings.
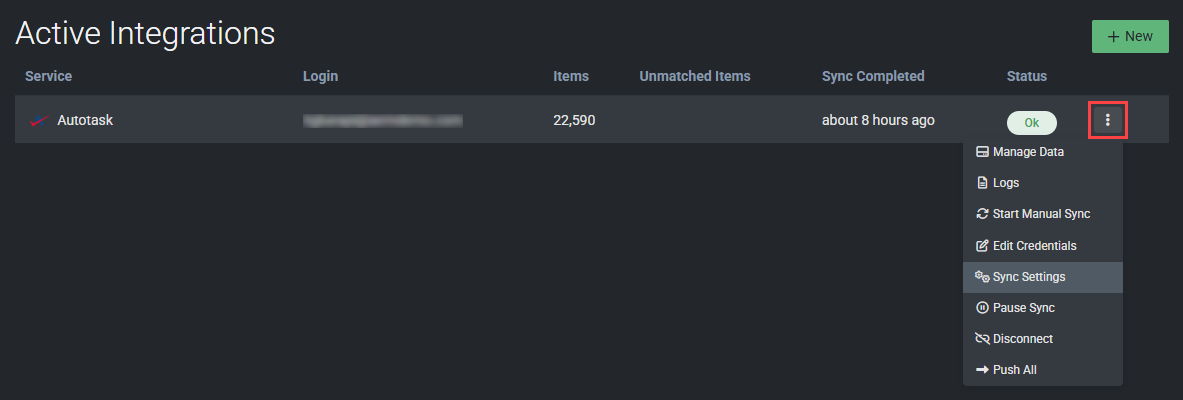
Sync Settings tab
On this page, you'll configure the settings that determine which Autotask records will sync to corresponding IT Glue records. Once matches are established, the records that exist in IT Glue are automatically updated to reflect the information coming from the records in Autotask with each sync.
Account Types
In the Account Types column, select the types of Autotask organizations you actively manage. Recommended options are listed first. Organizations of those types in Autotask will sync to IT Glue. If you are also syncing by classifications, an organization will not sync to IT Glue unless its assigned classification is selected in the Classifications column.
From the Default Account Manager drop-down menu, select the account manager to assign to all organizations created in IT Glue. Select a non-API user, such as an administrator. Autotask does not allow API-only users to be the owner of organizations.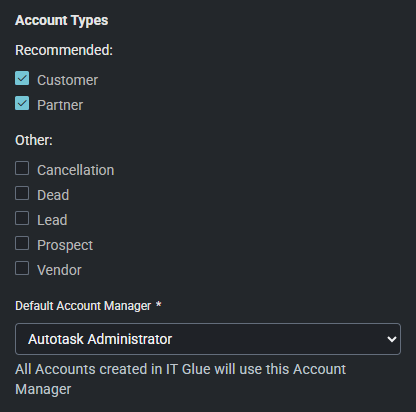
Classifications
In the Classifications column, select the Enable Sync check box if you wish to sync Autotask organizations to IT Glue based on their classifications. Then, select the types of Autotask classifications you actively use. If you want organizations that aren't assigned a classification to be included in the syncs, select the Sync Accounts without Classifications check box.
If an Autotask organization's type and classification (or lack of classification) are both selected in the sync settings, the organization will sync to IT Glue.
When an organization type and classification that are both enabled for syncing are applied to an organization in Autotask, and an organization with the same name already exists in IT Glue, the records will be automatically matched after the next full sync finishes. If an organization with the same name does not already exist in IT Glue, a new IT Glue organization will be automatically created and matched to the Autotask organization after the next full sync finishes.
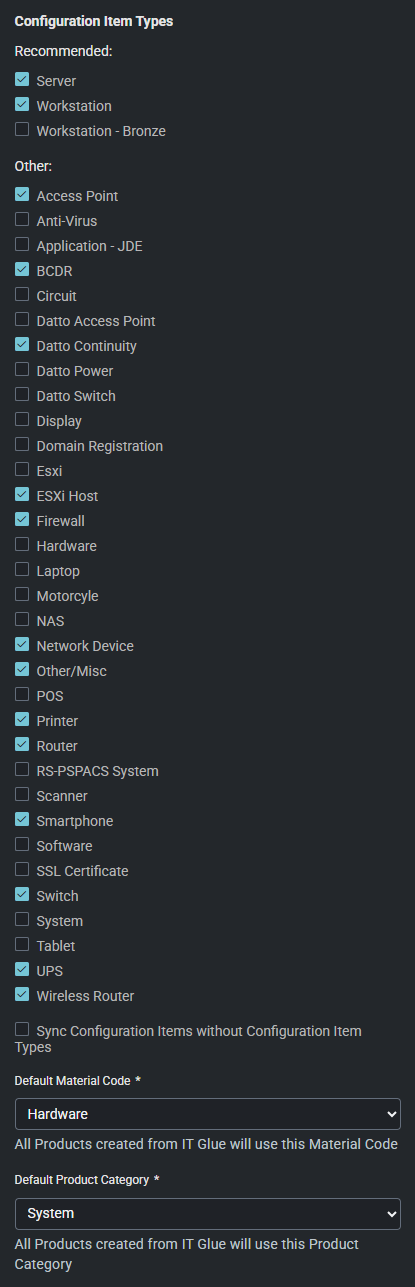
Configuration Item Types
Device types in Autotask are required to populate IT Glue configuration types. They are used by the integration to determine what to sync and how to label devices in IT Glue. In the Autotask Help system, learn about device types and how to add them.
NOTE If device types are blank in Autotask, they are displayed as Autotask Default configuration types in IT Glue. To learn how to resolve this issue, refer to Prevent mapped IT Glue configuration types from appearing as "Autotask Default".
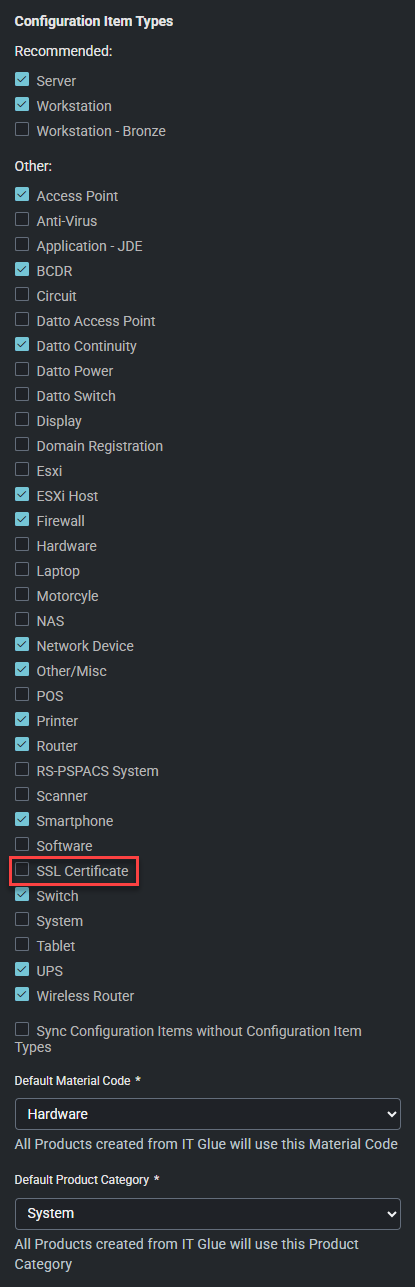
In the Configuration Item Types column, select the types of Autotask devices you actively manage. Recommended options are listed first. Devices of those types in Autotask will sync to IT Glue. If you want devices that aren't assigned a type to be included in the syncs, select the Sync Configuration Items without Configuration Item Types check box.
From the Default Material Code drop-down menu, select the material code to apply to all products created from IT Glue.
From the Default Product Category drop-down menu, select the product category to apply to all products created from IT Glue.
NOTE Autotask requires the Default Material Code and Default Product Category fields to be populated for all devices, which is why they are required in these sync settings. If you enable two-way syncing, any configurations you create in IT Glue will push to Autotask with the default values you select here. These defaults may not be what you actually want each device/configuration to be set to, so you may need to edit them from within Autotask to specify the actual material code and product category.
When a device type enabled for syncing is applied to a device in Autotask, and a matching configuration already exists in IT Glue, the records will be automatically matched after the next full sync finishes. To learn how devices and configurations are deemed as matches, refer to Matching logic. If a matching configuration does not already exist in IT Glue, a new IT Glue configuration will be automatically created and matched to the Autotask device after the next full sync finishes.
Contacts
To sync Autotask contacts to IT Glue, select the Enable Contacts sync check box. If this setting is not selected, IT Glue will not automatically create new contacts or reflect contact information from Autotask.
When a contact is created and assigned to a certain organization in Autotask, and an existing IT Glue contact with the same first and last name belongs to the IT Glue organization matched to the Autotask contact's assigned organization, no new contact is created in IT Glue. If a matching contact does not already exist in IT Glue, a new IT Glue contact is automatically created and added to the organization that is matched to the organization the Autotask contact belongs to.
NOTE IT Glue creates contacts that are associated with a configuration only if the contact in Autotask exists in the same organization as the configuration. Any contacts outside of that organization in Autotask are ignored during the sync.
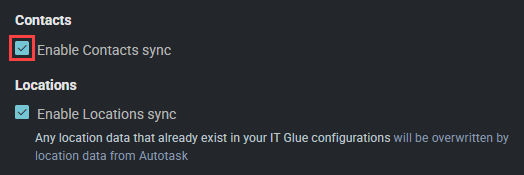
Locations
To sync Autotask locations to IT Glue, select the Enable Location sync check box. Any location data that already exists in your IT Glue configurations will be overwritten by location data from Autotask.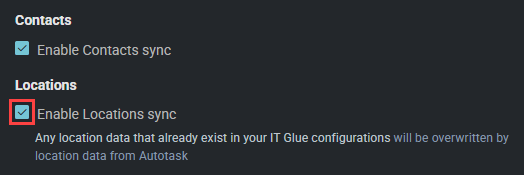
If an Autotask contact has a location specified, that location will be pulled into IT Glue and associated with the synced contact.
If an Autotask contact lacks a specified location, no location will be pulled into IT Glue.
If an Autotask contact has a manually entered address, that address will be pulled into IT Glue as a new location, associated with the synced contact, and not synced with Autotask.
Ticket Queues
In the Ticket Queues section, select the Autotask ticket queues you actively use. Autotask tickets from the selected queues will sync to IT Glue.
If you don't want unmaintained tickets from the selected queues included in the sync, enter a number of months in the Sync Tickets Updated Within the Last field. As a result, tickets that haven't been created or updated within that number of months are not included in integration syncs.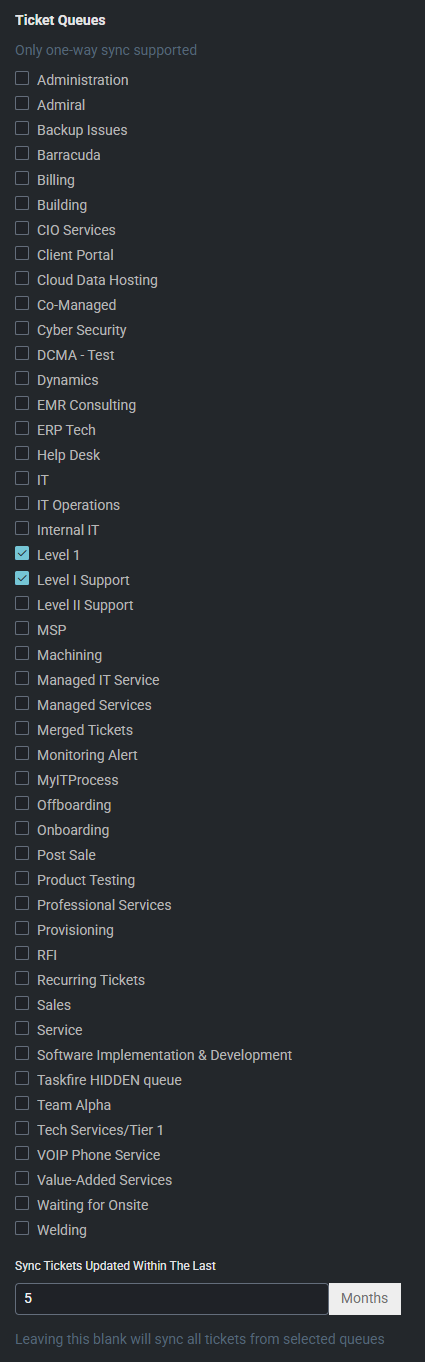
Before clicking Save, which immediately queues a sync, proceed to the Two-Way Sync Settings tab to review those options.
Two-Way Sync Settings tab
Two-way syncing allows any updates made to mapped fields in both IT Glue and Autotask to regularly sync to one another. Refer to the overview and FAQ of two-way syncing with PSA tools in the IT Glue Help system.
IMPORTANT If you have any existing organizations, devices, contacts, or organization locations in Autotask that also exist as organizations, configurations, contacts, or organization locations in IT Glue, you must manually edit and save each IT Glue record individually to trigger matching as part of the two-way sync. Otherwise, as a precautionary measure, the system will not push IT Glue records to Autotask. You are not required to make any changes when you select to edit and save each record. For a workaround, refer to Perform a one-time push to sync existing IT Glue data to Autotask.
To configure two-way sync settings, complete the following steps:
- Click the Two-Way Sync Settings tab.
- If you wish to initiate two-way syncing between Autotask and IT Glue, select the Enable two-way sync check box. If you leave this check box cleared, Autotask data is pushed to IT Glue but not vice versa.
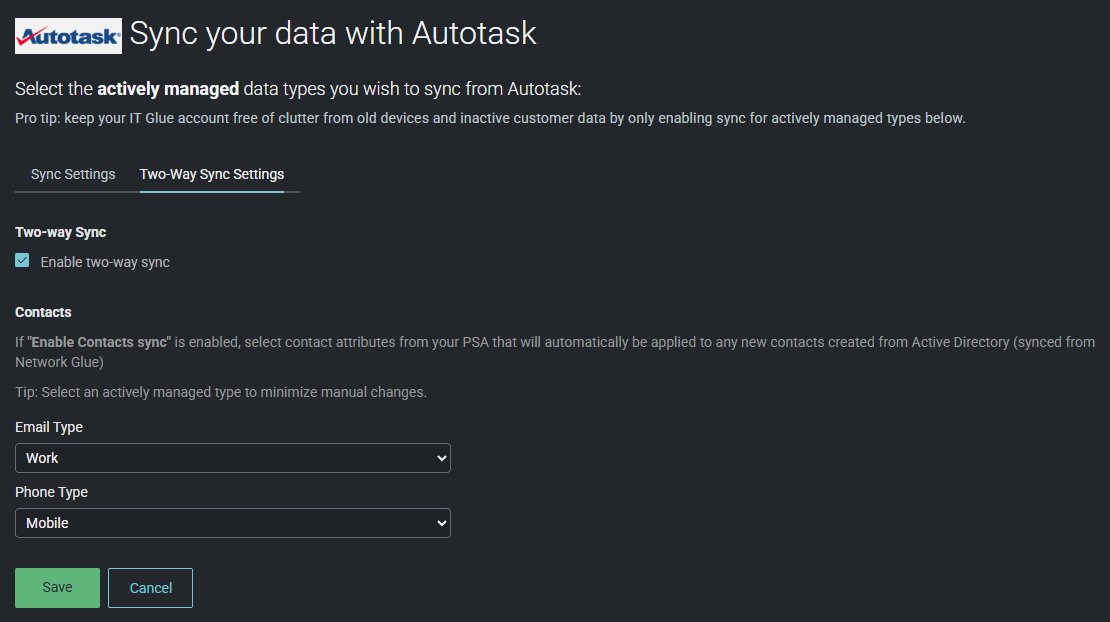
- The Contacts section is available only if the Enable Contacts sync check box is selected in the Sync Settings tab.
- Click Save. An integration sync is automatically queued on the Active Integrations page.
If you are a Network Glue and Active Directory customer, you can configure your contact attributes so that new contacts created from Active Directory are automatically pushed to Autotask. Learn about enriching IT Glue contacts with Active Directory user data in the IT Glue Help system. Select the Autotask Email Type and Phone Type that will be applied to the new contacts pushed to Autotask. If you select None, new contacts created from Active Directory are not automatically pushed to Autotask.
NOTE By default, newly queued syncs are scheduled to take place one hour later. From the more menu ![]() in the Autotask connector, select Start Manual Sync to initiate immediate syncing.
in the Autotask connector, select Start Manual Sync to initiate immediate syncing.
IT Glue will begin to import and match your Autotask data. During this process, the Status column displays Syncing. When the process finishes, the Status column changes to OK, and you will receive an email notification.
Once the sync starts and is in progress, you will begin to see logs on the Autotask Sync Logs page (by selecting Logs from the more menu ![]() in the Autotask connector). When the sync is complete, a final completion log appears.
in the Autotask connector). When the sync is complete, a final completion log appears.
Syncing SSL certificates from Autotask
To sync SSL certificates from Autotask, complete the following steps:
-
To enable the sync of SSL certificates from Autotask to IT Glue, the SSL certificate should first be added as a device in Autotask. Refer to Creating an SSL Certificate device.
-
These SSL certificates can now be synced as configurations in IT Glue, where only the fields specified in the field mapping KB will be synchronized.
Inviting Autotask users to your IT Glue account
When you initially set up the integration, you will see a list of all licensed users in your Autotask account on the next page. You have the option to invite any, all, or no users from this list to your IT Glue account.
By default, IT Glue selects all users to be invited. If you don’t yet want to send invitations to all users, be sure to individually clear the check boxes next to any users you plan to invite later or not at all. Next, click Invite Users.
If you're not ready to invite users to this integration, skip this step entirely by clicking Skip. Whenever you are ready to invite users, refer to Invite suggested Autotask users to IT Glue.
If you are a new Autotask customer and have already been using IT Glue, you have the option to push all your IT Glue data to Autotask at once.
This push allows you to quickly and conveniently populate your BMS account with all your well-maintained IT Glue records. If you opt for two-way syncing, performing this push prevents you from having to manually edit and save each IT Glue record in order for it to sync to BMS.
NOTE This push will not include any parent-child relationships configured within IT Glue. You will need to establish those parent-child relationships within Autotask afterward.
Through this action, eligible IT Glue organizations, configurations, contacts, and locations are pushed to Autotask. Before you perform this action, you should create any custom device types you would like to be able to apply to Autotask devices and subsequently sync to IT Glue configurations. To do so, navigate to Admin > Features & Settings > Devices > Device Types in Autotask.
IMPORTANT Enabling and usage of this feature is an irreversible action that cannot be undone by IT Glue. If you already have organizations, devices, and contacts configured in Autotask, this action has the potential to create duplicate records due to the absence of matching logic in this feature.
After reviewing the preceding information, complete the following steps in IT Glue to perform the one-time push and undergo a review of viability by your account manager:
- From the top navigation menu, click Admin.
- From the left navigation menu, click Integrations.
- From the more menu in the Autotask connector, select Push All.
- Contact your account manager to request more information on this service. They will coordinate with you on next steps and review the details of your account setup to ensure the environment is ready for this push by meeting the following requirements:
- No data already exists in Autotask that will create duplicate records.
- You have selected viable Autotask organization types and classifications, device types, and ticket queues to sync in the integration sync settings. Refer to Configure Autotask sync settings in IT Glue.
- After the review, Kaseya will enable the push. You can navigate to the Active Integrations page to check the status of the sync in the Status column.
Once the sync starts and is in progress, you will begin to see logs on the Autotask Sync Logs page (by selecting Logs from the more menu ![]() in the Autotask connector). When the sync is complete, a final completion log appears.
in the Autotask connector). When the sync is complete, a final completion log appears.
After the initial data sync, the integration automatically initiates regular syncing to populate the most up-to-date synced data in your integrated platforms. The Manage Autotask Data page provides a real-time summary of sync performance and the ability to manage every IT Glue record included in the syncs from a single view.
From this page, you can check the following sync results in a summarized format and perform the following actions:
- View the number of Autotask records synced to IT Glue from each category.
- View whether or not syncing is enabled and active for each category.
- View the orphaned records that are no longer syncing because they have either been deleted in Autotask or were changed to a type/classification that you do not have enabled for syncing.
- View the IT Glue records that have been disconnected from syncing with Autotask.
- Use the more menu to view and manage a list of synced records in IT Glue from each category, including the option to open the records in IT Glue.
- Identify whether records are enabled for syncing
 , orphaned
  , or affected by a sync error
  .
. - Disconnect records, delete orphaned records, or reconnect disconnected records.
- Open the applicable pages to edit synced records in IT Glue
 .
. - Quickly view who has access to certain configurations
 .
.
Complete the following steps to navigate to the Manage Autotask Data page in IT Glue at any time:
- From the top navigation menu, click Admin.
- From the left navigation menu, click Integrations.
- From the more menu in the Autotask connector, select Manage Data.
The IT Glue lists and detail pages for organizations, configurations, contacts, and locations included in Autotask syncs display the sync details.
In IT Glue, navigate to these records as follows:
- From the top navigation menu, click Organizations.
- Select an organization that is synced with an Autotask organization. On the organization page that opens, you'll see the Autotask sync status at the top of the page.
- You'll also see the sync status and details on the selected organization's configuration, contact, and location lists and detail pages if the records are synced with Autotask devices, contacts, and locations, respectively. From the left navigation menu, click Configurations, Contacts, or Locations.
NOTE You can also navigate to these detail pages directly from the Manage Autotask Data page. Refer to Review and manage the data synced from Autotask to IT Glue.
From the lists on the Configurations page, Contacts page, or Locations page, the List View Options icon ![]() allows you to select which columns should be visible in the list. Select Sync Status from the list to show the Sync Status column. The selection will persist the next time the page is accessed.
allows you to select which columns should be visible in the list. Select Sync Status from the list to show the Sync Status column. The selection will persist the next time the page is accessed.
You can filter the list by sync status by clicking into the filter bar at the top of the list, selecting Sync Status, and selecting a status from the list. Repeat this process to filter by multiple sync statuses at once.
NOTE If no records have a certain status, that status is not available as a filter option. In this example, no records are orphaned, so orphaned is not displayed for selection.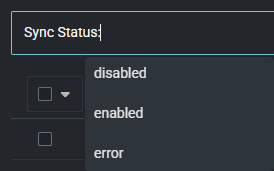
The Sync Status column displays the Autotask sync status.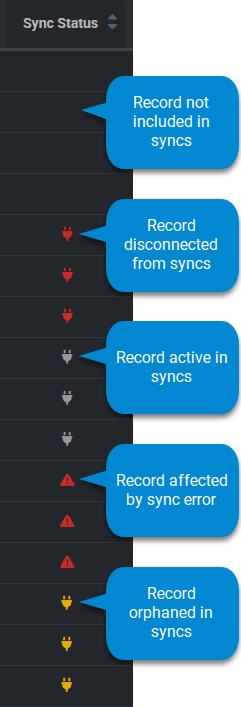
Sync status indicator
Upon clicking a record, the top of the page displays one of the following sync status indicators:
-
 Sync enabled: This record is actively syncing with Autotask.
-
 Sync orphaned: This record is orphaned (no longer syncing) with Autotask because it was either deleted, invalid, or no longer satisfies your sync settings.
-
 Sync disabled: This record is disconnected from syncing with Autotask.
Sync status details
The bottom of the page displays the sync details. The following links are available:
- Manage: Opens the corresponding record in a new tab in Autotask.
- Sync now: Initiates an immediate sync for only this record to pull the latest changes from Autotask.
- Enable sync OR Disable sync: Immediately enables syncing of this record with Autotask OR disconnects this record from syncing with Autotask.
EXAMPLE This record is actively syncing with Autotask. The latest change to the record in Autotask was made six months ago, and that change was synced to the IT Glue record at that time.
EXAMPLE This record is orphaned (no longer syncing) with Autotask because it was either deleted, invalid, or no longer satisfies your sync settings. If you don't wish for this record to be orphaned, you can recreate or try editing the record in Autotask, delete the record in IT Glue if no longer needed, or edit your sync settings to capture this record.
EXAMPLE This record is disconnected from syncing with Autotask.
EXAMPLE This record is not syncing with Autotask because of a sync error. You have the option to open the error details or try editing and saving the record to trigger a push. You are not required to make any changes when editing the record.
BEFORE YOU BEGIN An Autotask ticket's queue must be selected for syncing in the Autotask integration sync settings in IT Glue. Refer to Configure Autotask sync settings in IT Glue.
In IT Glue, navigate to synced Autotask ticket details as follows:
- From the top navigation menu, click Organizations.
- Select an organization that is synced with an Autotask organization.
- From the left navigation menu, click Tickets.
- Select a synced ticket in the list.
The ticket detail page displays a summary of the Autotask ticket fields as well as the sync status. To open the actual ticket in a new tab in Autotask, click Manage in the sync details at the bottom of the page.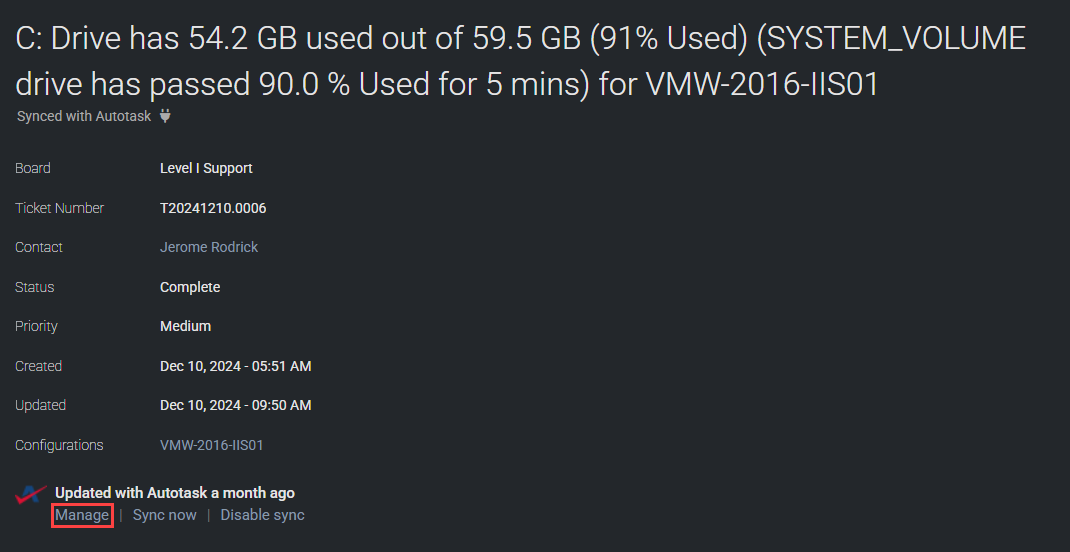
These instructions will streamline your workflow for inviting any Autotask users who don't yet have access to the integrated IT Glue account. An Autotask user refers to any licensed user account in your Autotask instance.
Complete the following steps in IT Glue:
- From the top navigation menu, click Admin.
- From the left navigation menu, click Users.
- Click the Suggested tab to see a list of Autotask users who are not already IT Glue users.

- Clear the check boxes next to any users you don't want to invite. All are selected by default.
- Scroll to the bottom of the list, and click Invite Users to proceed to the next page, where you can invite the selected individuals.
- You can specify the role, group membership, and organization access each user will have.
- Click Save to trigger an email to each user with a preloaded invitation message.
Each user account will have the same role, group membership, and organization access. If you want to make changes, you can edit individual users after sending the invitation. Learn about new user account setup in the IT Glue Help system.
IT Glue updates the Suggested users list as new users are added to your Autotask account, so you can visit the list any time to invite new Autotask users to IT Glue.
If device types are blank in Autotask, they are displayed as Autotask Default configuration types in IT Glue. You must change the device types to the appropriate type (for example: server, workstation, and so forth) for those records to be properly imported into IT Glue and facilitate the documentation and data retrieval process.
The administrator of the integration can complete the following steps in Autotask to correct this issue:
- Navigate to Admin > Features & Settings > Products, Services, & Inventory > Products.
- Enter a keyword (server, for example) in the Product Name field, and click Search.
- Open each item in the Product Category list and set the Default Device Type. For example, if the Product Category is Server, then change the Default Device Type to Server. Repeat for all product categories that are destined for IT Glue (for example: laptop, desktop, and so forth).
The Autotask device types will be correctly categorized in IT Glue after the next sync.
If a user with Admin permissions for Kaseya Integrations has enabled and configured the integration with IT Glue, all users will see the IT Glue tab on their user profile page. If you have an IT Glue user account, you now have the option to connect it to your Autotask user account.
NOTE You can also connect from the IT Glue Checklists tab on the organization accessory tabs. Refer to Establishing a connection in Work with IT Glue checklists embedded in Autotask.
To connect to IT Glue from Autotask, complete the following steps:
- From the top navigation menu, navigate to My > Miscellaneous > Profile.
- Click IT Glue.
- Click Establish Connection.
- From the IT Glue login page that opens in a new tab, log in to your IT Glue user account.
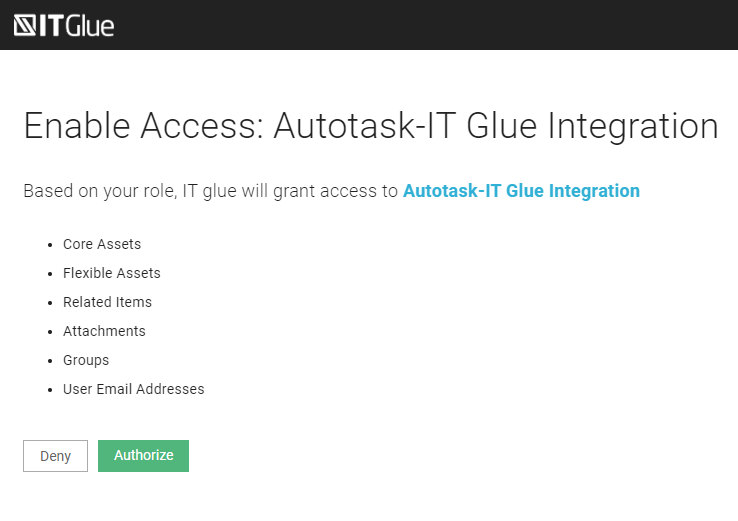
- Click Authorize to authenticate the connection.
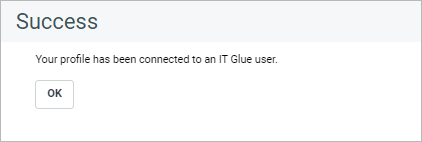
- In Autotask, a dialog box will confirm that your profile is now connected to your IT Glue user account.
To add a new checklist or prebuilt checklist to an organization in IT Glue, complete the following steps:
- From the top navigation menu, click Organizations.
- Select an organization that is synced with an Autotask organization.
- From the left navigation menu, click Checklists.
- From the New drop-down menu, you have the following options:
- Select a checklist template, which you have the option to edit.
- Select New Checklist to create a checklist from scratch.
- The checklist is automatically added to the organization's list of available checklists and can be edited any time. Checklist edits in IT Glue are reflected in the Autotask tickets the checklists appear in.
Users with Admin permission to configure Checklists & Templates can map a library checklist in Autotask to an IT Glue checklist template as follows:
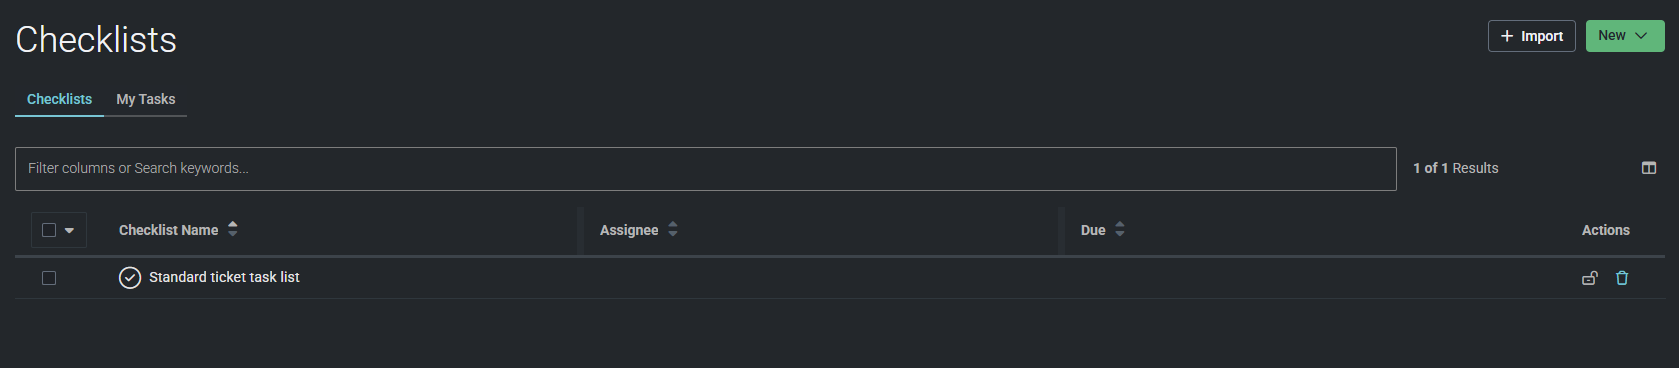
- In Autotask, navigate to Admin > Automation > Checklists & Templates > Checklists.
- To create a new checklist, click New Checklist. To edit an existing checklist, select Edit from the context menu.
- From the IT Glue Checklist Template drop-down menu, select a checklist template. All checklist templates are available.
- Once you select a template, a preview of the current checklist items in IT Glue will be displayed.
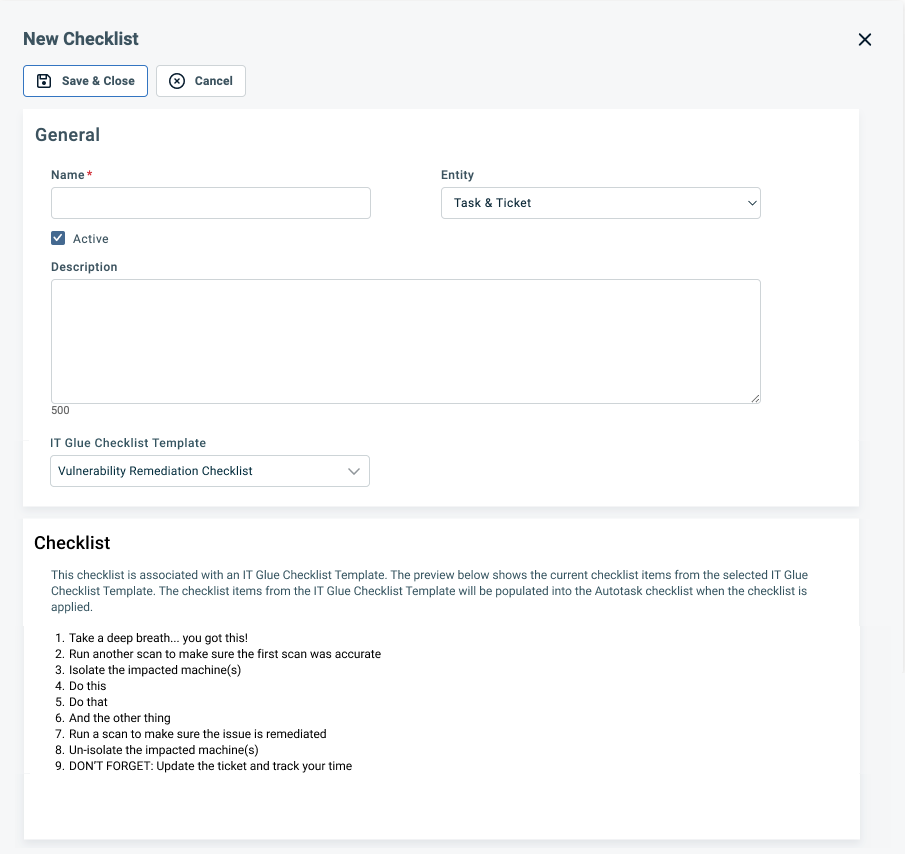
- The checklist items from the IT Glue checklist template will be populated into the Autotask checklist when the checklist is applied to a ticket.
- On the Checklist Library page, a check mark in the IT Glue Checklist column indicates the checklist is associated with an IT Glue checklist template. Hover over the check mark to see the name of the IT Glue checklist in a tooltip.
- This option is available only for ticket checklists.
- Click Save. Checklists associated with an IT Glue checklist template cannot be edited.
NOTE You cannot manually create additional checklist items if you associate an IT Glue checklist template.
Learn more about the checklist library in the Autotask Help system.
On tickets only, users who have the integration with IT Glue enabled can generate an Autotask ticket checklist from an IT Glue checklist template.
To select an IT Glue checklist template in Autotask, complete the following steps:
- Create a new ticket or edit an existing ticket.
- In the ticket Checklist section, click Add from IT Glue.

- From the Select Checklist drop-down menu, select an IT Glue checklist. A preview of the checklist items will be displayed.
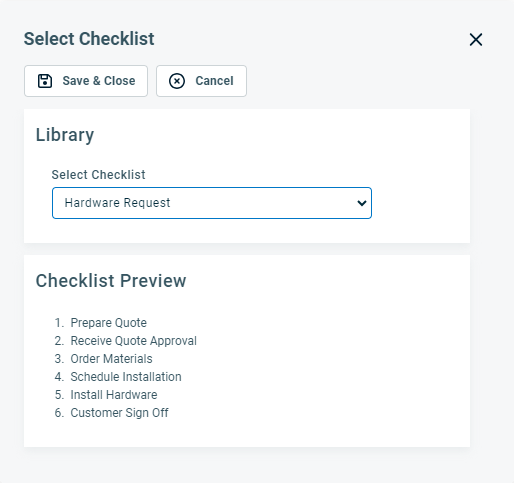
- Click Save & Close. The checklist tasks will be added to the Autotask checklist as items, but assignees and due dates will not be created.
IMPORTANT Once added to the ticket, you will be able to manage the checklist like any other Autotask checklist. No restrictions will be placed on items originating from IT Glue checklist templates. It will not be linked back to IT Glue.
Learn about tickets and checklists in the Autotask Help system.
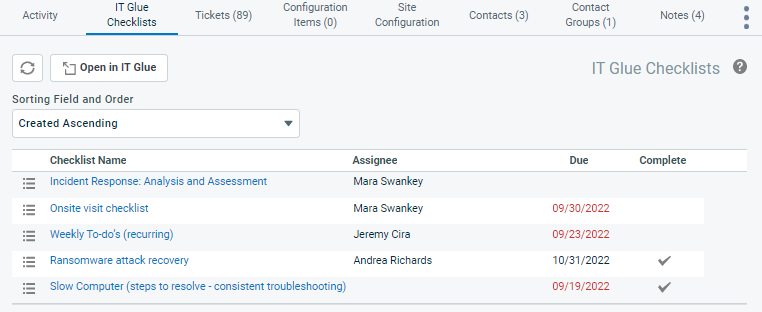
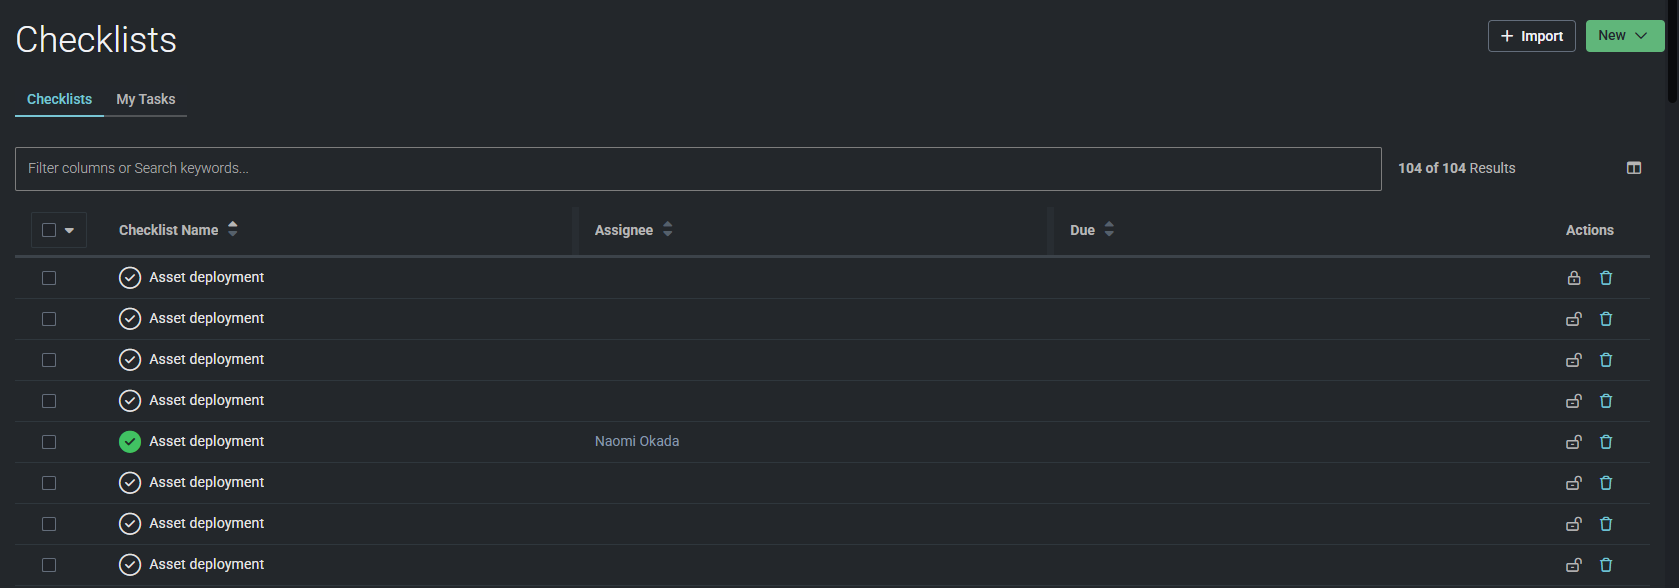
The IT Glue Checklists tab appears on the accessory tabs of the organization page via CRM > Organizations. Click an organization and click the IT Glue Checklists tab. On this tab, you can establish the connection between your Autotask and IT Glue user accounts.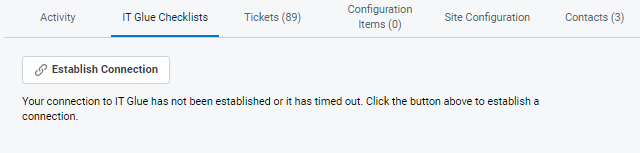
Once established, you can open IT Glue checklists in Autotask or IT Glue and complete checklists and individual tasks.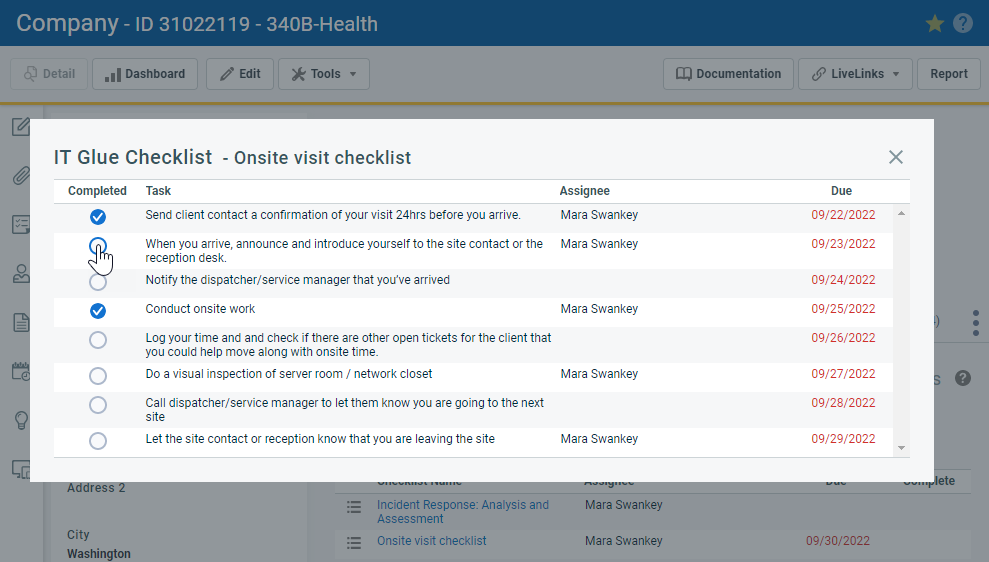
Permission to view and complete checklists is set by your IT Glue account permissions. You will be able to access the same checklists as in IT Glue.
If no checklists exist because the organization is not synced with IT Glue, this is stated in Autotask.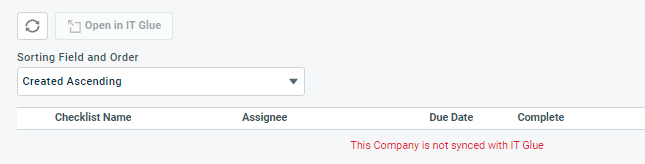
If not already completed in Establish a connection on the IT Glue tab in Autotask, complete the following steps to connect to IT Glue from the IT Glue Checklists tab:
- Click Establish Connection.
- From the IT Glue login page that opens in a new tab, log in to your IT Glue user account.
- Click Authorize to authenticate the connection.
- In Autotask, a dialog box will confirm that your profile is now connected to your IT Glue user account.
| Name | Description |
|---|---|
|
|
Click the refresh icon to execute the search on the current table again, using the same search criteria to find new records that were added since you first performed the search. |
|
Open in IT Glue |
When you click this button, IT Glue is launched to the Checklists page of the selected organization. The list of checklists is the same as in Autotask, but in IT Glue, you can also create new checklists for the organization. |
|
Sorting Field and Order |
Select how you would like to sort the checklists in Autotask. |

| Option | Description |
|---|---|
|
Complete / Uncomplete |
When you select this option, you complete the entire checklist. A check mark will appear on the table row in both Autotask and IT Glue. Selecting Un-complete Checklist will revert the status. NOTE Unlike in Autotask checklists, the individual tasks in the checklist will not be set to complete. |
|
Opens the specific checklist in IT Glue to the list of tasks. |
In Autotask, checklist names appear as hyperlinks. Clicking a checklist name will open the list of tasks that are part of the checklist and allow you to complete individual tasks.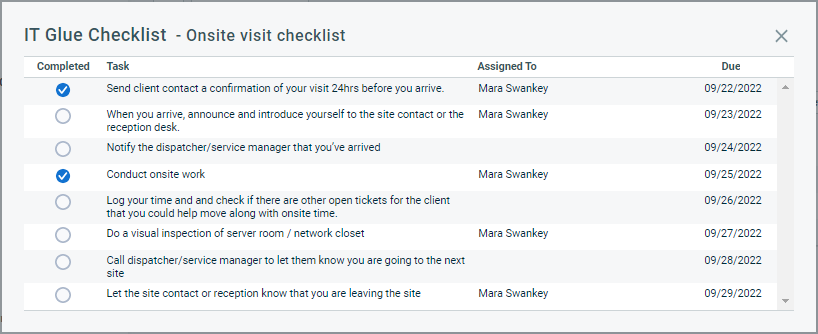
If you need to add tasks, you must open the checklist in IT Glue.
As an IT Glue Administrator or Manager, you can set up ticket rules that will allow for the suggestion of any IT Glue documents, passwords, and flexible assets related to the Autotask ticket your technician is working on. The technician must have the necessary access and permissions to view the IT Glue documentation that is suggested in Autotask tickets.
This workflow integration will help eliminate the time your technicians currently spend on switching between platforms to search for relevant information in IT Glue when resolving tickets. By setting up these ticket rules, you can make your ticketing resolution process in Autotask even more efficient. To learn how to leverage this feature within Autotask once ticket rules are set up, refer to View IT Glue insights in Autotask tickets.
Prebuilt Autotask ticket rules in IT Glue
As follows are the Autotask ticket rules available for you to use out of the box in IT Glue:
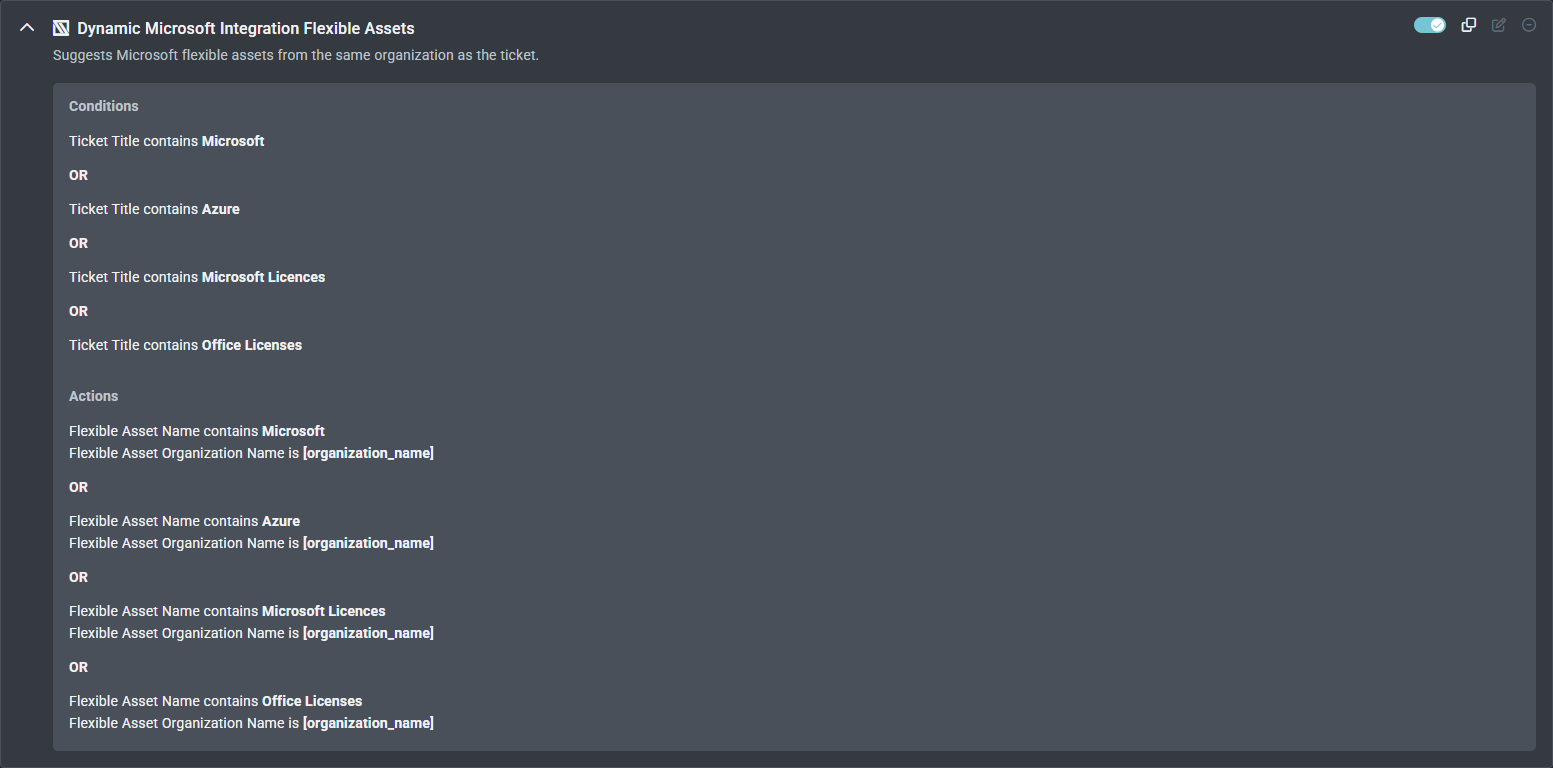
- Dynamic Microsoft Integration Flexible Assets: Suggests Microsoft flexible assets from the same organization as the ticket.
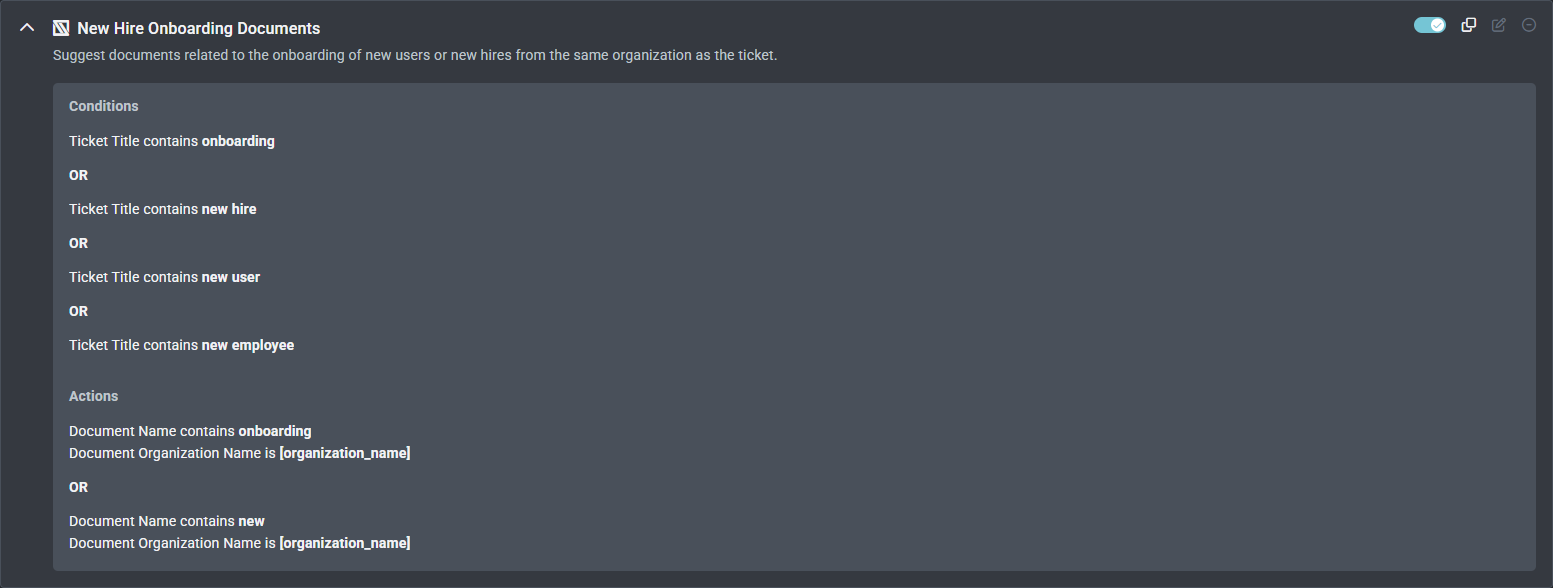
- New Hire Onboarding Documents: Suggests documents related to the onboarding of new users or new hires from the same organization as the ticket.
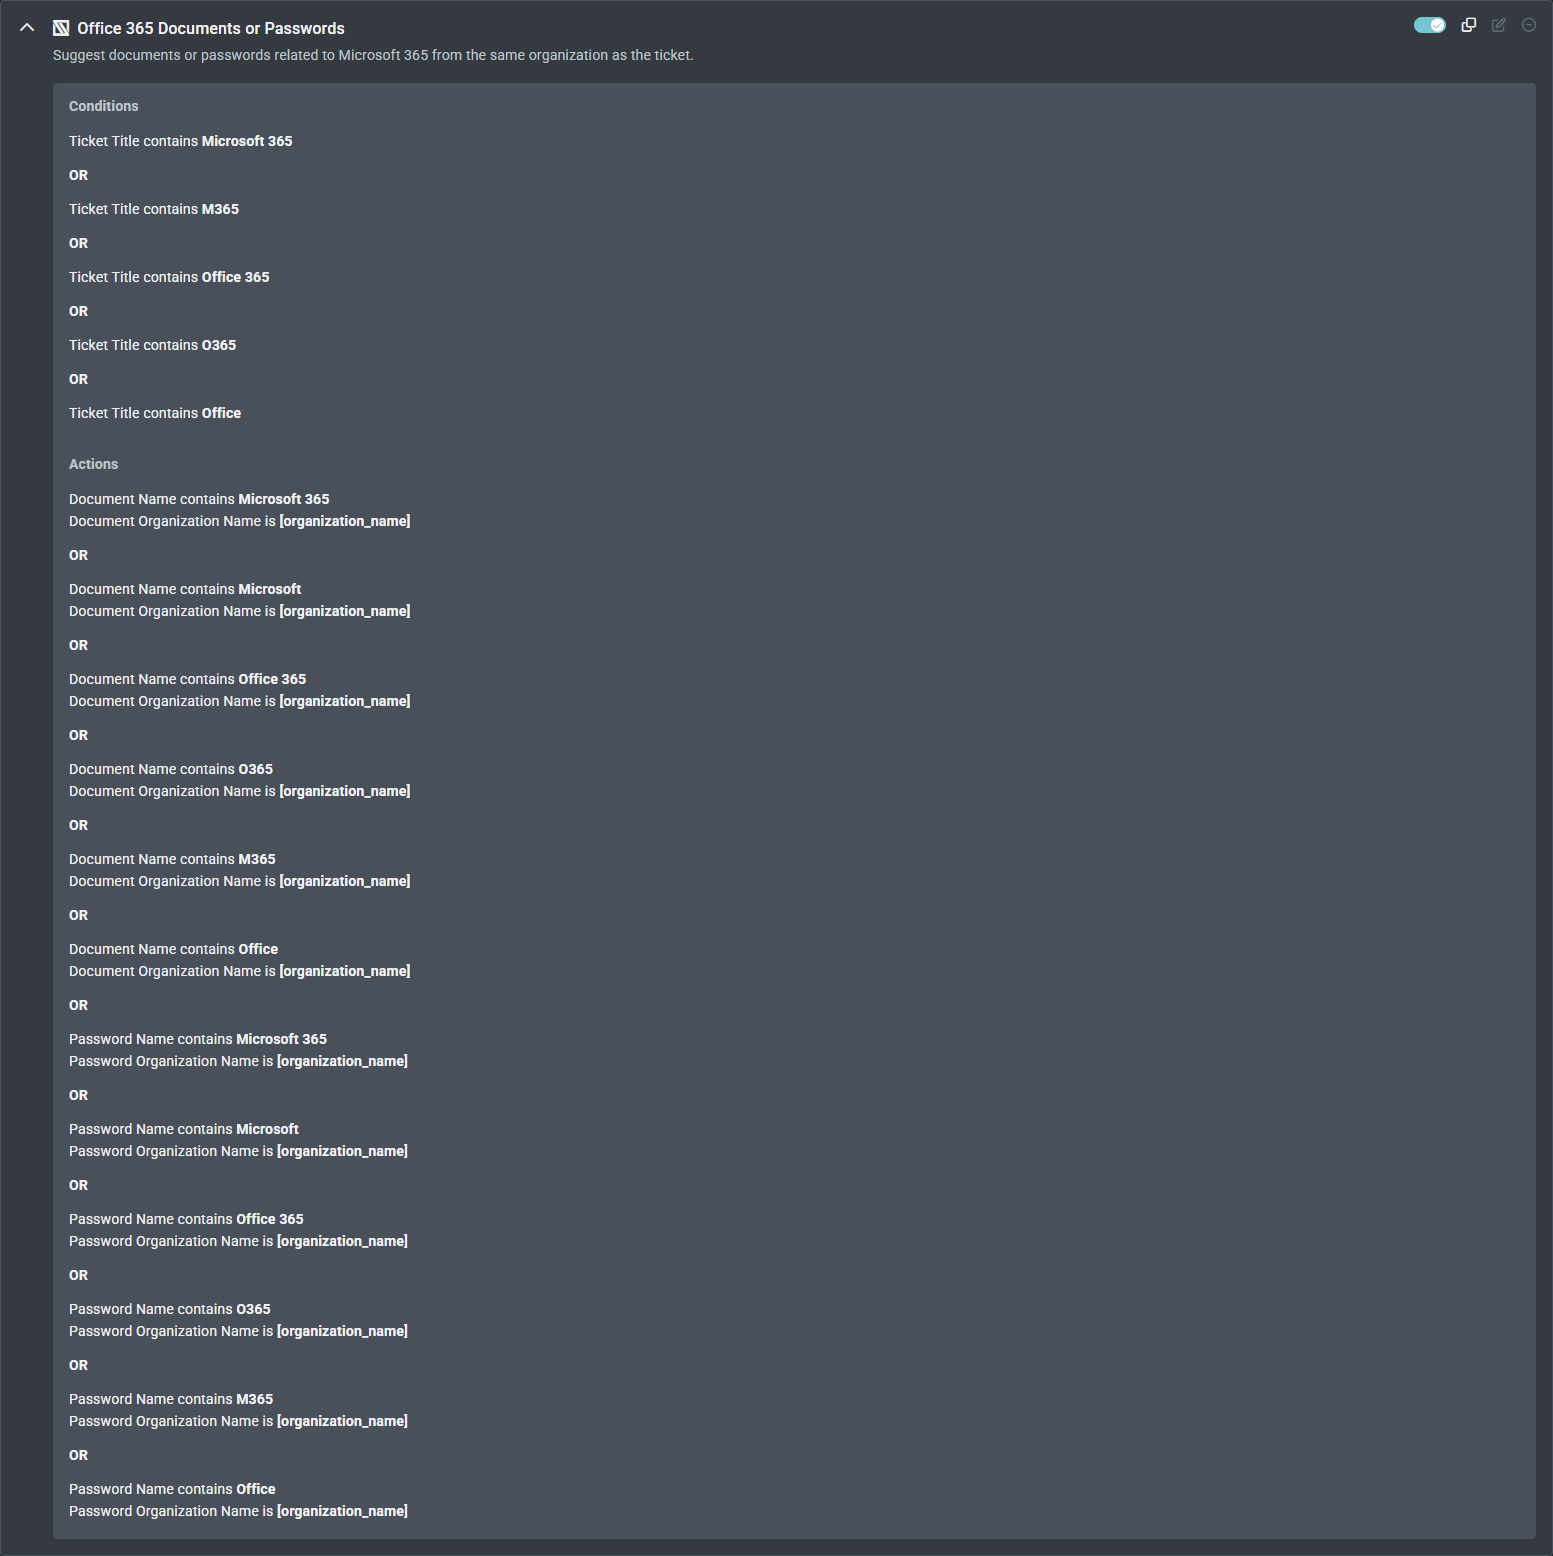
- Office 365 Documents or Passwords: Suggests documents or passwords related to Microsoft 365 from the same organization as the ticket.
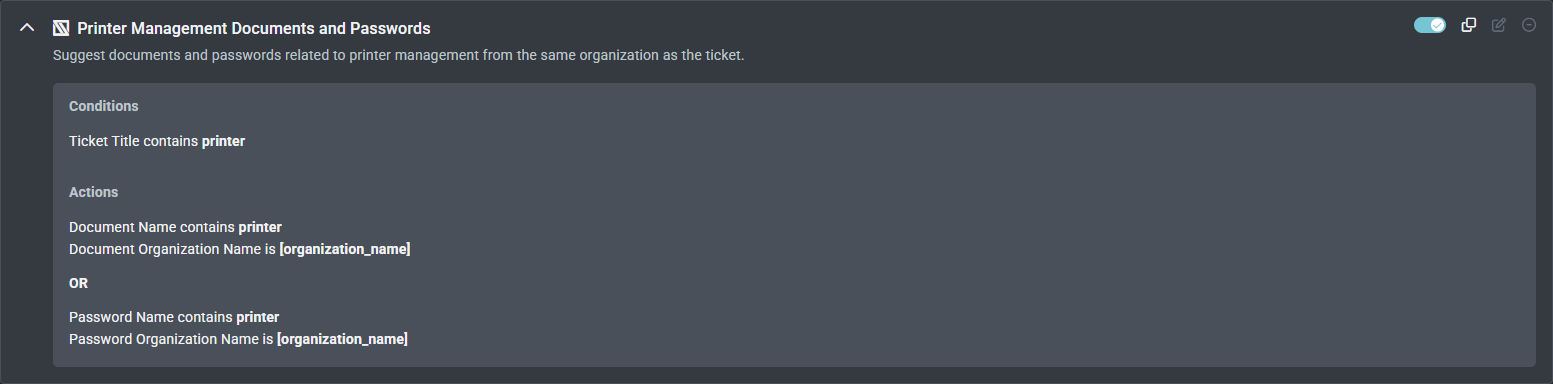
- Printer Management Documents and Passwords: Suggests documents and passwords related to printer management from the same organization as the ticket.
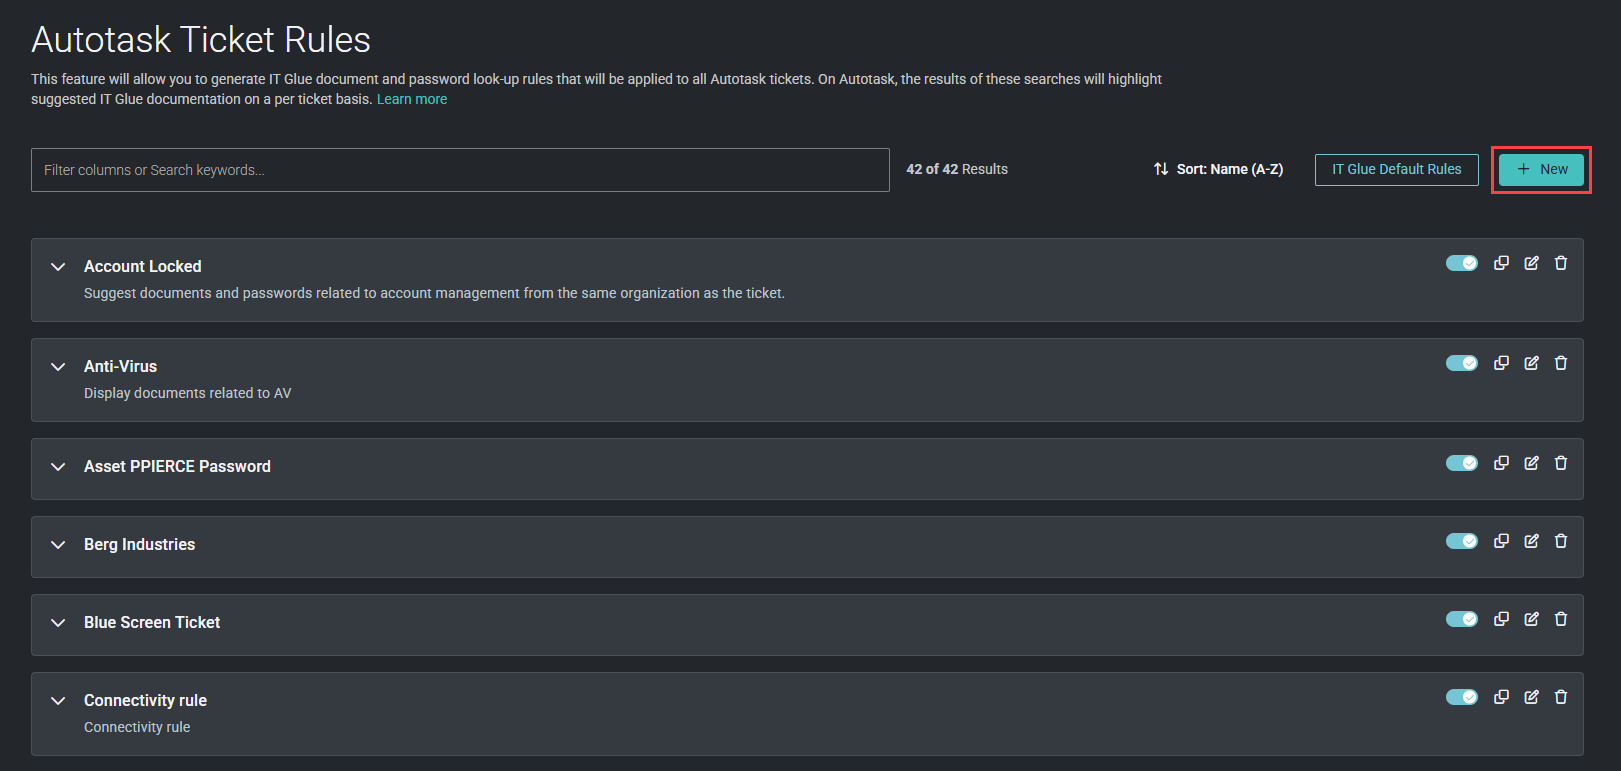
- From the top navigation menu, click Admin.
- From the left navigation menu, click Autotask Ticket Rules.
- In the upper-right corner of the page, click New.
Step 1: Details
- Enter a name for the new ticket rule. You can add or edit this name any time during the ticket rule creation process.
- To aid in organization of this ticket rule and those you may create in the future, enter a description.

- Click Next.
Step 2: Conditions
In the Conditions step, you'll specify the criteria of the Autotask tickets this ticket rule will apply to. The condition fields constitute the attributes of an Autotask ticket that will trigger particular documentation to appear as IT Glue insights in the Autotask ticket.
The first drop-down menu allows you to select an Autotask ticket attribute.
The second drop-down menu allows you to select an operator (contains, is, or is not). If you select contains, IT Glue will detect only complete words in the specified order and will not produce the match you are seeking if other words are interrupting the string of words you intend to match on.
The text box allows you to enter the value that the selected ticket attribute contains, is, or is not. Enter only one value per field. Values are not case sensitive. IT Glue will present exact text matches for the results based on the rules set up.
EXAMPLE You set up the ticket rule to return documents for any ticket that contains print in the ticket title. Items containing prints, printer, printed, printing, and so forth will not be returned. Only items containing print will be returned. As the matching is not case sensitive, items containing Print, PrInT, PRINT, and so forth will be returned.
You can add multiple ticket conditions for the system to detect using the Add parameter. Add, in this case, functions as x or AND logic.
The OR parameter functions loosely as + logic. You can have multiple additions grouped and separated by OR statements. To be returned, a ticket must meet at least one of the conditions separated by OR statements.
When finished configuring the ticket conditions, click Next.
Step 3: Actions
In the Actions step, you'll specify what IT Glue documentation will be surfaced in the Autotask ticket(s). Ticket actions present the attributes of the IT Glue documentation that will be displayed for all Autotask tickets meeting the conditions set in the Conditions step.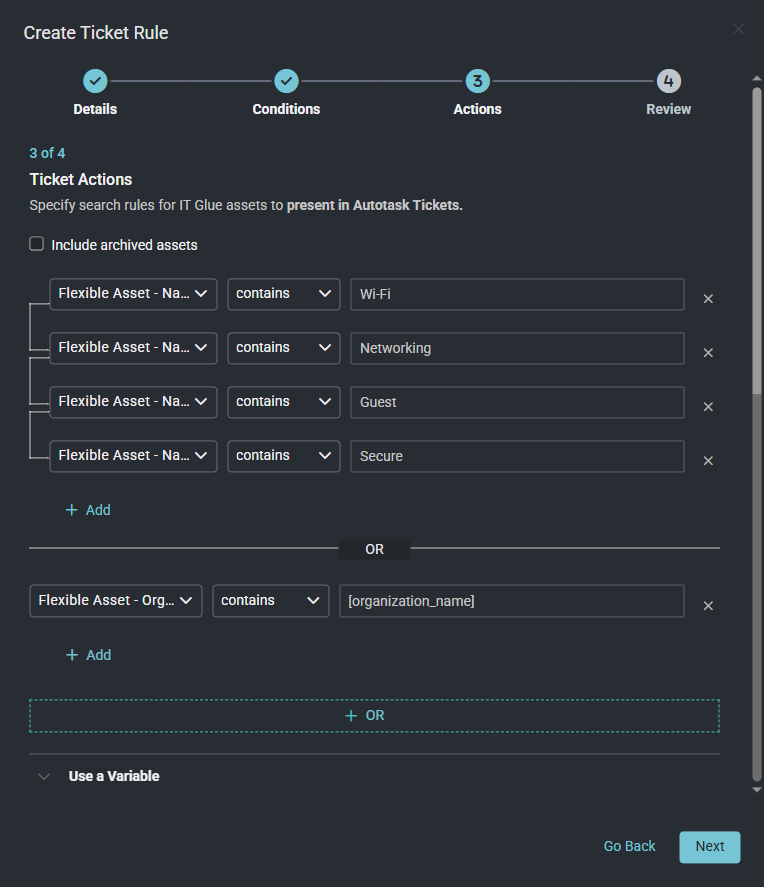
The first drop-down menu allows you to select an IT Glue documentation attribute.
The second drop-down menu allows you to select an operator (contains, is, or is not). If you select contains, IT Glue will detect only complete words in the specified order and will not produce the match you are seeking if other words are interrupting the string of words you intend to match on.
The text box allows you to enter the value that the selected documentation attribute contains, is, or is not. Enter only one value per field. Values are not case sensitive. IT Glue will present exact text matches for the results based on the rules set up.
You can add multiple ticket actions for the system to detect using the Add parameter. Add, in this case, functions as x or AND logic.
The OR parameter functions loosely as + logic. You can have multiple additions grouped and separated by OR statements. To be returned, a ticket must meet at least one of the conditions separated by OR statements.
TIP Kaseya recommends keeping these rules within bounds by configuring unique rules to surface a unique set of passwords or unique set of documents, for example. Catch-all rules or overly specific rules will not add value to this feature.
Using variables
You can use [organization_name] as a variable to create a single ticket action that links documentation from the same organization the ticket belongs to.
Simply add Document - Organization Name – is – [organization_name] OR Password - Organization Name – is – [organization_name] OR Flexible Asset - Organization Name – is – [organization_name] to have documents or passwords or flexible assets from each ticket’s respective organization appended accordingly.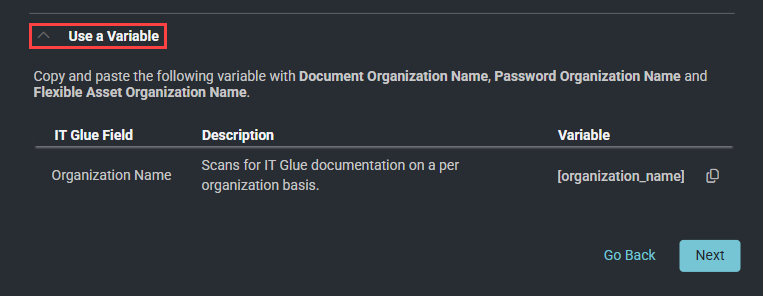
When finished configuring the ticket actions, click Next.
Step 4: Review
In the Review step, you can see the full logic of the rules you configured in the Conditions step and Actions step. To make any revisions, click Go Back.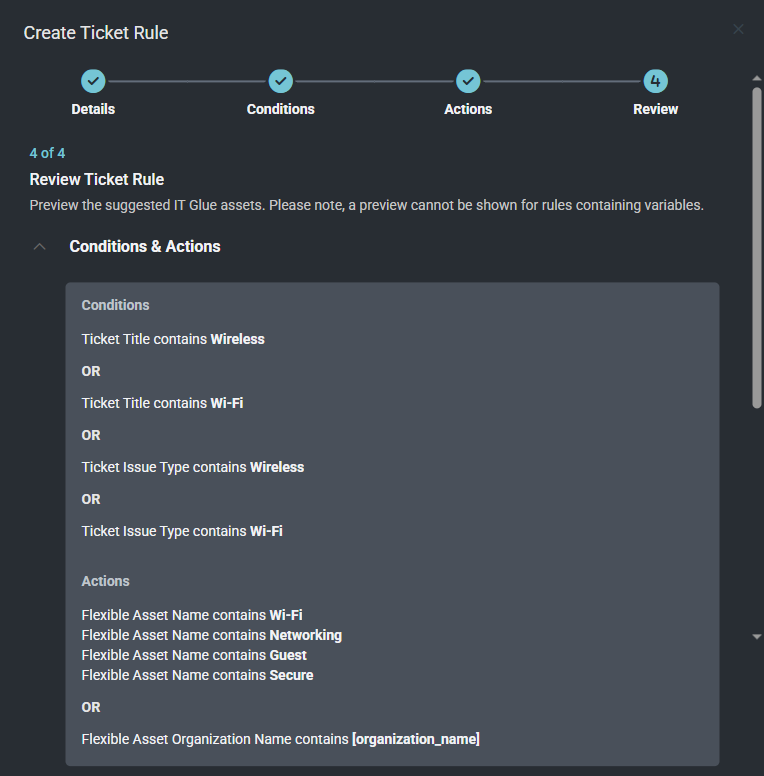
The Review step also provides you a sneak peek of what IT Glue documentation your ticket rules will surface in Autotask tickets.
NOTE If you used the [organization_name] variable in the Actions step, you do not see any results in the preview. Rest assured, your ticket rule is still working.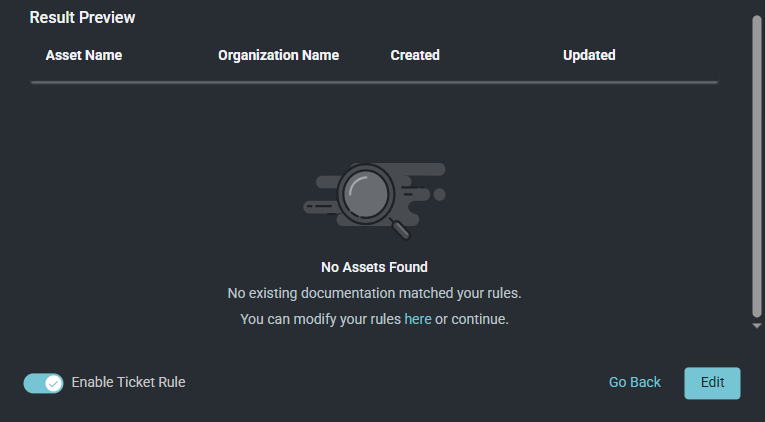
The Enable Ticket Rule toggle is turned on by default, which allows respective results to appear in your Autotask tickets. If you turn off this toggle, the results will not appear in Autotask tickets for now. Turning off the toggle is recommended if the ticket rule you are configuring is in a draft state but you wish to further edit and activate it in the future.
When ready to save the new ticket rule, click Create.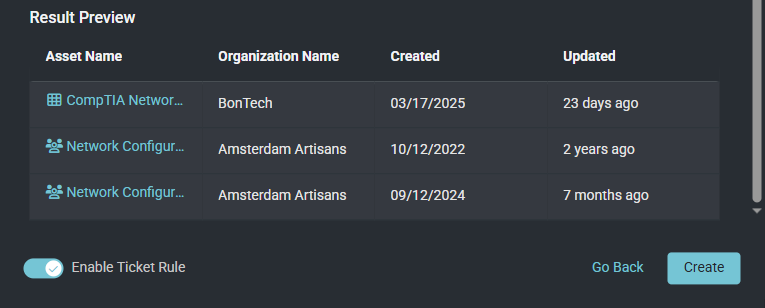
To view and manage all of the existing Autotask ticket rules in IT Glue, navigate to Admin > Autotask Ticket Rules.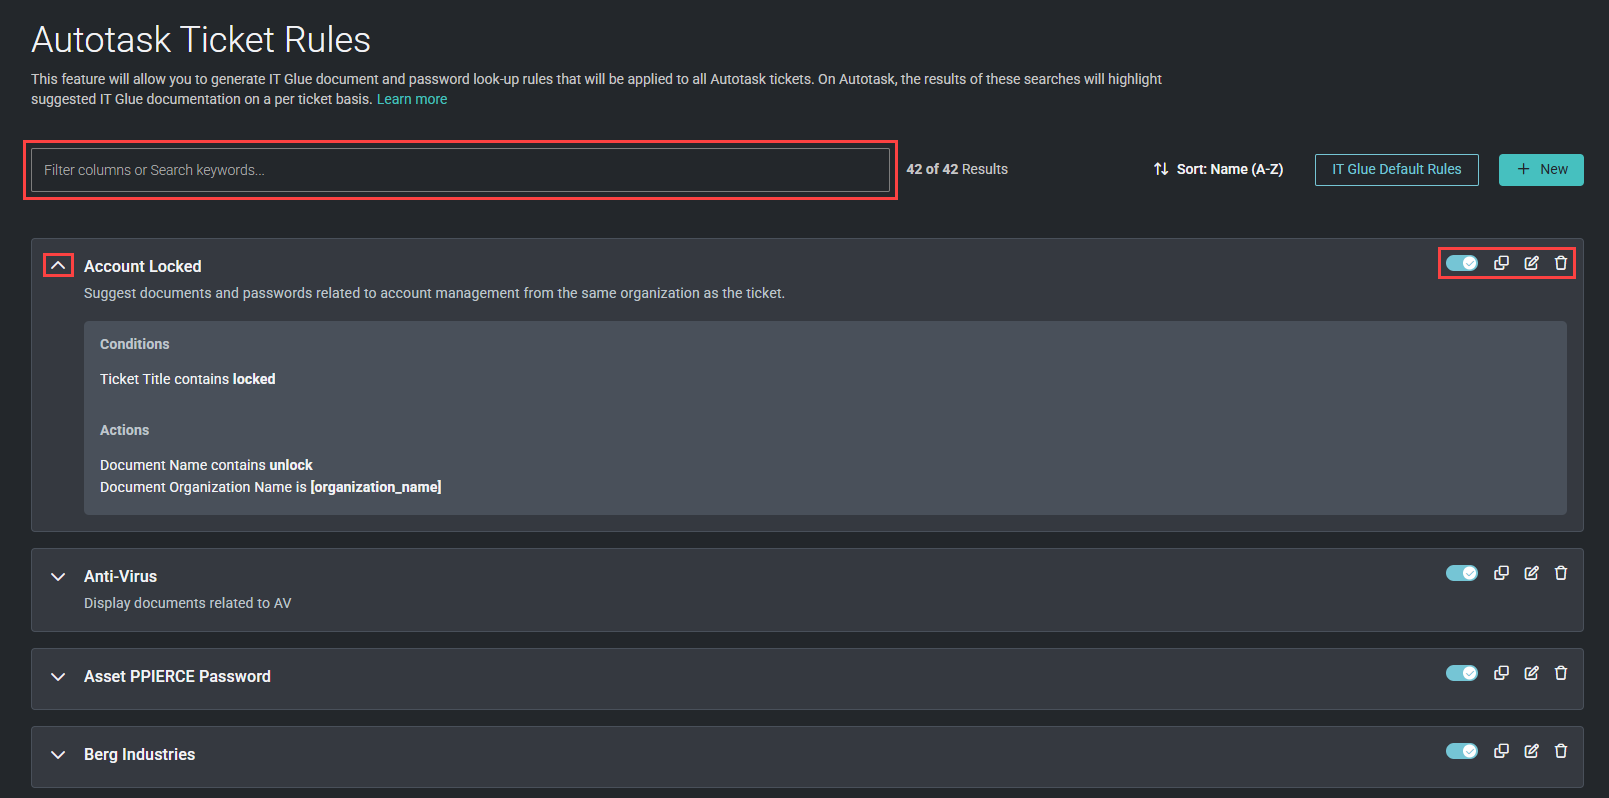
Use the filter/search bar at the top of the page to quickly locate a ticket rule by its name, status, or other keywords.
Each rule displays its name, description (if populated), and status, which can be toggled on or off to activate or deactivate the rule, respectively. After a toggle is turned on, the ticket rule is applied to your Autotask tickets after some time. Turning off a rule toggle rather than deleting the rule completely allows you to save its configuration for potential future use.
Expand a rule to view its conditions and actions. You can edit or delete a rule by clicking its pencil icon ![]() or trash can
or trash can ![]() icon, respectively.
icon, respectively.
Rather than creating a new rule from scratch, you may want to copy an existing rule with settings similar to the new one you wish to create by clicking its copy icon ![]() . The copied rule name will contain Copy of by default. You'll want to edit the rule name, edit the settings as necessary, and save the new rule.
. The copied rule name will contain Copy of by default. You'll want to edit the rule name, edit the settings as necessary, and save the new rule.
For a list of the ticket rules that are prebuilt for your use in IT Glue, refer to Prebuilt Autotask ticket rules in IT Glue.
To restore deleted prebuilt ticket rules, complete the following steps in IT Glue:
- On the Autotask Ticket Rules page, click IT Glue Default Rules.
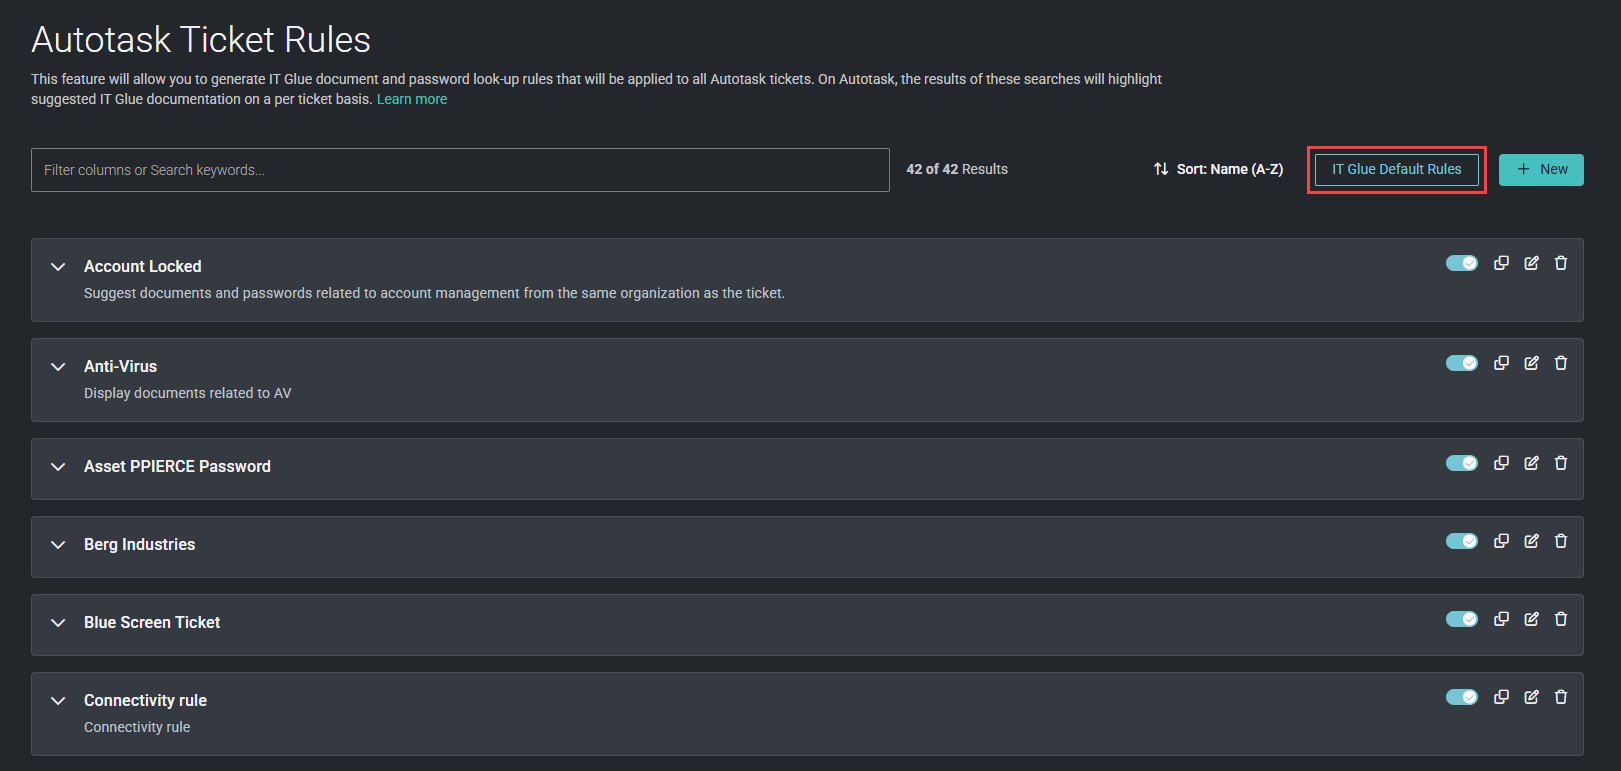
- Click Add to recover the deleted rule. Once re-added, the rule is active in Autotask tickets by default.

IT Glue insights are available to add to ticket categories in Autotask for users with Admin permission to configure Service Desk (Tickets).
For these insights to appear for a resource, the IT Glue integration must be enabled and the resource must have connected their Autotask user account to their IT Glue user account.
Technicians have access to IT Glue documents, passwords, and flexible assets right from an Autotask ticket. Three ticket insights are available:
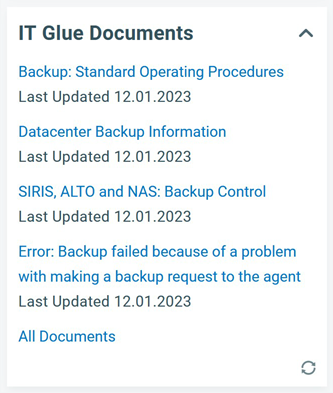
- IT Glue Documents
- IT Glue Passwords
- IT Glue Flexible Assets
When you view a ticket with an IT Glue insight, the following happens:
- Autotask passes information from the ticket to IT Glue. IT Glue processes the attributes through its rules engine and retrieves items that are relevant to the current ticket, devices associated with the ticket, and the ticket organization. For information on setting up these rules, refer to Configure ticket rules for suggested IT Glue documentation in Autotask tickets.
- The insight displays the Title and Last Updated Date of up to five items. If more than five items are available, clicking All at the bottom of the insight opens a list of up to 30 relevant items. The Title field is a hyperlink. Clicking the link launches a new window that opens the item in IT Glue.
To access IT Glue insights in Autotask, navigate to Admin > Features & Settings > Service Desk (Tickets) > Ticket Categories > context menu for selected category > Edit > Insights > IT Glue insights.
IMPORTANT Insights need to be added to a ticket category to be visible, and the integration must be enabled at both the database and resource levels. Learn about adding insights to a ticket category in the Autotask Help system.
| Insight Name | Description |
|---|---|
|
IT Glue Documents |
This insight shows relevant documents from IT Glue that have been surfaced by ticket rules. |
IT Glue Flexible Assets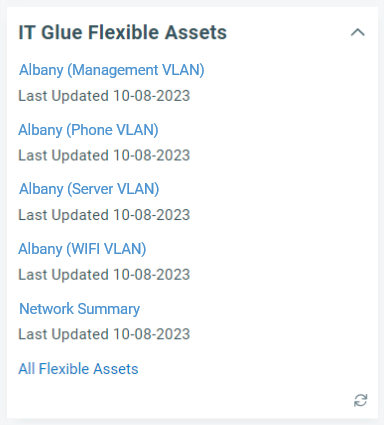 |
This insight shows relevant flexible assets from IT Glue that have been surfaced by ticket rules. |
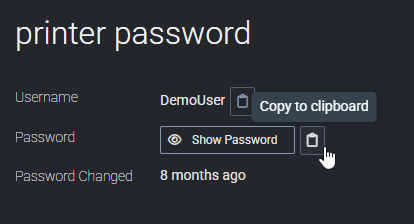
IT Glue Passwords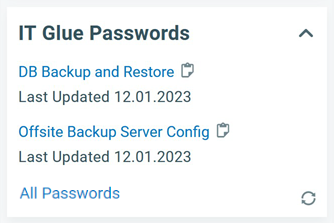 |
This insight shows relevant passwords from IT Glue that have been surfaced by ticket rules. A Copy to clipboard option is available for regular passwords. For vaulted passwords, you will need to enter your user-specific passphrase to copy it. NOTE If the copy icon is not displayed, the user doesn't have permission to copy. They may see a password returned in the list that they don't have permission to view. |
Learn about tickets and insights in the Autotask Help system.
Work seamlessly by creating intelligent links to open client information in IT Glue directly from Autotask.
To make integrating with other applications easy, IT Glue is built using principles that ensure predictable or stable URLs. Every organization and configuration in IT Glue is associated with a base URL that can be added to Autotask. When these URLs are added to Autotask (using the organization ID and product ID as dynamic parameters), links to the relevant resources in IT Glue are activated.
Four types of links are available to create:
- IT Glue Org link on Autotask organization pages
- IT Glue Org link in Autotask tickets
- IT Glue Config link in Autotask tickets
- IT Glue Config link on Autotask device pages
Creating and managing LiveLinks requires special permissions separate from Autotask security level permissions. Autotask System Administrators can assign these permissions to any user, even users who are not System Administrators. Only System Administrators can access this tab.
Learn about LiveLinks Designer in the Autotask Help.
Navigate to Admin > Automation > AutoForms & LiveLinks > LiveLinks Designer. If you are a non-administrator, navigate to Home > LiveLinks Designer.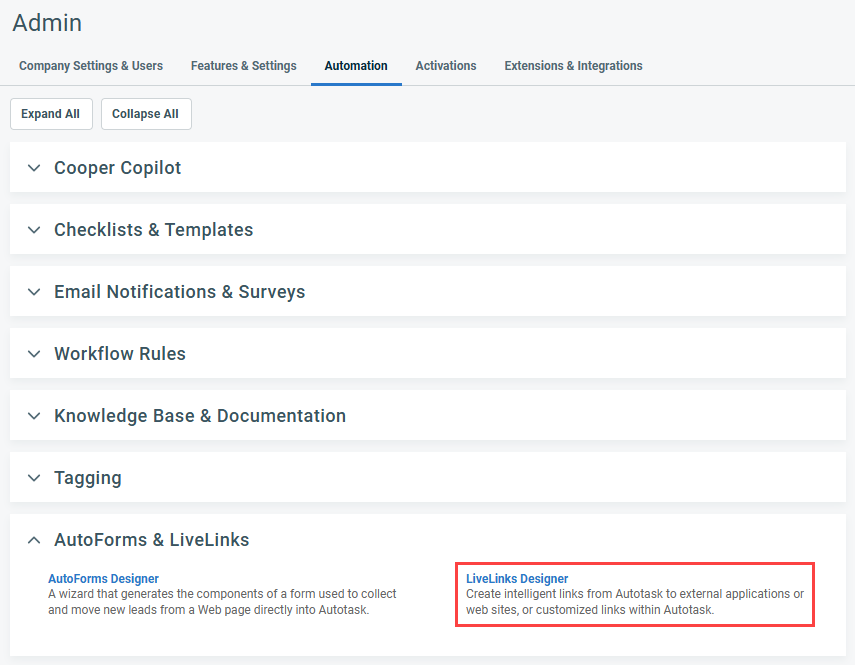
- From LiveLinks Designer, click New.
- Complete the required fields as follows:
- LiveLinks Name: Enter a name describing the IT Glue link type and location it will appear in Autotask.
- Label: Enter the name you want to appear as the link name.
- Category: Select Service Desk.
- Base URL: Enter the IT Glue URL for the link, replacing [mycompany] with your own subdomain.
- Entity: Select the Autotask entity that will present this link in the Autotask user interface.
- Click Okay in the warning dialog box.
- LiveLinks Parameters: Select the applicable parameter.
- Click anywhere in the Querystring Values field, and then click Insert to populate the <ACCOUNTID>.
- Click Save & Publish.
- On the Security Levels tab, select at least one security level.
- On the Department tab, select at least one department.
- Click Save & Close.
EXAMPLE IT Glue Org Links in Autotask Tickets
EXAMPLE IT Glue Org
EXAMPLE Organization pages: https://[mycompany].itglue.com/links/autotask/org/
EXAMPLE Configuration pages: https://[mycompany].itglue.com/links/autotask/config/
Example configurations
Information used to create links to organization/client information in IT Glue from Autotask organization pages: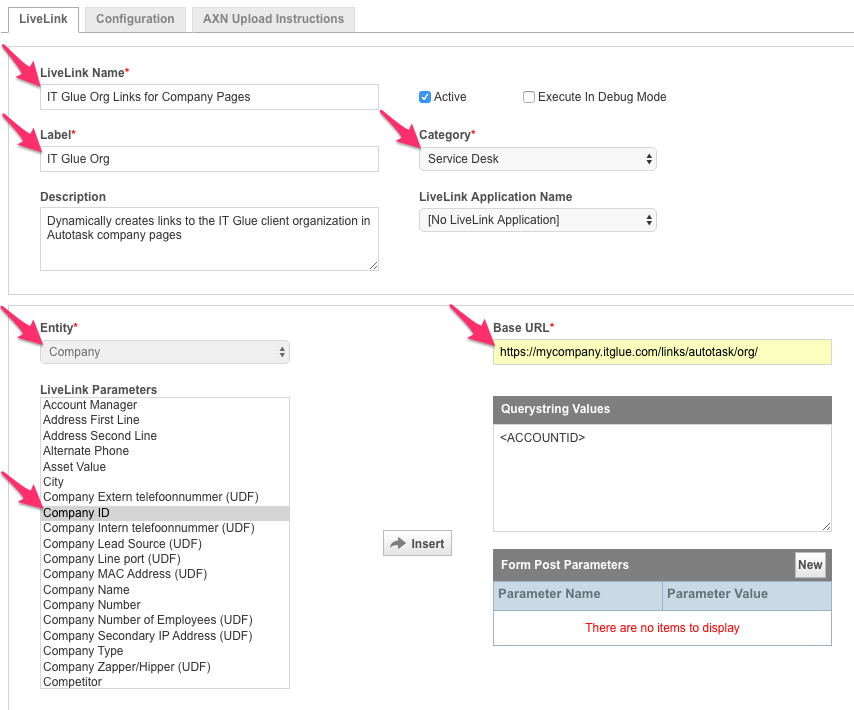
Information used to create links to organization/client information in IT Glue from Autotask tickets: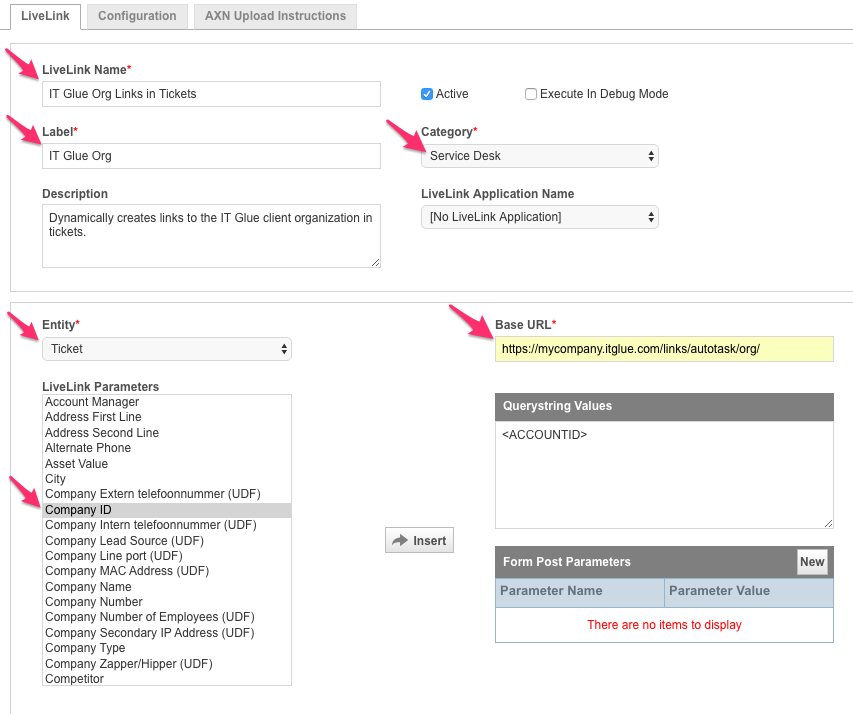
Information used to create links to configurations in IT Glue from Autotask tickets: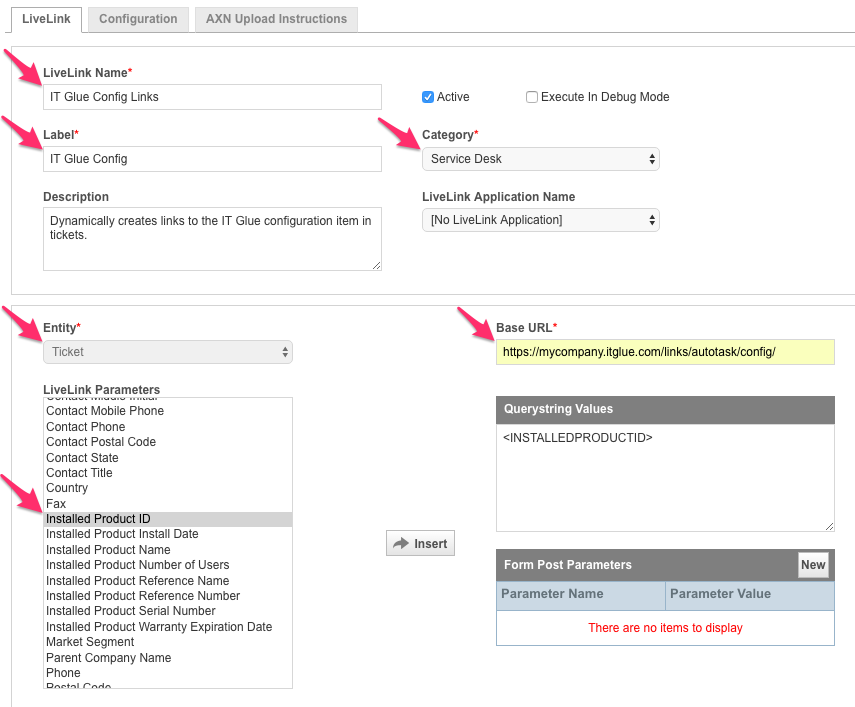
Information used to create links to configurations in IT Glue from Autotask device pages:
After adding all of the links, if a user browses to one of the organizations or devices that sync with IT Glue (or to a ticket that has a synced organization or device specified), they can select the IT Glue entry from the LiveLinks drop-down menu. This opens an IT Glue pop-up window or new tab. If it doesn't, check for a pop-up blocker.
All security levels that have Can access Knowledge Base in the Knowledge Base & Documents section of their security level enabled can search and manage Knowledge Base articles in Autotask. Learn how to access and use the Knowledge Base search page in the Autotask Help system.
To disconnect your Autotask user account from IT Glue, navigate to My > Miscellaneous > Profile > IT Glue and click Disconnect.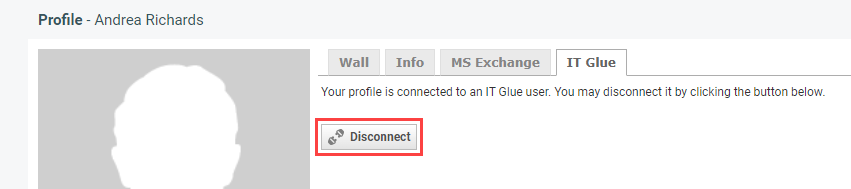
This action will not affect the integration connection or visibility of data for other users.
You have the following two options when removing the integration with Autotask in IT Glue:
- Permanently disconnect records but keep all data. Refer to Option 1: Permanently disconnect records but keep all data.
- Permanently delete all data, including all related/child records. Refer to Option 2: Permanently delete all data, including all related/child records.
Prerequisites
- You must have Administrator or Manager-level access in IT Glue to remove the Autotask integration.
- Before you delete anything, make sure you have a recent backup of your IT Glue account. Learn how to export and back up account data in the IT Glue Help system.
- Kaseya strongly recommends that you double-check your data before performing any irreversible actions. Learn about preventing accidental deleting of data.
Option 1: Permanently disconnect records but keep all data
By not deleting the data, you have the benefit of keeping the data for use with other types of integrations, such as an RMM integration.
NOTE You should contact IT Glue Support before changing the way you are integrated with other sync tools.
- From the top navigation menu, click Admin.
- From the left navigation menu, click Integrations.
- From the more menu in the Autotask connector, select Disconnect.
- Select Permanently disconnect records from Autotask but keep all data.
- Click Disconnect to execute the action.
The integration is now removed from your account. This will also disconnect any syncing organizations and any associated items that belong to those organizations but will leave a copy in IT Glue for standalone use.
NOTE Should the integration need to be reactivated, standard matching logic will apply that matches data from Autotask to the data existing in IT Glue. Refer to Autotask-IT Glue field mappings.
Option 2: Permanently delete all data, including all related/child records
IMPORTANT You are required to contact IT Glue Support to have this feature enabled on your account to prevent you from accidentally deleting data.
With this method, all core assets, passwords, flexible assets, GlueFiles, checklists, and IT Glue documents contained in synced organizations will be deleted and not recoverable from the activity logs.
This action performs a hard deletion of all data associated with Autotask synced organizations, and the only way to restore this data is to initiate a disaster recovery request by contacting IT Glue Support. Ensure you have a recent backup in the event that data recovery is necessary. Learn how to export and back up account data in the IT Glue Help system.
NOTE For RMM-integrated accounts, if the items you delete are matched to RMM data, the matched data will be unmatched, and the associated RMM data will not appear anywhere unless the data is rematched.
- From the top navigation menu, click Admin.
- From the left navigation menu, click Integrations.
- From the more menu in the Autotask connector, select Disconnect.
- Select Permanently delete all data including all related/child records.
- Click Disconnect to execute the action.
After deleting the integration in this way, integrating Autotask again later may result in the same data being recreated but without the passwords, domain assets, SSL assets, GlueFiles, IT Glue documents, and other items that were only in IT Glue. Data entered into flexible assets, attachments, and related items are also lost.
Integration FAQ
After enabling the two-way sync, any updates to a mapped field in IT Glue are immediately pushed to Autotask.
Updates from Autotask sync regularly, and the time required for completion depends on how many records have changed since the last sync. You can use the manual sync functionality any time (from Admin > Integrations) to prioritize the sync to start sooner.
While directly mapping the Autotask data to licenses in IT Glue is not an option, it is possible to perform a one-time conversion. You will need to export the Autotask license data to CSV and reformat that CSV to match the structure/columns of your license flexible asset in IT Glue. Learn about importing CSV data in the IT Glue Help system.
Due to the dynamic nature of user-defined fields and API limitations, this option is not supported.
User-defined fields for locations will not sync to IT Glue in the Autotask locations sync feature.
Yes, all data pulled into IT Glue from Autotask can be returned from the API.
This is true of locations that are synced from Autotask. When the locations sync is enabled, these fields remain locked. To unlock the fields in IT Glue, you can create a location in Autotask with an identical address, associate that location with the contact, and then perform a full sync to IT Glue.
When the locations sync is enabled, the primary location in IT Glue will be named the same as what exists in Autotask for the primary location. In most Autotask accounts today, the name will be Primary Location by default, so you will see your location in IT Glue synced with this same name. If you've given the organization location a different name in Autotask, this is reflected in IT Glue upon syncing.


