Integrating with myITprocess
IT Glue
NAVIGATION Admin > Settings > API Keys
PERMISSIONS Administrator
myITprocess
NAVIGATION My Account > Account Settings > Integrations > Connect IT Glue
PERMISSIONS IT Provider Admin
Overview
Simplify myITprocess onboarding by pulling organizations from IT Glue, avoiding the need to populate your customers into myITprocess after purchase or after signing a new customer. Synchronizing your clients between IT Glue and myITprocess reduces the time and effort it takes to onboard a new MSP client.
For proactive support and complete visibility, this integration also allows you to enrich device documentation with automatically synced hardware expiration dates. Overlooking hardware expiration dates can lead to unexpected downtime, compliance issues, and costly last-minute replacements. IT Glue’s automatic syncing of expiration dates empowers you to stay proactive, minimizing disruptions and reducing manual tracking.
With this integration, you can view expired configurations directly from your myITprocess home page and create strategic recommendations targeting those configurations immediately.
Kaseya 365This integration is included as part of a Kaseya 365 Ops subscription and will be configured for you in a session with an implementation consultant from Kaseya. Refer to Getting started with Kaseya 365 Ops. |
Automations powered by this integration
- True-Sync for IT Glue Data: Configure IT Glue sync settings in myITprocess
- One-Deploy for Client Onboarding: Map myITprocess organizations to IT Glue organizations
Prerequisites
- IT Glue Enterprise plan.
- Add the IP address 20.75.104.242 to the IT Glue allowlist (IP Access Control) to ensure the integration with myITprocess works as expected.
NOTE In this article, IT Glue screenshots are presented in dark mode while myITprocess screenshots are presented in light mode for easy differentiating.
How to...
To enable the integration, complete the following steps in IT Glue:
- From the top navigation menu, click Admin.
- From the left navigation menu, click Settings.
- Click the API Keys tab.
- In the Custom API Keys section, click + to add a new API key.
- Enter a name indicating that this key is used for the integration with myITprocess.
- Click Generate API Key.
- Copy and securely save the newly generated API key, which you will later enter in myITprocess.

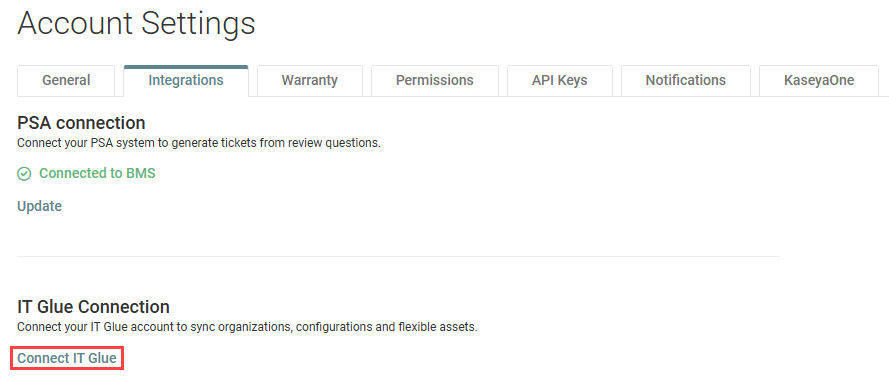
- In the upper-right corner of the header, click your username (My Account) and select Account Settings.
- In the IT Glue Connection section, click Connect IT Glue.
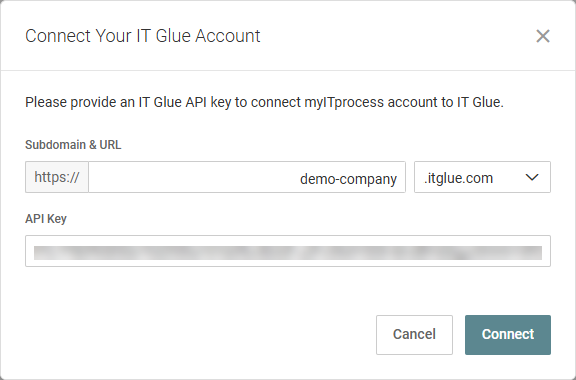
- In the Subdomain & URL field, enter the subdomain of the myITprocess account you are integrating. From the drop-down menu, select the domain of your myITprocess account.
- In the API key field, enter the key you generated in Generate an API key in IT Glue.
- Click Connect. If all fields are successfully validated, myITprocess will connect to IT Glue.
BEFORE YOU BEGIN You must add organizations and configurations in IT Glue to sync them to myITprocess. Learn about adding IT Glue organizations and adding IT Glue configurations in the IT Glue Help system.
Configuring IT Glue sync settings in myITprocess allows you to set parameters for the IT Glue organizations and configurations that are synced to myITprocess and back to IT Glue. Complete the following steps:
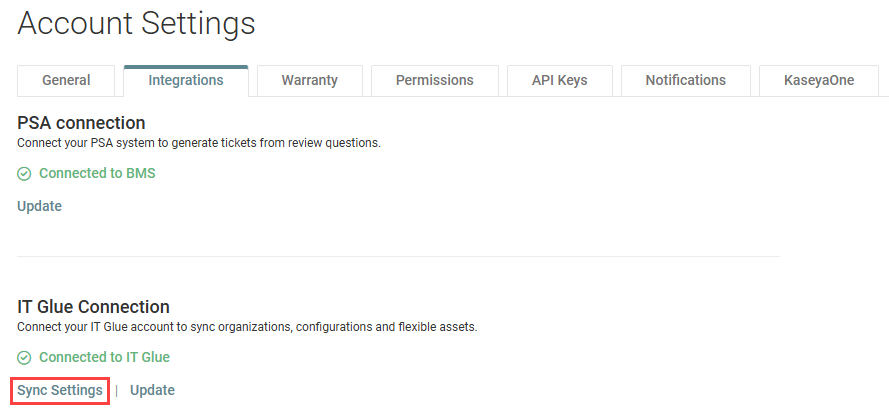
- In the IT Glue Connection section of the Integrations tab, click Sync Settings.
- Select the Enable Warranty Expiration Sync check box to allow myITprocess to automatically sync warranty expiration data for a range of hardware assets, such as servers, switches, firewalls, access points, and workstations, to IT Glue. This setting will also enrich the list of devices in myITprocesses with warranty and device lifecycle information from Dell, HP, Lenovo, and Cisco Meraki. Refer to Review warranty expiration and end-of-life data for configurations in IT Glue.
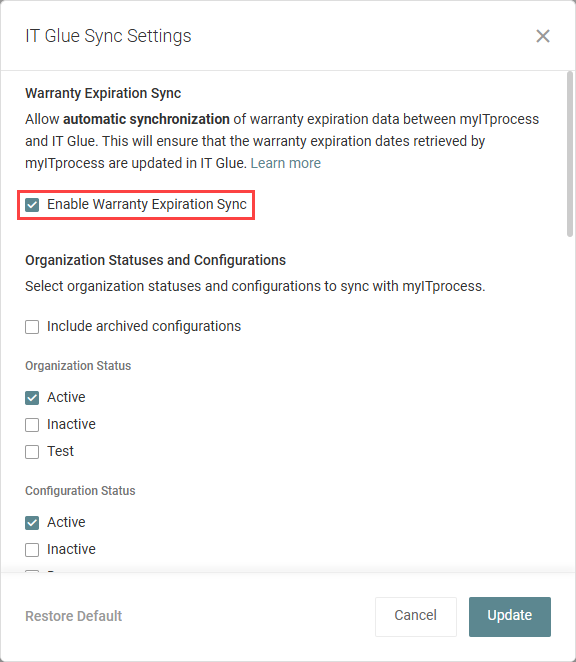
- In the Organization Statuses and Configurations section, you will determine which IT Glue organizations and configurations will sync to myITprocess. Select the organizations you want to sync based on status, and select the configurations you want to sync based on status and type. By default, archived configurations are excluded from the sync, but you have the option to select the Include archived configurations check box.
- If you make any changes, click Update. The system will alert you if you make changes and attempt to navigate to a different tab or page before you have saved your changes.
BEFORE YOU BEGIN You must add your organizations in IT Glue before you can associate them with your organizations in myITprocess. Learn about adding IT Glue organizations in the IT Glue Help system.
You can map IT Glue organizations to myITprocess organizations using the following methods:
- Individually select IT Glue organizations to map to existing myITprocess organizations.
- Mass import IT Glue organizations that haven't already been synced to myITprocess. IT Glue organizations that share the same name as myITprocess organizations (case sensitive) will be automatically mapped. If no match exists, myITprocess organizations will be automatically created and associated with the imported IT Glue organizations.
To perform either of these mapping methods, navigate to the Setup Organizations page as follows:
- In the upper-right corner of the header, click your username (My Account) and select Account Settings.
- From the left navigation menu, click Setup Organizations.
Individually mapping IT Glue organizations to myITprocess organizations
- In any organization row, click the IT Glue Organization value (either None or the currently mapped IT Glue organization) to select or change the IT Glue organization to map to the myITprocess organization. To narrow the list, start typing an organization name in the field.
- When finished configuring the mappings, click Save.
Organizations newly added to IT Glue are denoted with a New tag. To refresh the synced data, click Refresh.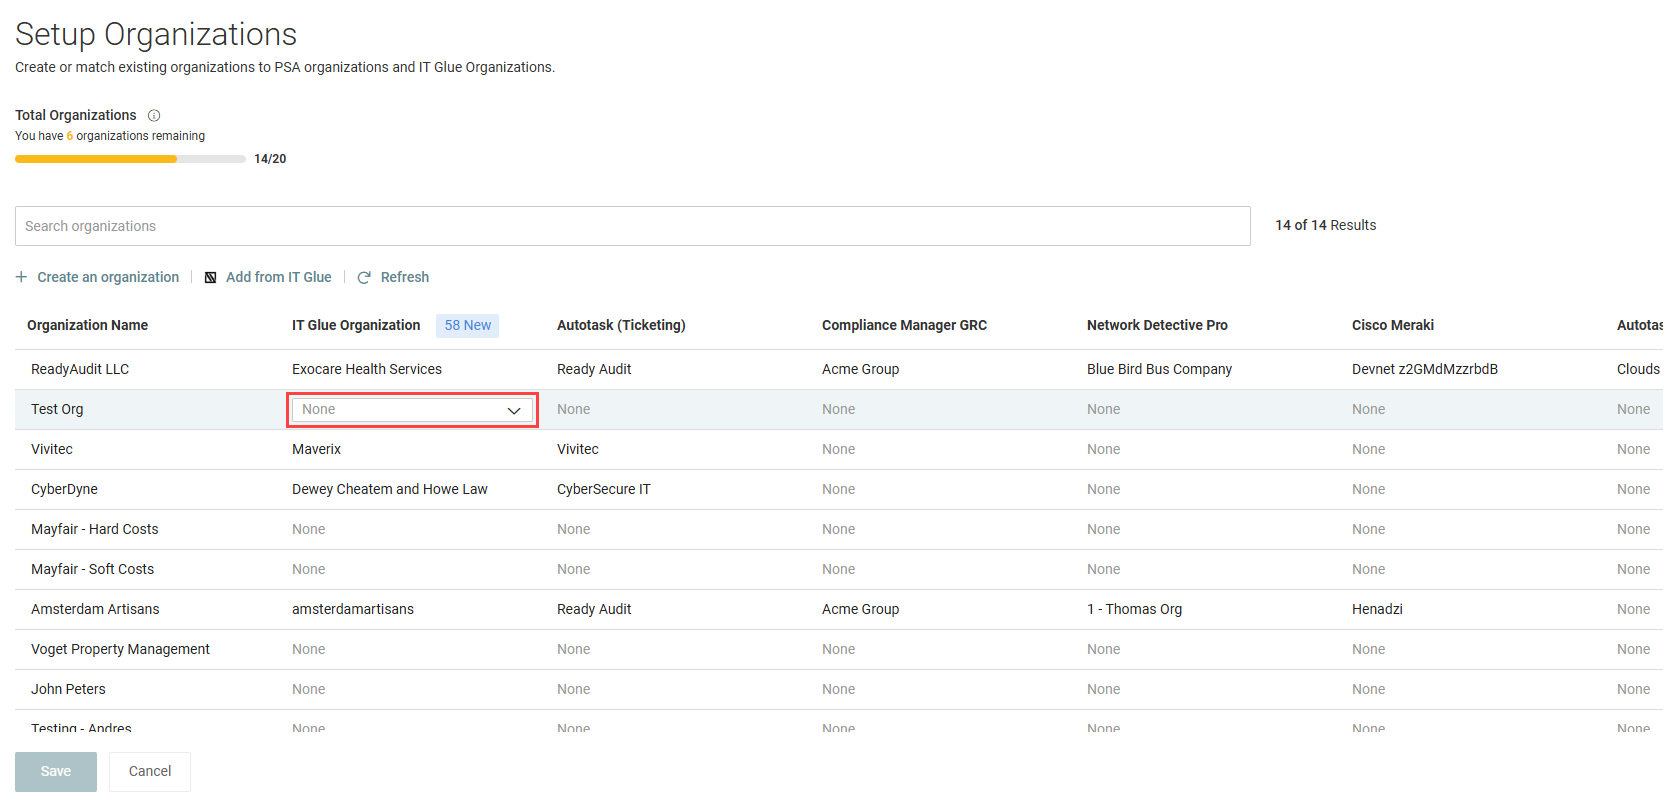
Mass importing IT Glue organizations and automatically creating associated myITprocess organizations
- Click Add from IT Glue.
- From the IT Glue Organizations drop-down menu, select any number of IT Glue organizations to import into myITprocess. If a myITprocess organization with a matching name (case sensitive) does not already exist, a new myITprocess organization will be automatically created and mapped to the selection.
- Click Import.
Organizations newly added to IT Glue are denoted with a New tag until the drop-down menu is opened and closed.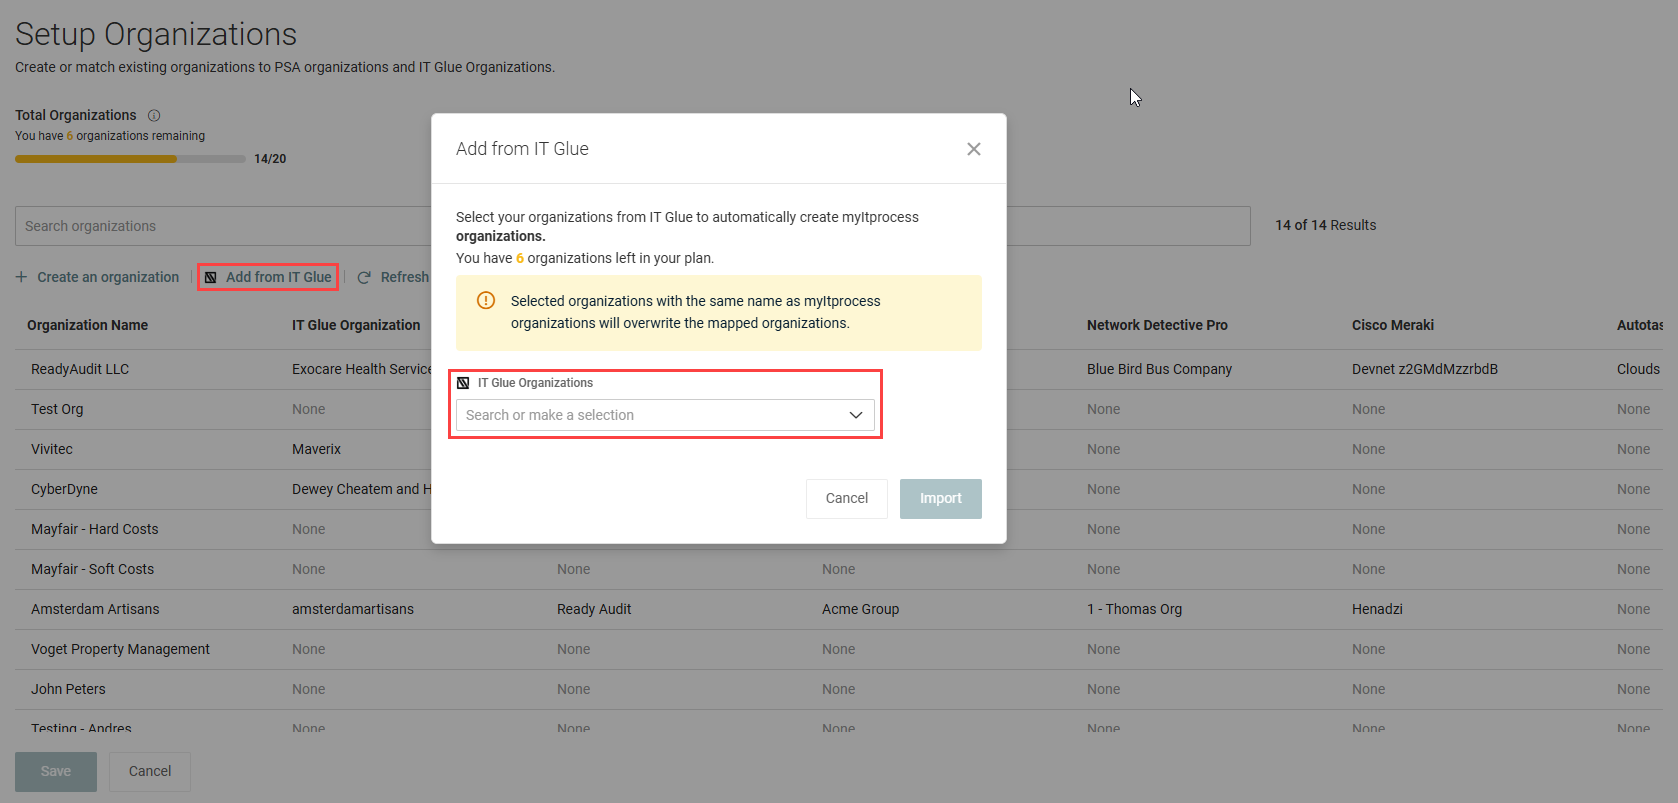
BEFORE YOU BEGIN This feature requires certain integration sync settings in myITprocess. In the sync settings, the Enable Warranty Expiration Sync check box must be selected, and IT Glue configurations you want to view warranty expiration and end-of-life data for must be synced to myITprocess. Refer to Configure IT Glue sync settings in myITprocess.
- From the top navigation menu in IT Glue, navigate to Organizations.
- Select an organization that is synced to myITprocess in the integration sync settings.
- From the left navigation menu, click Configurations.
- Click the List View Options icon
 in the upper-right corner of the page.
 - Scroll through the list and select the myITprocess: Warranty Expiration and the myITprocess: End-of-Life check boxes.
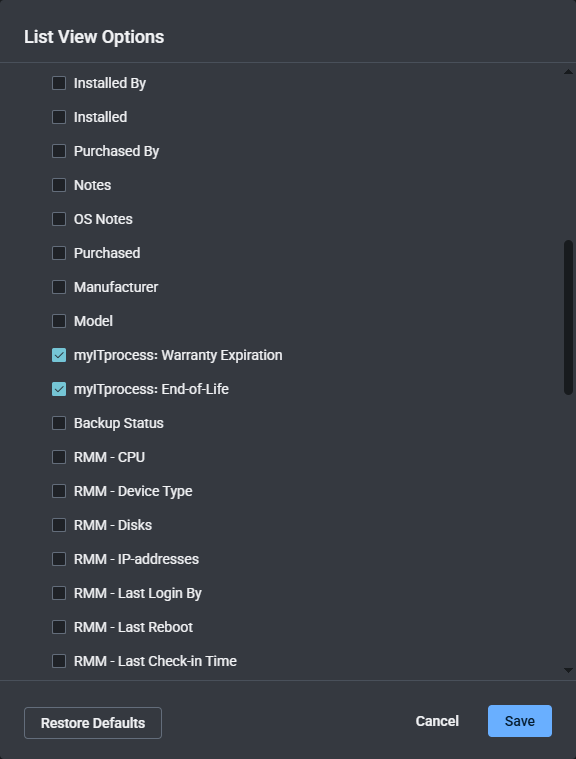
- Click Save. The column selections will persist the next time the Configurations page is accessed.
- In the newly added Warranty Expiration and End-Of-Life columns, denoted with the myITprocess logo, you'll see warranty expiration and end-of-life dates synced from myITprocess for the IT Glue configurations.
The colors of the dates indicate the expiry status. Red dates are Expired, gold dates are Due Soon, and dates in the default color are Supported.
BEFORE YOU BEGIN This feature requires certain integration sync settings. In the sync settings, the Enable Warranty Expiration Sync check box must be selected, and IT Glue configurations you want to view data for in myITprocess must be synced to myITprocess. Refer to Configure IT Glue sync settings in myITprocess.
In myITprocess, this integration will automatically enrich the list of synced devices for an organization with warranty information from Dell, HP, Lenovo, and Cisco Meraki. Configurations synced from IT Glue must have Manufacturer and Serial Number values populated in IT Glue for device statistics to be available in myITprocess. myITprocess conducts warranty lookup automatically based on the serial number.
NOTE In the event that myITprocess cannot retrieve data from the manufacturer, the list of devices will show the expiry date that was added to IT Glue, and the status will be populated based on this date.
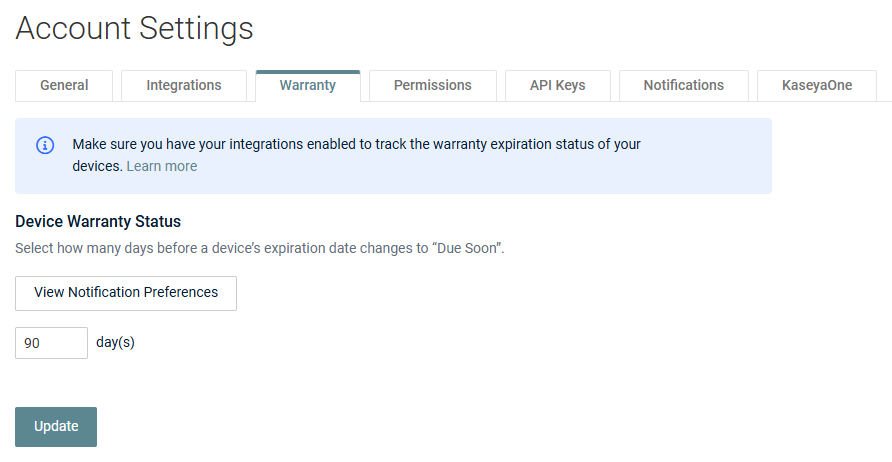
Setting the Device Warranty Status
For proactive device lifecycle management, you can set the number of days before a device’s expiration date that the expiry status will show Due Soon. Complete the following steps in myITprocess:
- In the upper-right corner of the header, click your username (My Account) and select Account Settings.
- Click the Warranty tab.
- Enter the desired number of days and configure any notification preferences.
- Click Update.
Viewing device statistics
To review device statistics in myITprocess and open IT Glue configurations directly from myITprocess, complete the following steps:
- From the top navigation menu, click Home.
- In the Device Warranty Lookup widget on the home page, view a short summary of devices grouped by statuses.
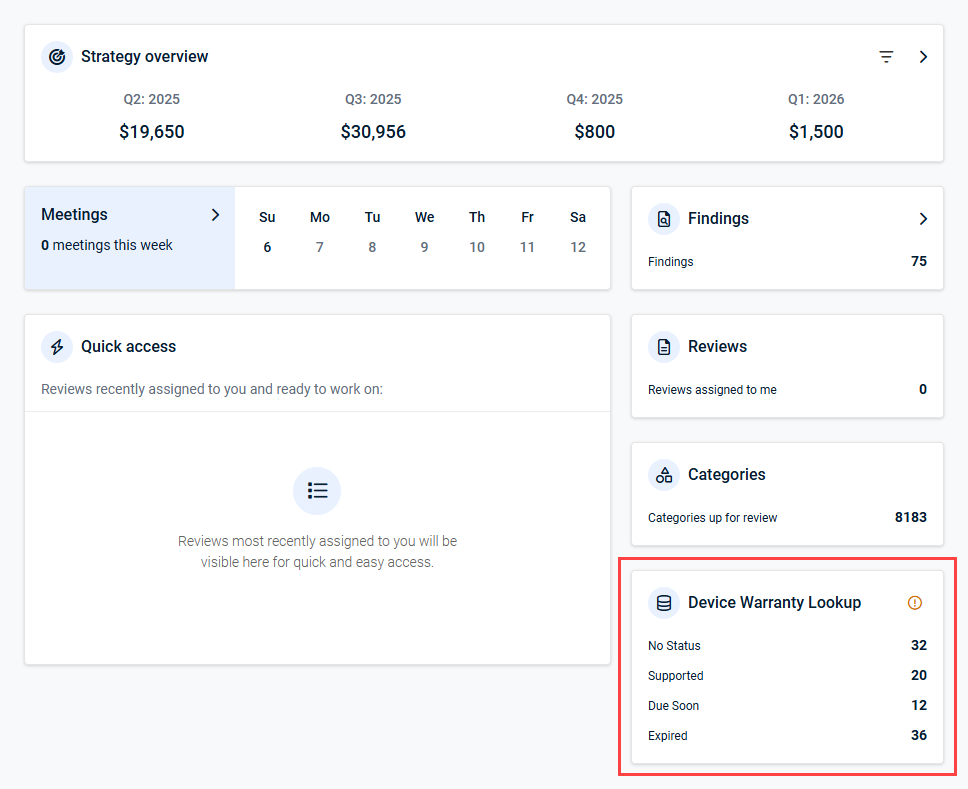
- Click the widget to drill into detailed device information. From the drop-down menu in the upper-left corner of the page, select a myITprocess organization that is mapped to an IT Glue organization to filter the device data for that organization.
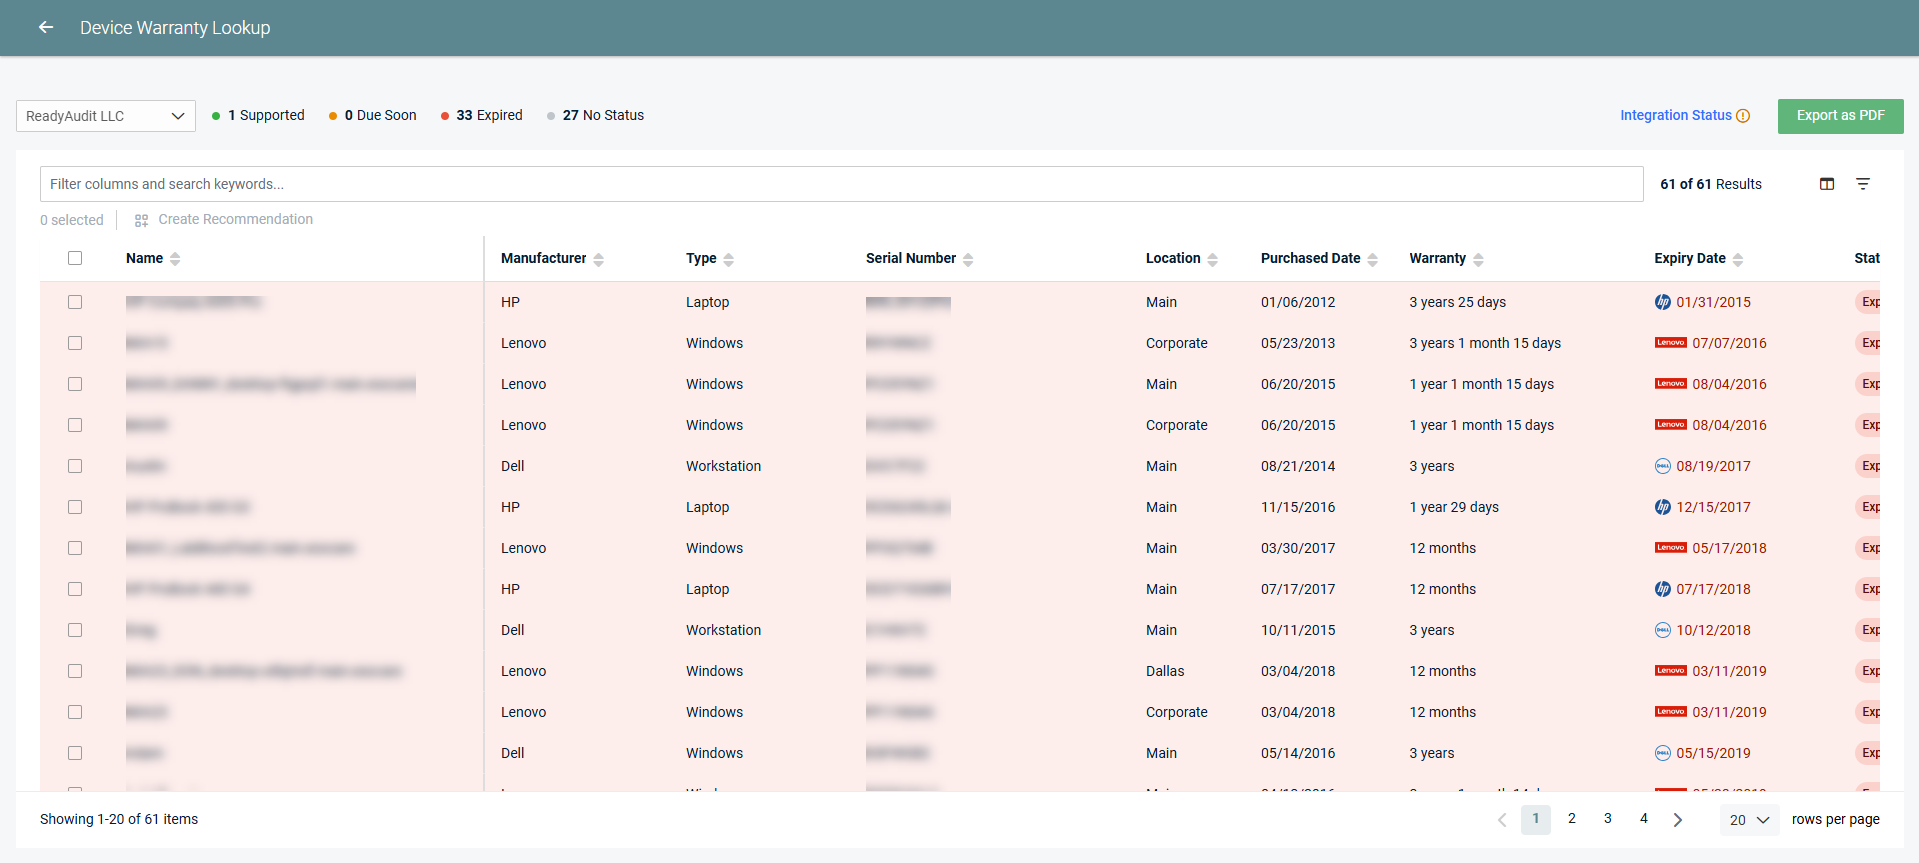
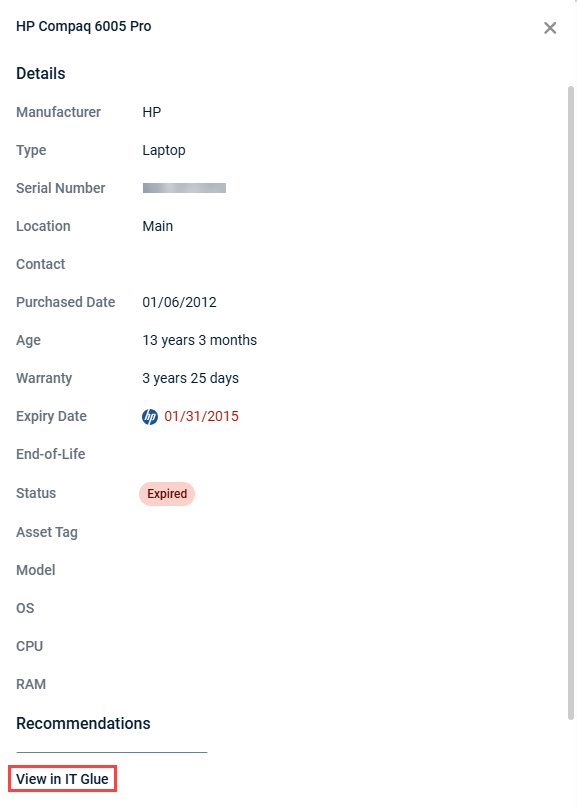
- Click a device to open its detail pane on the right side of the page.
- Click View in IT Glue to open the configuration in IT Glue.
Expired devices (IT Glue configurations) associated with a myITprocess organization are also quickly accessible in the organization's strategic roadmap as follows:
- From the top navigation menu, click Strategy.
- From the drop-down menu in the upper-left corner of the page, select a myITprocess organization that is mapped to an IT Glue organization to populate the strategic roadmap for that organization. Refer to Map myITprocess organizations to IT Glue organizations.
- Click the menu in the upper-right corner of the page.
- The Device Warranty Lookup value displays the number of expired devices from this organization in parentheses.
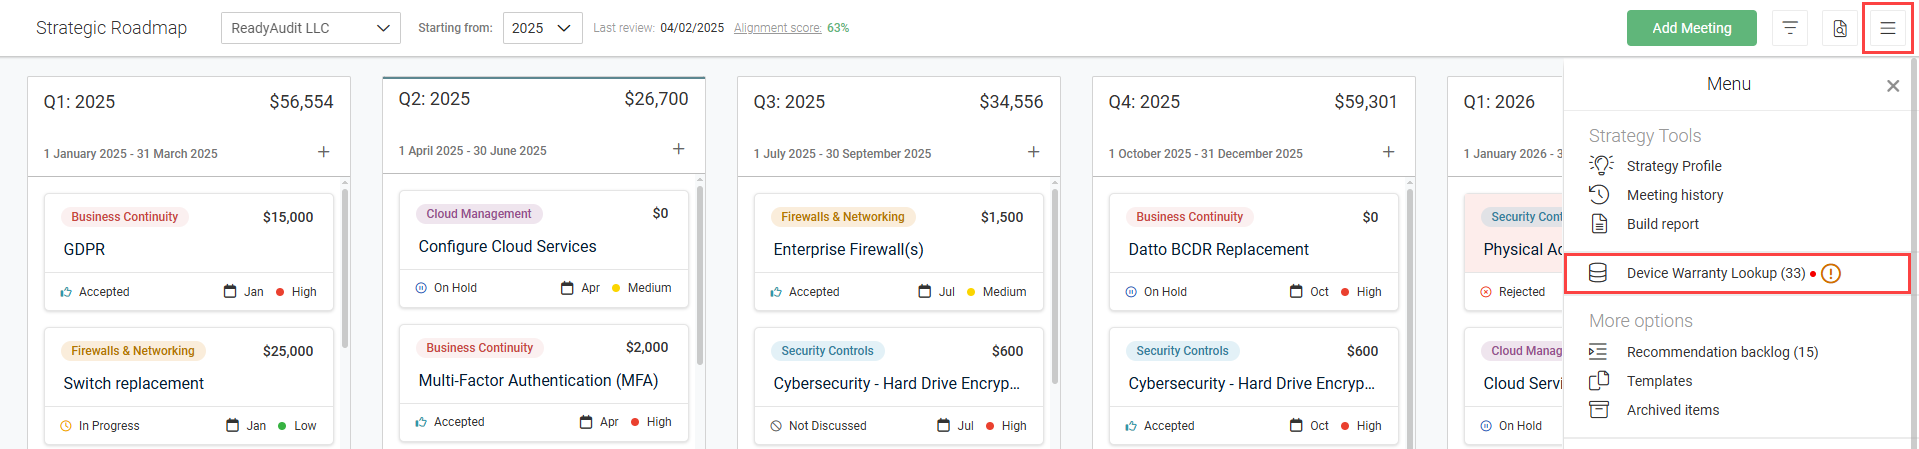 Clicking this value will open the list of devices from this organization in myITprocess.
Learn more about device lifecycle management in the myITprocess Help system.
From the list of devices described in Review warranty expiration and end-of-life data for configurations in IT Glue or from the Strategic Roadmap page for an organization, you have the option to create myITprocess recommendations that include IT Glue configurations as assets. These assets can be cited as documentation as to why you recommend that your client move forward with your recommendation.
From the list of devices in myITprocess, create a recommendation with IT Glue configurations as follows:
- From the drop-down menu in the upper-left corner of the page, select a myITprocess organization that is mapped to an IT Glue organization to filter the device data for that organization.
- Select one or more check boxes to select the devices (IT Glue configurations) to add to the recommendation.
- Click Create Recommendation.
- Complete the required fields to generate the recommendation. The Assets tab displays all attached IT Glue configurations.
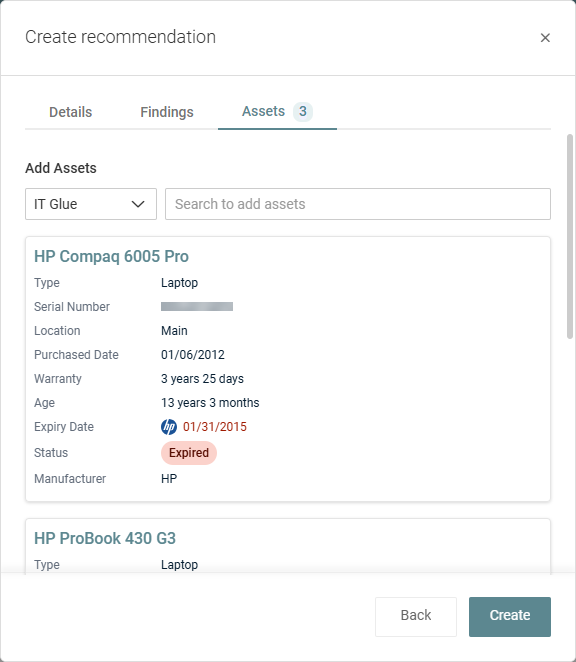
- Click Create.
NOTE Devices with no check box already have a recommendation associated with them.
EXAMPLE In this example, the list is filtered for HP laptops with an Expired status from the Ready Audit LLC organization (which is mapped to its corresponding IT Glue organization in the sync settings). The check box at the top of the list was selected to automatically select all devices in the list. The last item, the HP EliteBook 850 G5, was automatically omitted from the mass selection because it is already associated with an existing recommendation.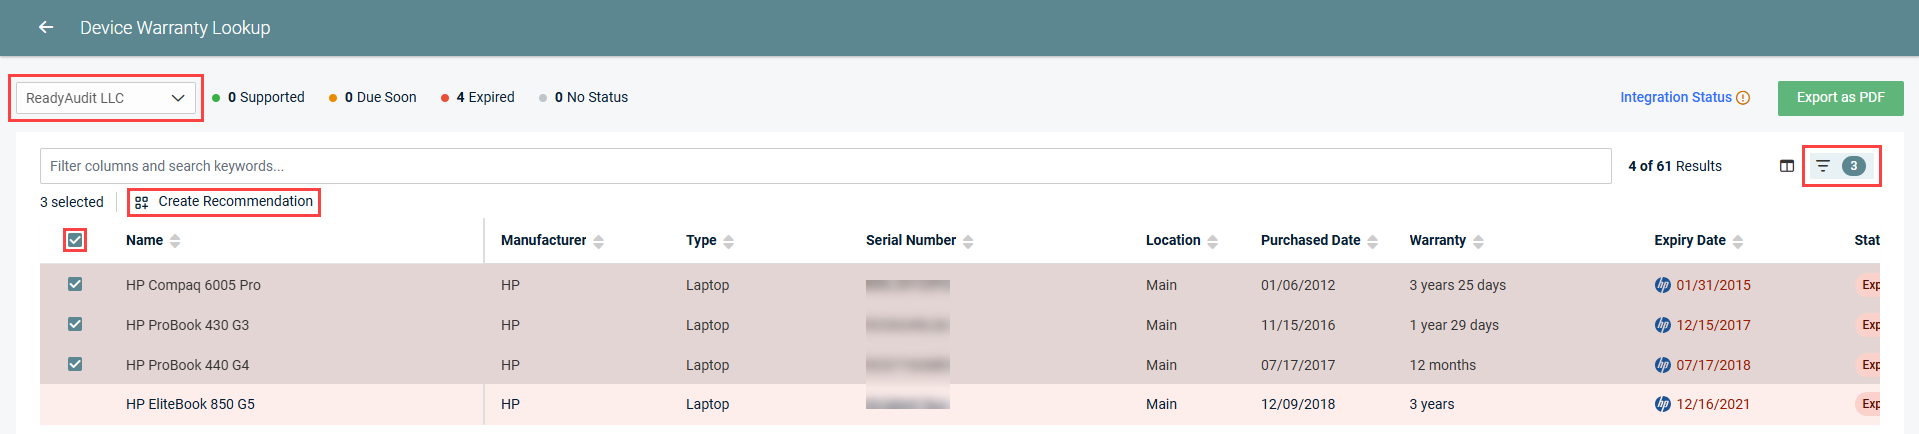
NOTE This option is also available from the device detail pane upon clicking a single device.
Learn about recommendations in the myITprocess Help system.
This integration allows you to associate flexible assets in IT Glue with client template questions, review questions, and strategic roadmap recommendations in myITprocess, providing a single lens to view data.
Adding flexible assets to client templates
Learn about client templates in the myITprocess Help system.
- From the top navigation menu in myITprocess, click Standards.
- From the drop-down menu in the upper-left corner of the page, select a myITprocess organization that is mapped to an IT Glue organization to populate the client template for that organization. Refer to Map myITprocess organizations to IT Glue organizations.
- Expand a category and then a sub-category in that category.
- Click a question in that sub-category.
- To add a flexible asset to that question in the organization's client template, click View Assets in the View question pane.

- If you are logged in to IT Glue, you will be able to search for and add flexible assets from IT Glue for that question by clicking Add Asset. Each time you perform a review of this question for this client, this asset will be visible.
If you are not logged in to IT Glue, you will be prompted to do so. After successfully logging in to IT Glue, you will be redirected back to the client template, where you can search for and add assets to any questions.
Adding flexible assets to review questions
Learn about reviews in the myITprocess Help system.
- From the top navigation menu in myITprocess, click Alignment.
- From the drop-down menu at the top of the list, select either My Reviews to filter the list by reviews you created, or select All Reviews to populate a list of all reviews in the account.
- Click a review for an organization that is mapped to an IT Glue organization. Refer to Map myITprocess organizations to IT Glue organizations.
- Click the IT Glue icon for a question to open the pane where you can add IT Glue flexible assets. In the following example, the question already has two IT Glue configurations attached to it as assets.
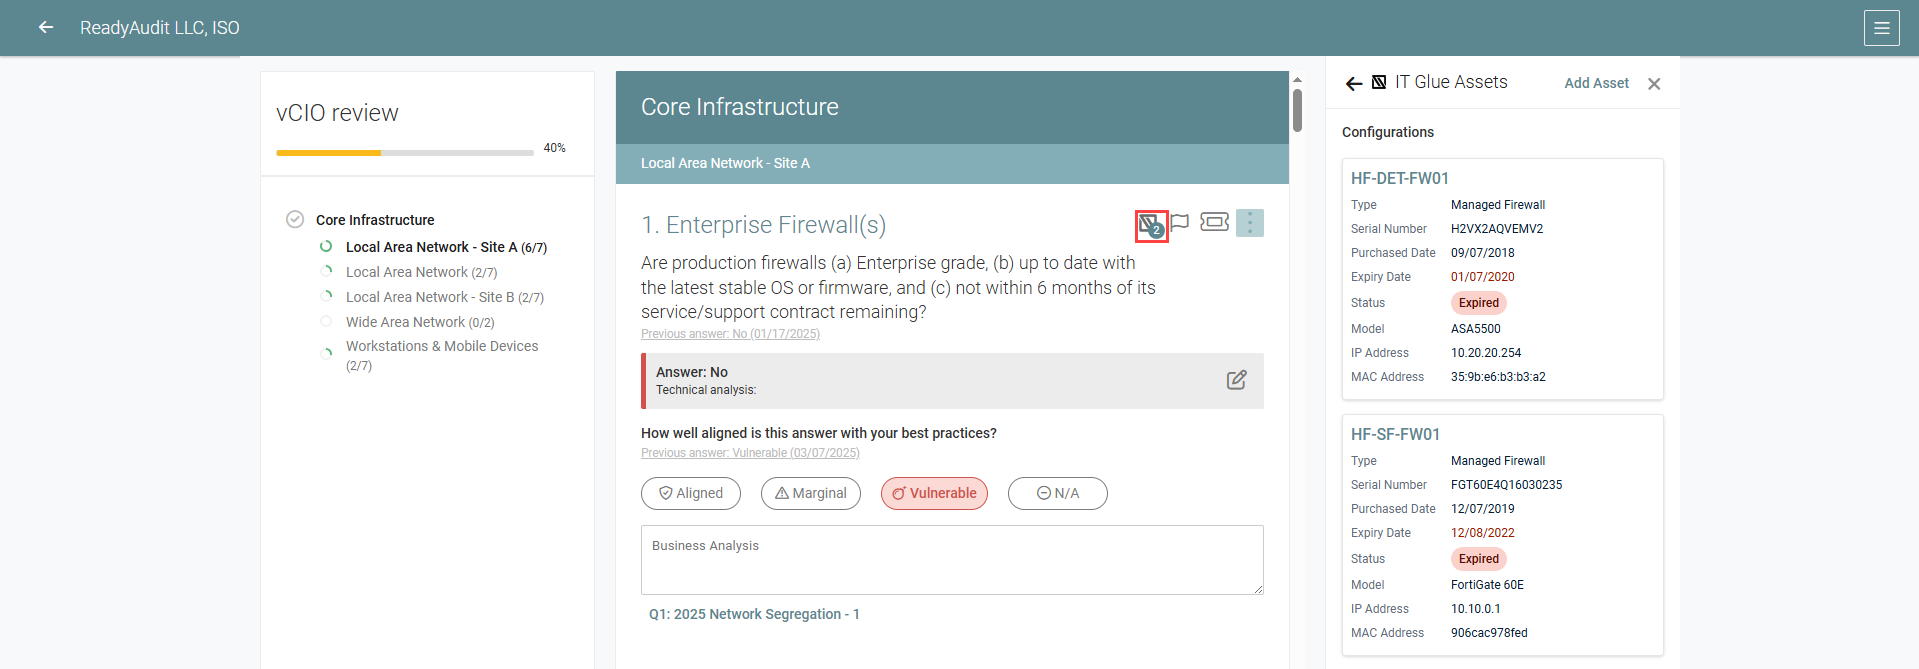
- If you are logged in to IT Glue, you will be able to search for and add flexible assets from IT Glue for that question by clicking Add Asset. Assets added to this question will be visible to your client only in this particular review.
If you are not logged in to IT Glue, you will be prompted to do so. After successfully logging in to IT Glue, you will be redirected back to the review, where you can search for and add assets to any questions.
Adding flexible assets to recommendations
Learn about recommendations in the myITprocess Help system.
- From the top navigation menu in myITprocess, click Strategy.
- From the drop-down menu in the upper-left corner of the page, select a myITprocess organization that is mapped to an IT Glue organization to populate the strategic roadmap for that organization. Refer to Map myITprocess organizations to IT Glue organizations.
- In the quarter you wish to create a myITprocess recommendation for, click the + icon.

- To create a new recommendation, click Next. To create a recommendation from a template, select a template and click Next. Learn about recommendation templates in the myITprocess Help system.
- Complete the required fields to generate the recommendation, and click the Assets tab.
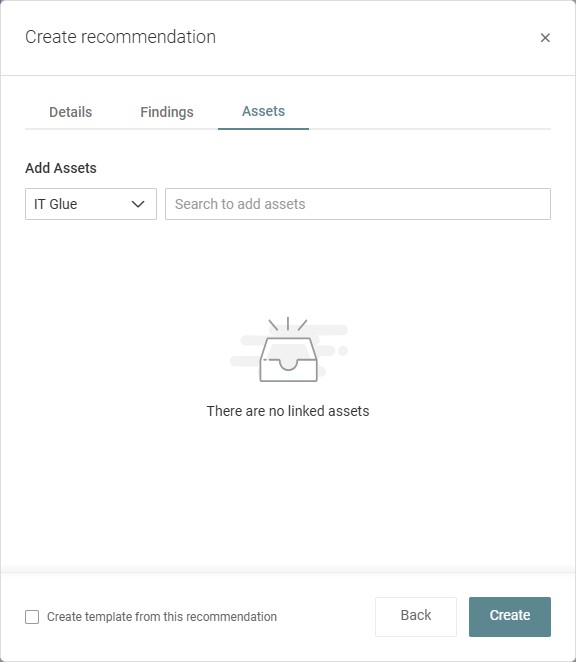
- If you are logged in to IT Glue, you will be able to search for and add flexible assets from IT Glue to this recommendation. Added assets will appear on individual recommendations and during the presentation.
If you are not logged in to IT Glue, you will be prompted to do so. After successfully logging in to IT Glue, you will be redirected back to the recommendation, where you can search for and add assets to the new recommendation. - When finished configuring the recommendation, click Create.
NOTE You have the option to sync IT Glue flexible assets to an existing recommendation by opening the recommendation and clicking the Assets tab.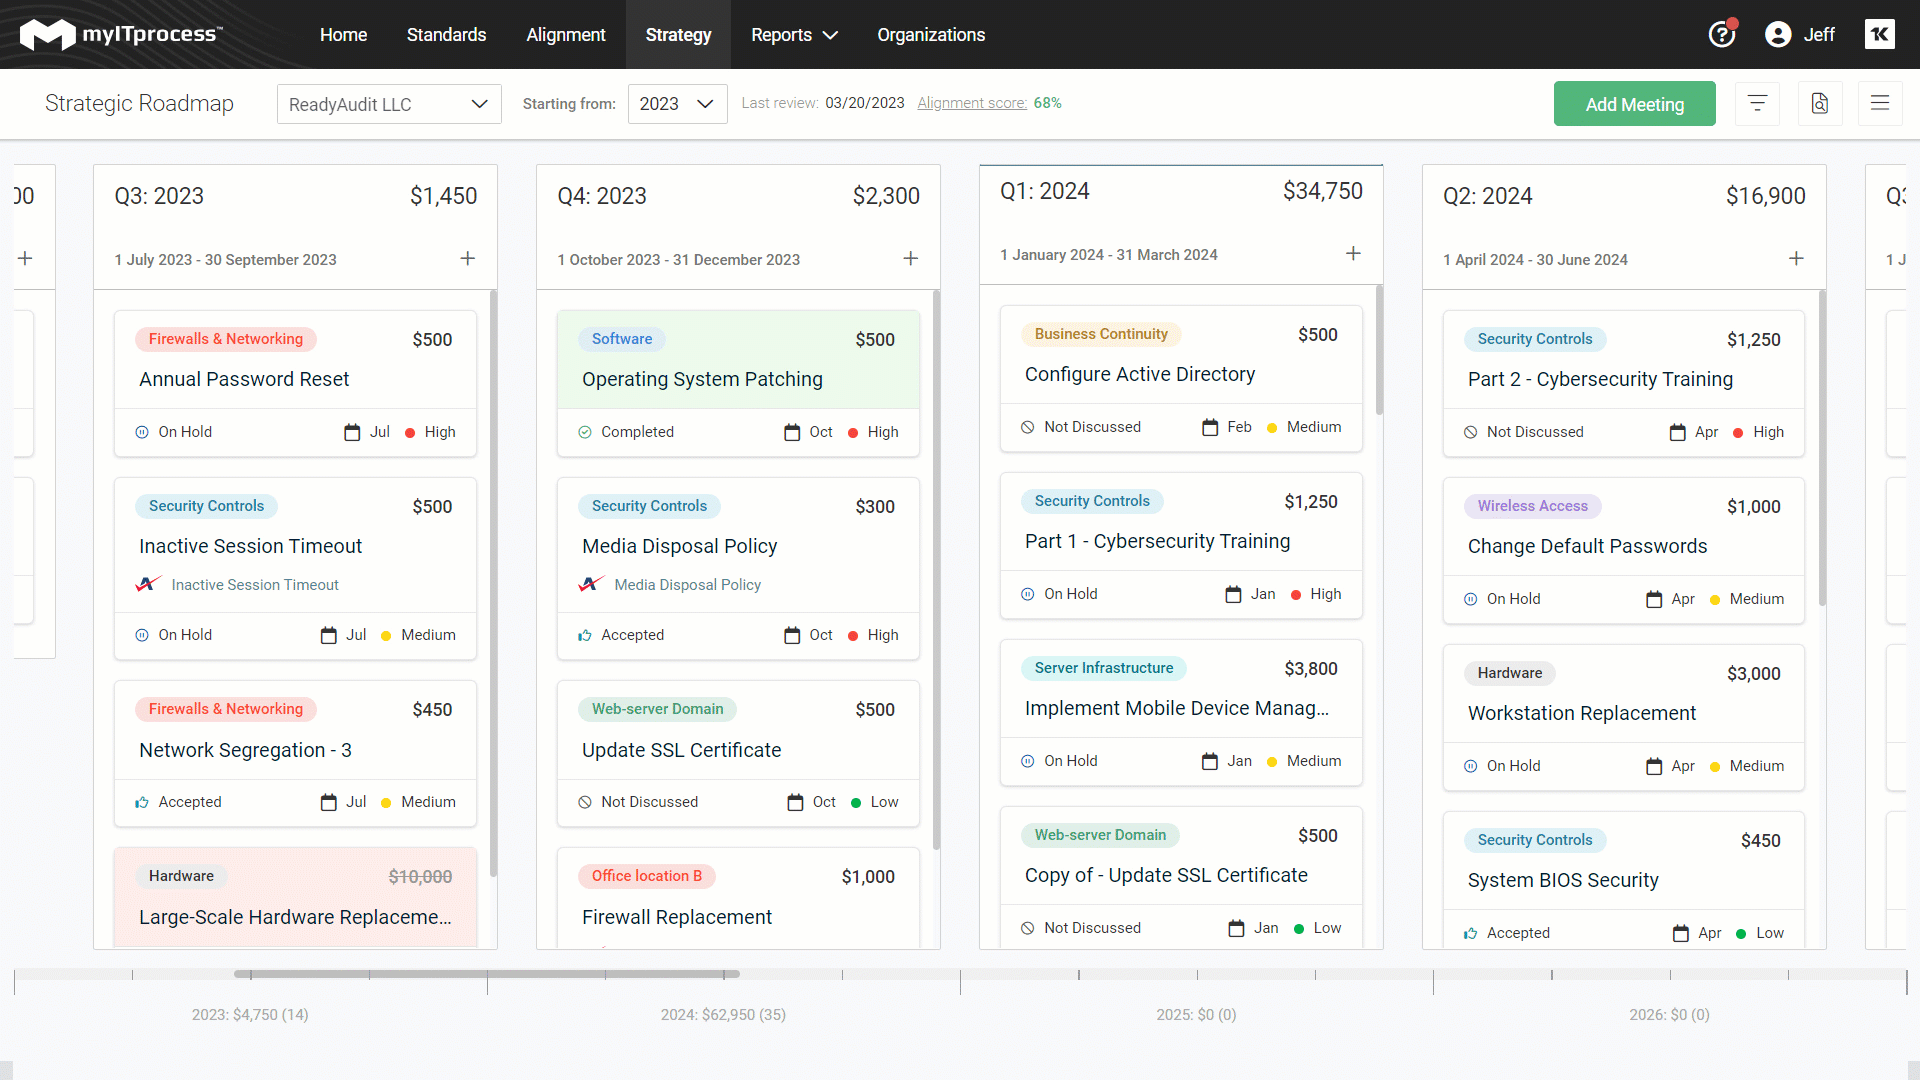
To disable the integration, complete the following steps in myITprocess:
- In the upper-right corner of the header, click your username (My Account) and select Account Settings.
- Click the Integrations tab.
- In the IT Glue Connection section, click Update.
- Turn on the Disable Connection toggle.
- The confirmation dialog box will indicate that disabling the connection will not remove the integration, but you will no longer be able to view and add IT Glue flexible assets in client templates, review questions, and recommendations. Click OK to disable the connection or Cancel to close out of the dialog box.


