Creating and scheduling runbooks
For partners subscribed to the current Enterprise plan.
To view and print client data collected in IT Glue as runbooks, follow these instructions. The runbooks feature gives you the ability to create offline asset documentation for disaster recovery, compliance, reporting, and offboarding purposes. You can also schedule runbooks to be generated as needed.
IT Glue Runbooks are generated as single PDFs including two main sections: Core Assets and Flexible Assets. Content in runbooks are automatically generated for you so there is nothing to configure except when it contains masked password values to protect private information.
Prefer to view your data in spreadsheets? We also make it easy to Exporting from list view.
Prerequisites
- You must have Administrator access to IT Glue to access the runbooks feature
- You must have an account on the current Enterprise plan
Instructions
Creating a runbook
- Navigate to Account > Runbooks. In the Select Organizations selection, start typing to search for organizations and sub-organizations.

- Click to select each organization you want to generate a runbook for. Other functions:
- Click the trash can icons to remove organizations one-by-one or,
- Click the Remove All button to clear the field.

- Click the All Organizations toggle switch to create runbooks for every organization in your account. These will all appear together in a zipped folder.

-
In the Assets section, select the core assets and flexible assets to be included in the runbook. Customizable runbooks are applicable for scheduled runbooks as well.
All assets are included, by default. These assets can be for multiple organizations or for a single organization.
At least one asset is required to be selected. If no assets are selected, it will not be added to the runbook (an error will be displayed) and you will not be able to download the runbook.NOTE If assets like Passwords or BiltLocker Recovery Keys are added to the Vault, they will not be added to the runbook.
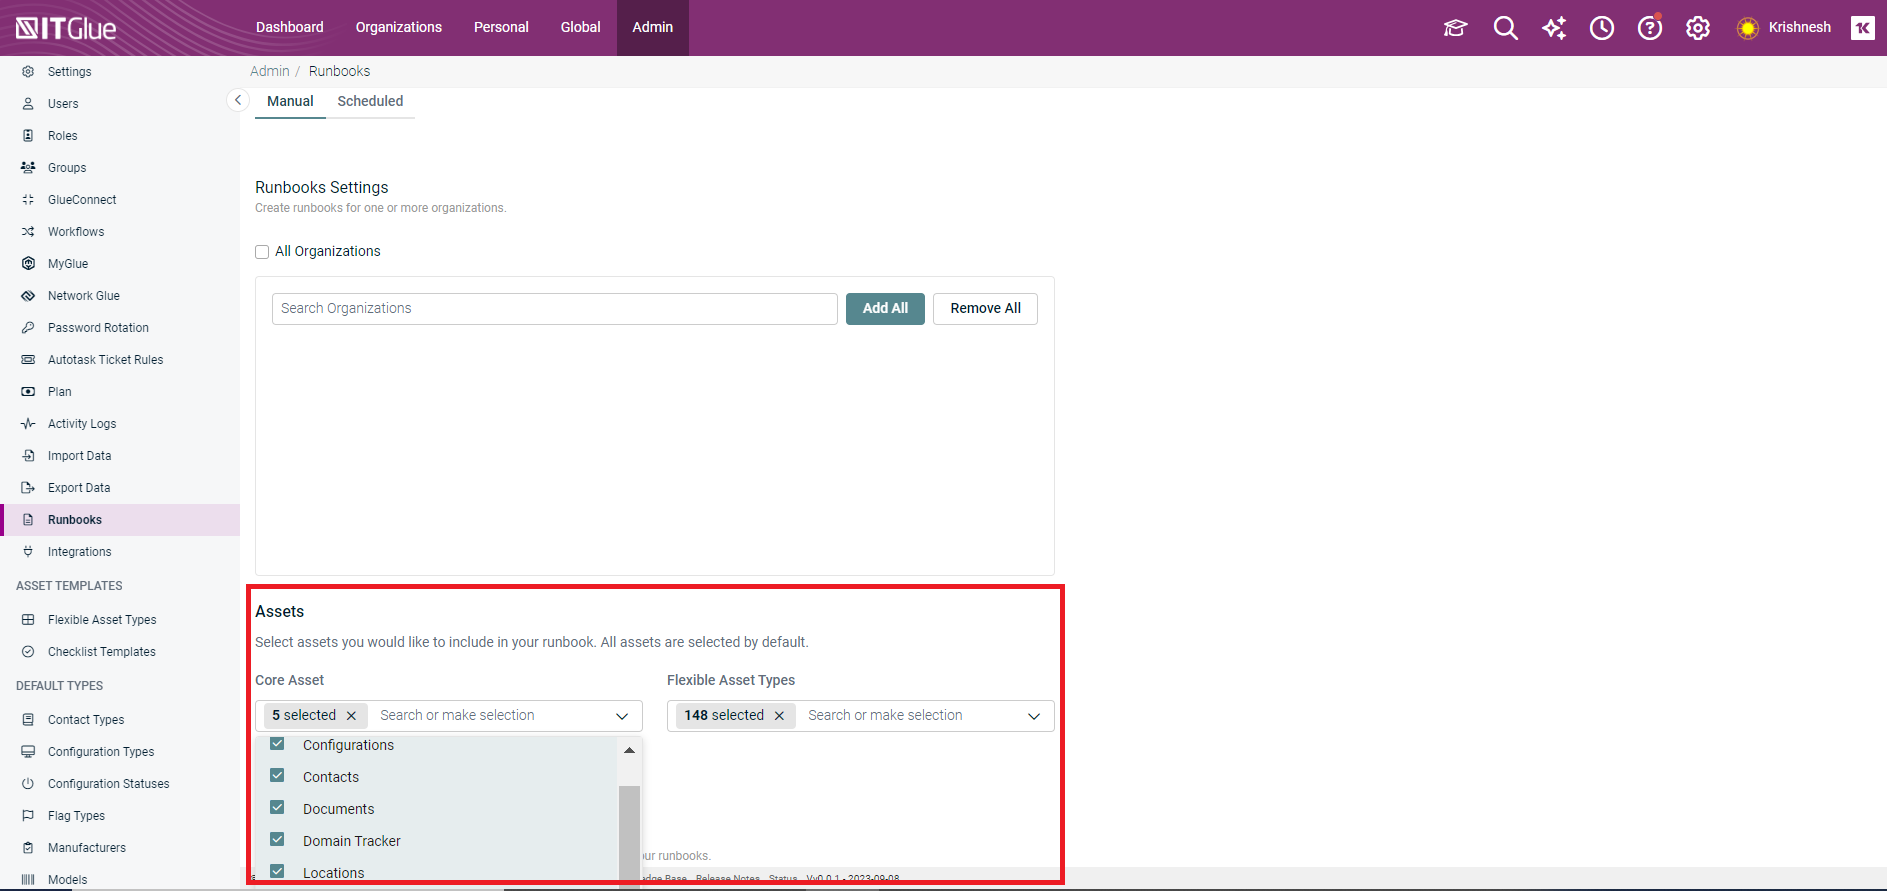
NOTE When you select multiple organizations and exclude one of the assets, then this asset will be excluded for all the selected organizations.
- By default, the Mask Passwords switch is turned on. Leaving this option on will automatically redact passwords in the runbook PDF, meaning asterisks will replace all passwords. Turning this option off will display passwords in human-readable format.

-
Select Include archived assets option to manually add archived assets when generating the export.
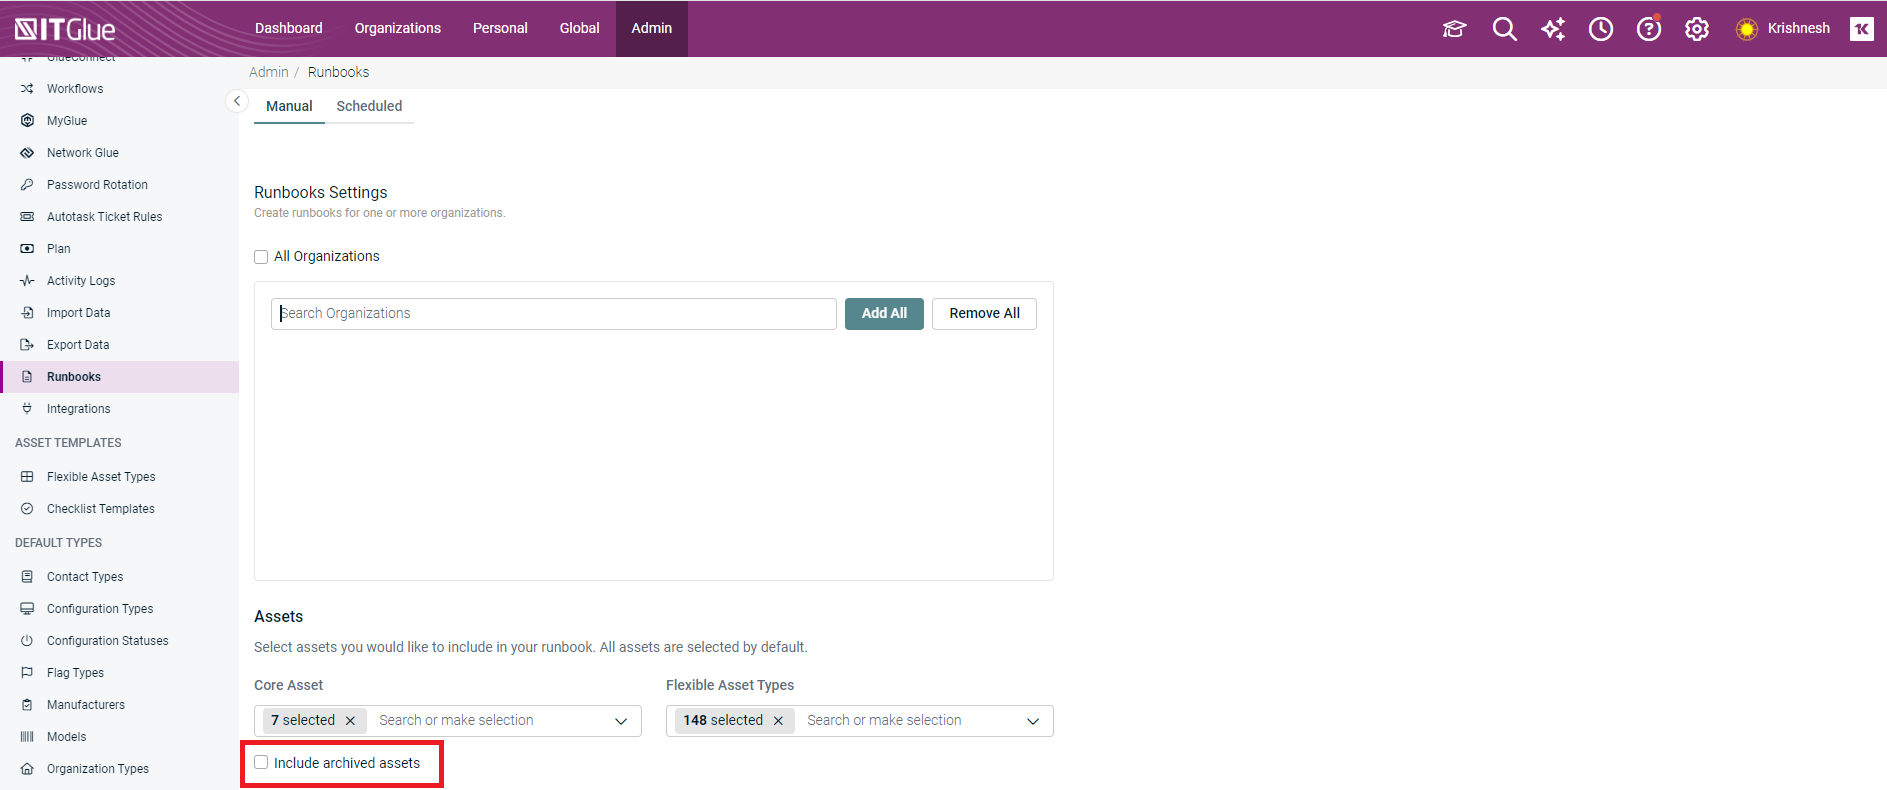
- Click the Submit button to start creating the runbook(s).
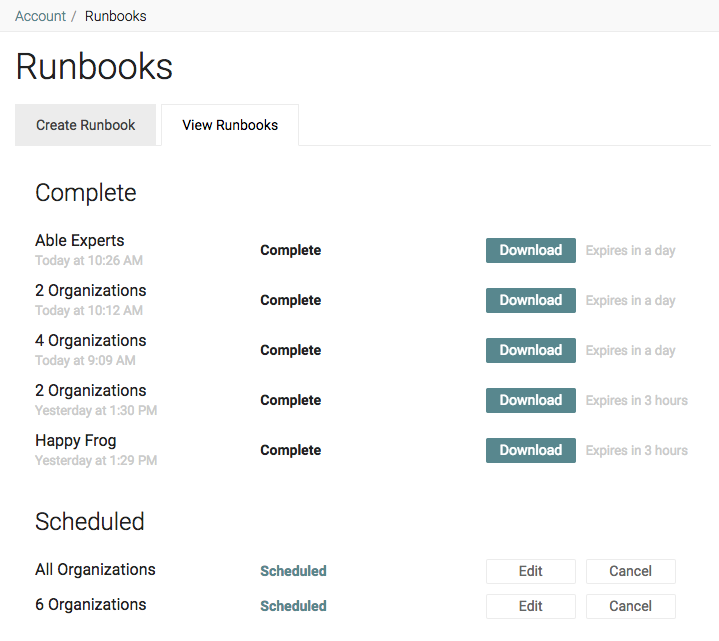
- Click the View Runbooks tab to see the job status.
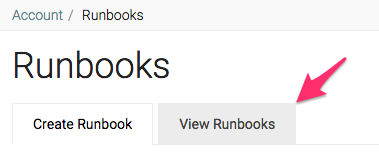
- Once the runbook status changes from In Progress to Complete, click the Download button. This opens your downloads folder where you will find either a PDF or a zip file containing multiple PDFs depending on the selections you made in previous steps.

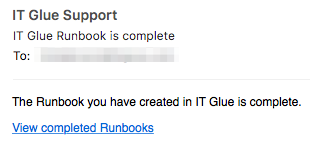
You will also receive an email alert when your runbook is ready for download. Just click the View completed Runbooks link in the email and you'll be taken directly to where you can download the file(s).
Additional notes
- While a job is in progress, no other job can be started.
- If you generate a single runbook, it will typically be ready to download in a very short time depending on the requested data and system load. The average time of generating runbook can vary and depends on the number of organizations and number of assets selected. It always takes at least a couple minutes but it can take even a longer time.
- If you generate runbooks for multiple organizations, processing may take a while, so please be patient. Remember, we'll email you when it's ready.
IMPORTANT Once a runbook is available to download, you have 24 hours before it expires and is deleted. After that time, you will need to create a new runbook.
Scheduling the automatic creation of a runbook
IT Glue Runbooks allows you to schedule runbooks to be generated at a future date and time.
- Start creating a new runbook following steps 1 to 3 in the previous section.
- Click on the Schedule option, select the date from the calendar and, set the time you want the runbook to start generating. By default, the date will be today's date and the time will be set a half hour or more in the future.
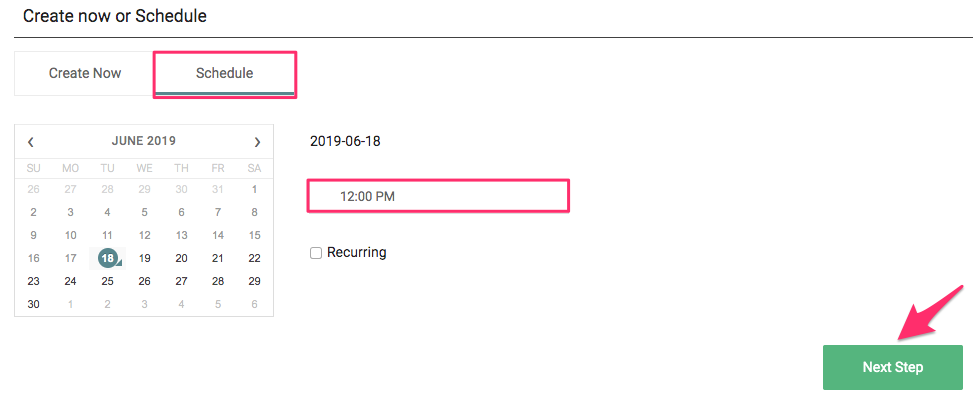
- Click the Next Step button to continue creating your runbook and click Submit when you're done.
Adding a recurrence
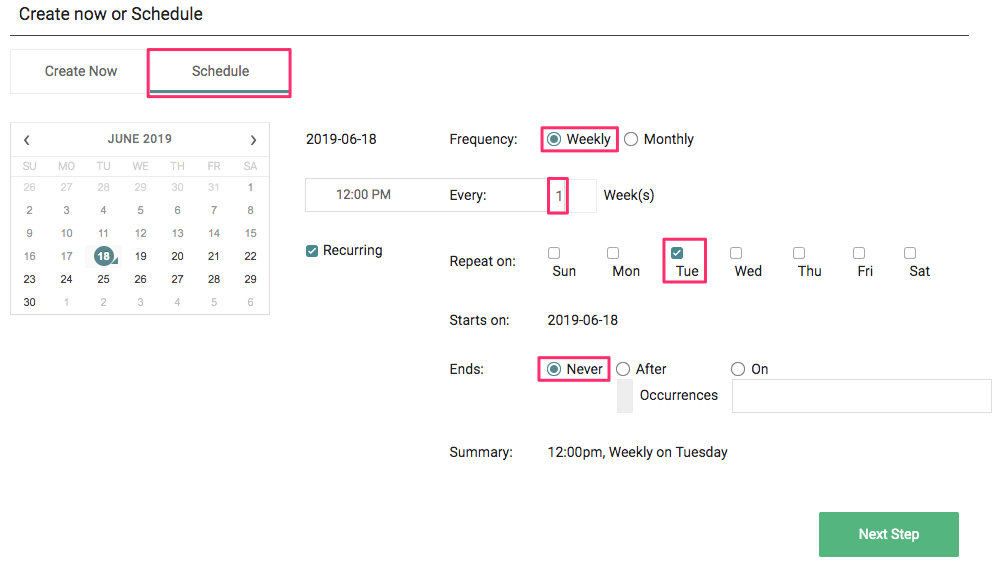
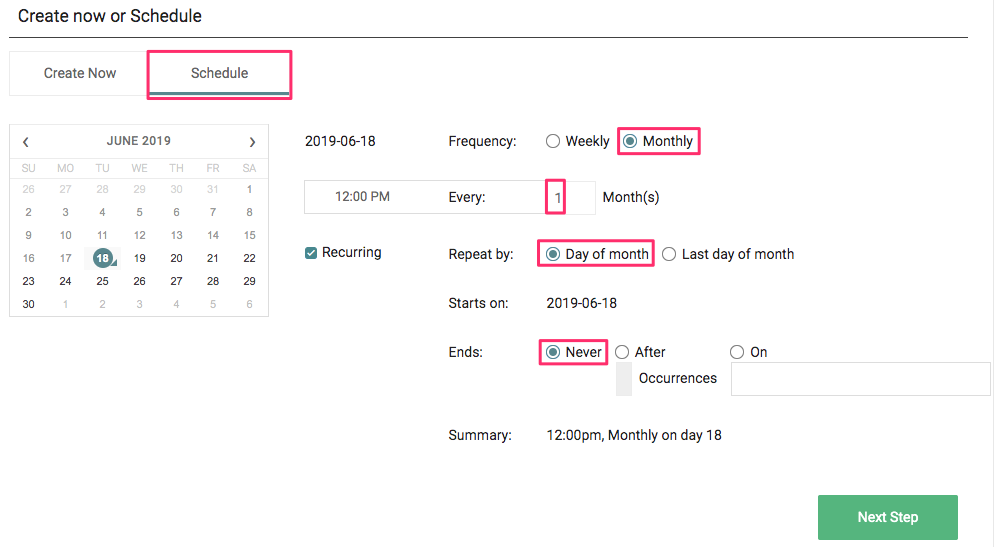
If you wish to create the same runbook on a regular schedule, simply add a recurrence. In the Schedule dialog, click the Recurring checkbox. A new dialog opens allowing you to choose a weekly or monthly recurrence.
- Weekly
- Choose how many weeks apart you want the runbook to generate.
- Choose the day of the week the runbook will generate on.
- Choose when this recurrence will end.
- Review the summary before clicking Next Step.
- Monthly
- Choose how many months apart you want the runbook to generate.
- Choose the day of the month the runbook will generate on.
- Choose when this recurrence will end.
- Review the summary before clicking Next Step.
Managing your scheduled runbooks
Click the View Runbooks tab to view all your scheduled runbooks. You will be taken to a page that list all jobs. Any scheduled runbooks will be listed at the very bottom of this screen. You can click the Edit button to make changes in each individual runbook schedule.
Cancelling a runbook
To cancel a job that has not yet finished processing, go to the View Runbooks tab. The current job will be listed first in the list. Click the Cancel button.
To cancel a scheduled runbook, go to the View Runbooks tab and scroll down to the Scheduled section. Click the Cancel button to cancel any future runbooks that have not yet started.


